Precision Matters: Why Measuring and Mixing Are So Important
Epoxy resin is a two-part system—resin and hardener—that requires precise measuring and thorough mixing to cure properly. Whether you're working on a river table, a countertop, or a small craft project, even slight deviations in ratio or technique can lead to issues like soft spots, improper curing, bubbling, or cloudiness.
In this article, we’ll cover everything you need to know to get perfect results: how to measure accurately, determine the right batch size, avoid common mixing mistakes, and follow practical tips to streamline your workflow.

Contents(Click any link to jump to that section) |
|
Determining the Right Batch Size Common Measuring & Mixing Mistakes to Avoid |

Understanding Epoxy Ratios
Epoxy resin systems consist of two parts: resin (Part A) and hardener (Part B).
To cure correctly and achieve a strong, clear, and durable finish, these two components must be combined in the exact ratio specified by the manufacturer.
Most common epoxy formulas follow one of two ratios:
1:1 ratio—Equal parts resin and hardener by volume. This includes both:
2:1 ratio—Two parts resin to one part hardener. This includes:
These ratios are by volume, not by weight. This is an important distinction because resin and hardener often have different densities. Measuring by weight when not intended can throw off the chemical balance and lead to improper curing.
Why the Ratio Matters
Epoxy cures through a chemical reaction. Too much resin, and you’ll end up with a surface that stays sticky or soft. Too much hardener, and the mixture may become brittle, discolored, or fail to cure evenly. Even a small deviation can create long-term issues like:
-
Weak structural integrity
-
Cloudiness or hazing
-
Poor adhesion
-
Yellowing or tackiness
-
Uneven curing across your surface
That’s why precision is critical. Always refer to your epoxy brand’s instructions—not all 1:1 or 2:1 formulas behave the same way, and pot life (working time) can vary between products.
Use Marked Tools Only
When measuring your components, always use clearly marked measuring containers—preferably transparent and graduated. Avoid “eyeballing it” or relying on household kitchen tools that may be stained, warped, or inaccurately labeled.
In our store, we offer flexible mixing containers with graduated mixing lines. You'll find them on the following pages:
- 5-Quart Mixing Container (for large epoxy batches)
- 1-Quart Mixing Container (for small epoxy batches)
If you’re working with multiple small batches or doing detailed artistic pours, label your containers “Resin Only” and “Hardener Only” so there’s no accidental cross-contamination before mixing.

Determining the Right Batch Size
Preparing an appropriately sized batch is a key part of successful epoxy work. Mix too much, and you risk a premature chemical reaction due to heat buildup. Mix too little, and you may find yourself rushing to blend a second batch before the first one begins to set—potentially leading to uneven bonding or visible seams.
Factors to Consider:
-
Project Dimensions: Measure the length, width, and thickness of the area you’ll be pouring. Larger projects like table tops or river tables require more epoxy, but it doesn’t always make sense to pour all at once—especially for deeper pours.
-
Type of Epoxy Used: Different epoxy formulas handle volume and depth differently.
-
UltraClear Bar & Table Top Epoxy is ideal for thin pours (up to 1/4" thick per layer). It cures quickly, so stick to smaller batches—typically no more than 16–32 oz at a time.
-
UltraClear Deep Pour Epoxy is formulated for thick applications (up to 2" in a single pour), and can accommodate larger batch sizes—sometimes up to a full gallon or more—depending on ambient temperature and container shape.
-
UltraClear Art & Craft Epoxy is also fast-curing and better suited for small, detailed projects like jewelry or coasters; keep batches modest for best results.
-
-
Working Time (Pot Life): Every epoxy has a limited pot life—the amount of time you have to work with it before it starts to cure. Larger batches tend to shorten that window because they generate more heat. Know your epoxy’s working time and never push the limit.
-
Ambient Temperature: Warmer conditions accelerate curing and can make large batches risky. If you’re working in a space over 80°F, reduce batch size or cool the room to avoid overheating.
-
Pouring Technique: Are you doing one large flood coat or several smaller layers? Smaller layers are often more forgiving and allow for corrections, especially for beginners.

General Guidelines by Product:
| Product Type |
Max Recommended Batch Size |
Working Time | Notes |
|---|---|---|---|
|
UltraClear Bar & Table Top |
16–32 oz | 5 minutes | Quick curing, shallow pours |
|
UltraClear Deep Pour |
64–128 oz | 30 minutes | Slower curing, good for large/thick pours |
|
UltraClear Art & Craft Epoxy |
8–16 oz | 40 minutes | Ideal for small-scale, detailed work |
Reminder: It's always better to mix two small, manageable batches than one large, uncontrollable one.

Mixing Epoxy: Step-by-Step
Once you've measured your epoxy properly, mixing it correctly is just as critical. A well-mixed batch leads to a flawless finish with minimal bubbles, maximum strength, and a smooth, even cure.
Step #1: Use Clean, Dedicated Tools
Start with fresh mixing containers and stir sticks—preferably disposable or epoxy-safe plastic. Any contamination (like leftover paint, dust, or even moisture) can disrupt the chemical reaction and ruin your batch. It’s also important to wear nitrile gloves and work in a clean environment to prevent introducing debris.
Tip: Avoid wood stir sticks if they’re dusty or untreated, as they may absorb resin or introduce particulates. Plastic or silicone tools are a safer bet.
Step #2: Measure Carefully
Use a graduated measuring container to measure your resin and hardener precisely according to the manufacturer’s ratio—1:1 for UltraClear Bar & Table Top Epoxy and UltraClear Art & Craft Epoxy, or 2:1 for UltraClear Deep Pour Epoxy.
-
Always measure by volume, not weight, unless explicitly instructed otherwise.
-
Double-check the calibration lines on your container.
Mistake to Avoid: Never “eyeball” measurements. Inaccurate ratios can cause improper curing, tacky surfaces, or resin that never fully hardens.
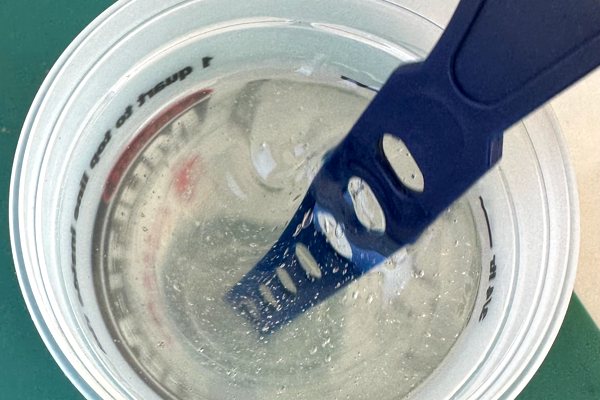
Step #3: Mix Slowly & Thoroughly
Once measured out, begin mixing the components together with a slow, steady motion for 3 to 5 minutes, depending on batch size.
For small batches, you should stir manually, using suitable stir sticks (plastic or wood).
For large batches—about a gallon or so—you can use a power drill with an attached mixing bit. Because using a drill tends to be much more forceful, it's important to keep the bit fully submerged, near the bottom, to prevent it from pulling in air, which can otherwise get trapped within the epoxy.
-
Scrape the sides, bottom, and corners of the container consistently while mixing. This prevents the resin from clinging or settling, ensuring a full and even blend.
-
Stirring too quickly can introduce air bubbles, resulting in a cloudy or pitted finish.
-
Mix until the epoxy becomes crystal clear and uniform—no streaks, swirls, or separation.
If you're mixing a large batch, set a timer to ensure you don’t under-mix.
Step #5: Pour Promptly After Mixing
Epoxy begins curing the moment it's mixed, so don’t delay. Once your batch is ready, pour it immediately into your project area or mold.
-
Let it self-level, then use a spreader or brush if needed.
-
For projects requiring layering (like deep pours or detailed artwork), be mindful of each layer’s curing stage before adding the next.
Important: Keep a heat gun or torch on hand to remove surface bubbles within the first 10–15 minutes after pouring.
Step #6: Monitor and Adjust (Optional but Useful)
Stay nearby for the first 30 minutes after pouring. Environmental changes, bubble formation, or resin movement may require slight adjustments. In this window, you can:
-
Pop any missed bubbles.
-
Adjust embedments or pigments.
-
Catch early signs of uneven curing or spills.
This detailed approach ensures the chemical reaction between resin and hardener happens evenly and reliably—producing a glossy, hard, and professional-grade finish every time. Mastering this process is essential for both beginners and experienced epoxy crafters alike.

Common Measuring & Mixing Mistakes to Avoid
Even small mistakes during the measuring or mixing stages can sabotage your project before it really begins. Below are the most common pitfalls that beginners (and even some experienced users) make, along with how to avoid them:
Guessing the Ratio
Why it's a problem: Epoxy resin relies on precise chemical ratios to cure correctly. If you estimate your measurements or "eyeball" the amounts, you run a very high risk of an imbalanced mix.
What happens: You may end up with soft, tacky, or even uncured epoxy that stays sticky indefinitely or develops an oily residue. This can't be fixed without removing the flawed layer and starting over.
How to avoid it: Always use a graduated container or mixing cup clearly marked with measurement lines. Stick strictly to the resin-to-hardener ratio provided by the manufacturer—1:1 for UltraClear Bar & Table Top Epoxy and 2:1 for UltraClear Deep Pour Epoxy, for example.
Over-Mixing or Whipping the Epoxy
Why it's a problem: Mixing too aggressively creates turbulence, introducing air bubbles that get trapped in the resin.
What happens: You may end up with a cloudy, aerated finish that’s dotted with microbubbles—especially noticeable on deep pours or clear layers. Some bubbles can be removed with heat, but not all.
How to avoid it: Stir slowly and deliberately. Think of the motion more like folding than whisking. Use a flat-sided stir stick and maintain contact with the bottom and sides of the container at all times.
Under-Mixing the Resin and Hardener
Why it's a problem: If the two parts aren’t thoroughly blended, your epoxy will cure unevenly or not at all.
What happens: You may get sticky spots, soft patches, or a rough texture in areas where the hardener and resin weren’t fully integrated. This is often mistaken for a ratio issue but is actually due to mixing failure.
How to avoid it: Mix for a full 3 to 5 minutes, or until the resin becomes completely clear with no visible swirls. Use a timer, and don’t cut corners. Transfer to a second container and mix again (the “double-cup method”) for extra security.
Using Contaminated or Improper Tools
Why it's a problem: Some tools with leftover materials (like old epoxy, paint, or even water) can interfere with the curing process.
What happens: Contaminants can cause foaming, fisheyes (craters or pits), or complete curing failure. Even dust or lint can become trapped and mar the finish.
How to avoid it: Always use clean, dry, and epoxy-safe tools. Avoid wood stir sticks unless they are sealed or sanded smooth. Silicone, plastic, or metal tools are safer bets. Never reuse a container unless you’re sure it’s 100% clean and dry.
Incorrect Temperature Conditions
Why it's a problem: Epoxy is temperature-sensitive. If it’s too cold, the resin thickens and cures slowly. If it’s too hot, the chemical reaction accelerates too quickly—potentially overheating or curing unevenly.
What happens: You might experience sticky or soft resin in cool environments or cracking, warping, or yellowing in overly warm conditions.
How to avoid it: Maintain a consistent room temperature between 70°F and 80°F—ideally 75°F. Warm your resin (but not the hardener) by placing the sealed bottle in warm water if necessary. Avoid working outdoors in variable climates or direct sunlight.
Letting Epoxy Sit Too Long Before Pouring
Why it's a problem: Once mixed, epoxy begins its chemical reaction immediately. If it sits in the mixing cup for too long (especially in larger batches), the reaction can accelerate and lead to early curing or overheating.
What happens: The mixture may become thick, generate heat (exotherm), or even begin to smoke. Once this starts, the batch is unusable.
How to avoid it: Plan your workflow ahead of time so you're ready to pour immediately after mixing. Have your surface prepared and any embedments or tools in position before you start mixing.
Avoiding these mistakes helps ensure a smooth, clear, durable finish and saves you both time and materials. If you’re ever unsure about your process, it’s better to pause and double-check rather than rush and risk a failed pour.

Bonus Tips for Reliable Results
-
Warm the Resin: If it’s cold, place the sealed resin bottle in warm water for 10–15 minutes. This reduces viscosity and improves flow—but never warm the hardener.
-
Mix in a Well-Ventilated Area: Even high-quality epoxies like UltraClear emit minimal odor, but proper airflow is still important.
-
Work in Small Segments: For large projects, divide the pour into manageable sections or layers. This gives you time to adjust without rushing.
-
Use a Timer: Set one as soon as you start mixing to track your working time (also called “pot life”).
-
Have a Cleanup Plan: Epoxy begins to cure quickly. Have isopropyl alcohol and disposable towels ready to clean tools before they harden.

Have Questions? Want Advice? We're Here to Help!
If you have any questions about measuring or mixing epoxy resin, or if you'd like assistance in planning an epoxy project, please reach out to us at UltraClear Epoxy—our epoxy experts are ready to assist!
You can contact us via phone or email here. During business hours, you can also text chat online with one of our resin specialists by clicking the Help button at the bottom of your screen.
In our online store, you'll find a variety of useful tools and supplies, ideal for resin projects, plus our award-winning UltraClear Bar & Table Top Epoxy and our UltraClear Deep Pour Epoxy.
UltraClear Epoxy—Trusted by over 1 Million+ Happy Customers


