One of the most common issues that can come up when working with epoxy is the formation of air bubbles. They tend to appear during the flood coat phase and less commonly during the other coating phases.
Air bubbles are typically easy to remove. In fact, the epoxy process has a built-in step for handling them before moving on to the final curing phase of an epoxy project.
Still, sometimes there are more air bubbles than expected, or they may be missed during the usual steps in which you'd remove or prevent them entirely. When working on a major project like an epoxy countertop, this is much better avoided, so we're going to show you how.
In the sections below, we explain why air bubbles appear and what you can do to prevent them. We then go over common practice on how to handle them, and methods for dealing with worst-case scenarios.
Why do air bubbles appear?
There are two common reasons. Let's talk about both.

Reason #1: The substrate material is porous.
A porous material is one that has numerous tiny holes and grooves within its structure. These tiny spaces tend to hold small pockets of air (assuming the material is dry).
When mixed epoxy resin such as our UltraClear Table Top Epoxy is poured directly onto a porous surface like this, the epoxy will slowly seep into these grooves and holes, pushing the air out and filling in the space.
However, because epoxy is thick and viscous, the air will sometimes get trapped inside the resin before it can make it all the way through to the surface. This trapped air is what we call air bubbles.
When air bubbles form but aren't removed through the methods below, they can show up in your cured epoxy finish, usually visible just below the hardened surface.
Obviously, that is detrimental to both the strength of the finish and the beauty of its appearance.

Reason #2: The epoxy components weren't mixed properly.
Both our table top epoxy and our UltraClear Deep Pour Epoxy are initially stored as two separate components, a hardener component and a resin component.
These components must be mixed together right before being applied to the substrate of your project. While mixing, there are small things that can go wrong and pull in air bubbles preemptively into your epoxy resin mixture.
For example, when mixing a batch of less than a gallon combined, you should stick with manual stirring using stir sticks.
If you instead choose to use an electric drill with a mixing bit, you may end up pulling in air due to the low quantity of epoxy and the high speed and power of the drill, which is typically used at medium setting for gallon-sized batches to ensure a good blend.

Even with a gallon-sized batch, it's possible to lift the drill bit too high while blending, which can similarly pull in air.
When mixing epoxy resin with either method, there will occasionally be some unblended residual components on the sides or bottom of your container.
If, after pouring out your batch, you then attempt to scrape this residue to maximize usage, it's likely that new bubbles and other blemishes will form. This occurrence is because the residue leftover is actually improperly blended resin that started curing too early in the mixing container and does not meet the proper blend ratio needed for a clean cure.
Fortunately, both of these causes are easily prevented.
How do you prevent air bubbles?
There are two essential rules to preventing air bubbles during the epoxy process.

Rule #1: Make sure you apply a seal coat when needed.
An epoxy seal coat is a brushed-on coat of epoxy that seals your surface area and pushes out the air inside porous materials. It's very thin because of the amount used and the manual application method. Because such a small amount of epoxy isn't enough to trap the air in, the air is able to pass through the resin layer and is removed from the substrate.
Furthermore, the seal coat will bond readily with any flood coats or deep pour coats your project calls for. Just make sure you follow the right timing for this, as described in the instructions provided with your epoxy.
A seal coat for non-marine purposes is nearly always applied with table top epoxy; you should avoid using deep pour epoxy for this, as it isn't as effective for this method.
Occasionally a substrate material is so porous that it requires two seal coats to adequately seal the surface. This isn't common, but it's perfect viable to do so when necessary.
In such cases, you should apply the second seal coat about four hours after finishing the first one, then resume the epoxy process as normal based on your instructions.

Rule #2: Measure and mix your epoxy components carefully.
When making a resin batch, measure by volume, preferably by using graduated mixing containers.
We offer some high quality containers on our store, and you can likely acquire them at many home improvement retailers. These are great because of how important it is to mix accurately, and each epoxy has a particular ratio that the components should be combined in.
For instance, the ratio for our table top epoxy is 1:1, so the resin and hardener will be blended together in equal amounts.
For deep pour epoxy, the ratio is 2:1, so you'll use more resin than hardener. For instance, four ounces of resin would be mixed with two ounces of hardener.
When you mix epoxy, the method is determined by the volume being mixed. For anything less than about a gallon, you should use stir sticks to manually stir the epoxy together, making sure to occasionally scrape the sides and bottom to reduce residue buildup and guarantee a good blend.
On the other hand, if you're mixing up a full gallon-sized batch, you can use an electric drill with a mixing drill bit. We recommend the Workforce 1-Gallon Helix Paint Mixer drill bit, as it is both reusable and consistent in epoxy projects.
Before you start mixing, always make sure you've read your instructions closely, as these will explain the exact settings and the duration of your mixing phase.

How do you remove air bubbles?
Formation of some air bubbles during the process is expected, and removal is straightforward.
On the other hand, removing air bubbles from cured or mostly-cured epoxy is more difficult and will require a recoating afterward.
Let's go over both methods:

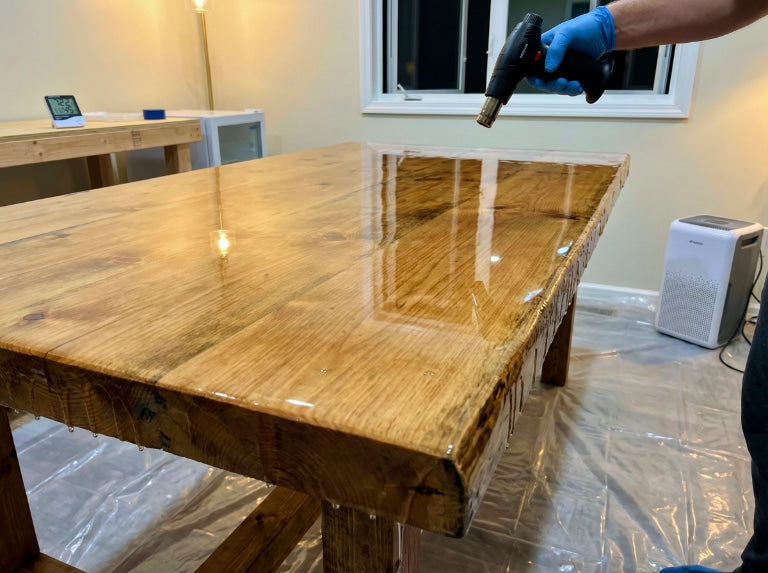
Method #1: If the epoxy hasn't hardened, use a torch or heat gun.
When you pour a flood coat, it's almost inevitable to get a few bubbles here and there, even with a proper seal coat. This is easily dealt with by using a propane torch, or a heat gun if you're uncomfortable with using a torch.
After pouring the flood coat, you'll use the propane torch to remove air bubbles by hovering it a few inches away from the epoxy surfaces while moving back and forth until you've briefly heated the entire surface.
Keep in mind the following tips:
- Don't linger for more than a second over any spot. If you linger, the epoxy will rapidly heat, and you might cause heat damage to the surface which will show itself later when it cures.
- Don't let the flame touch the epoxy. You should be at a reasonable distance, a few inches away. It just needs the heat, not the flame, to remove the bubbles.
- Don't use a hair dryer or anything similar. Most other appliances aren't intended for this and are more about forceful air flow, which for epoxy can mean sending particles and dust into your resin.
After you go over the epoxy resin once with your torch or heat gun, wait ten minutes; then do it again. This is to make sure you remove any air bubbles that hadn't been able to surface originally.
You can lower your perspective to almost parallel with your surface to make it much easier to see air bubble blemishes due to how they deflect light at sharp angles.
This method is the optimal way to remove the bubbles, but it must be done during the process, before the epoxy has hardened.
Method #2: If the epoxy has hardened, use sanding and acetone.
If the bubbles are surface level:
- Sand the surface lightly.
- Wipe the surface with acetone. Wait 30 minutes for it to evaporate.
- Apple a new seal coat to fill in blemishes. Wait four to six hours.
- Apply a new flood coat to the entire surface.
If the bubbles are deep within the epoxy:
- Sand heavily, removing most of the flood coat until you've cleared every air bubble.
- Wipe the surface with acetone. Wait 30 minutes for it to evaporate.
- Apply a seal coat. Wait four to six hours.
- Apply a second seal coat. Wait four to six hours again.
- Apply a new flood coat.
Note: If you attempt to spot fix instead of recoating the entire surface with a flood coat, you'll end up with an uneven surface; it's best to give it a full, smooth coating over the entire area.
If you ever lose your instructions or prefer to read them on a phone or computer, you can find digital copies of our epoxy instructions on our support site:
The best way to avoid bubbles is to make sure you use a quality resin.
Epoxy provides a beautiful finish when applied properly, but only if the resin product you use is high-quality.
Sadly, there are many sellers who take advantage of newcomers interested in epoxy by selling substandard products that won't hold up long-term.
Our free ebook, The Ugly Truth About Epoxy Resin: What Companies Don't Want You to Know, discusses the ways in which these sellers use dishonest advertising to offload cheap, low-quality epoxy products. In reading this book, you'll enable yourself to spot these shady vendors and avoid wasting time and money on faulty epoxy resin products.
Additional Resources
We hope this article has been helpful to you.
Below, we've listed some additional resources you may find useful:
- Epoxy: Proper storage, shelf life, and preventing "yellowing" - Proper methods for storing unused epoxy, as well as how to prevent yellowing.
- Guidelines for cleaning epoxy surfaces - Techniques for cleaning your epoxy surface to keep them looking good as new.
- How to wash away resin and epoxy on your hands and skin - Sometimes mistakes happen, and maybe you get some resin on your skin. Here's how to remove it.

Have Questions? Want Advice? We're Here to Help!
If you have any questions about epoxy resin, or if you'd like assistance in planning an epoxy project, please reach out to us at UltraClear Epoxy—our epoxy experts are ready to assist!
You can contact us via phone or email here. During business hours, you can also text chat online with one of our resin specialists by clicking the Help button at the bottom of your screen.
In our online store, you'll find a variety of useful tools and supplies, ideal for resin projects, plus our award-winning UltraClear Bar & Table Top Epoxy and our UltraClear Deep Pour Epoxy.
UltraClear Epoxy—Trusted by over 1 Million+ Happy Customers


