Welcome to our guide on epoxy resin coasters!
This guide is written with beginners in mind, so if you're new to epoxy resin, this is a great place to start. In fact, resin coasters are an excellent beginner project—they don't take a lot of hands-on time and are easy to make.
Coasters can even be a good project for children, as long as they're supervised by an adult who understands the process.
In this guide, we'll explain how to make resin coasters of your own, including the supplies you'll need and anything you should be aware of before starting, such as how to deal with air bubbles.
How to make resin coasters
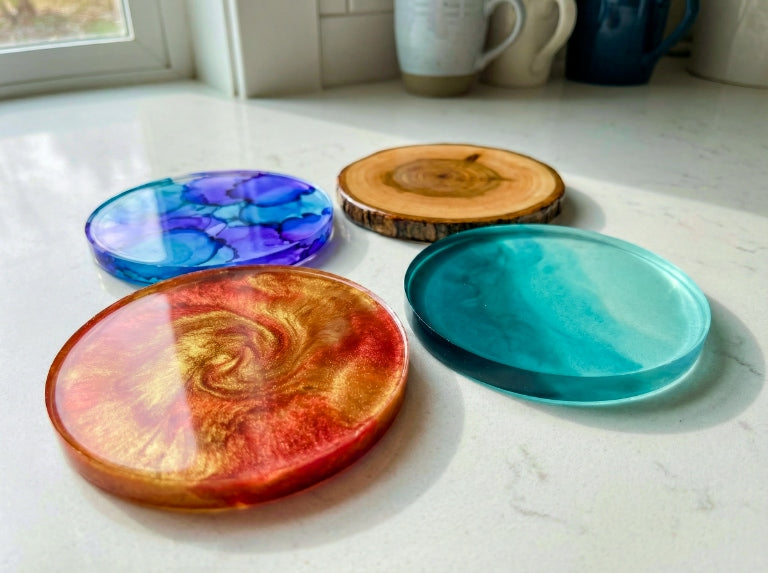
Before you begin gathering supplies, you'll need to decide how you want your coaster to look. There are a few ways to give resin your own artistic flourish, such as:
- Resin dyes
- Epoxy powder pigments
- Embedments (small objects)

Resin dyes are potent liquid colorants that you add small amounts of to your epoxy resin as you mix it. As you stir, the dye will spread throughout until the resin has a uniform tone (such as blue). When using resin dyes, it's best to start with a small amount, then add more until you achieve the look you want.
As you add more resin dye, the resin's color will become deeper, darker, and more opaque (meaning less transparent). This can't be reversed, which is why we recommend starting low and working your way up until satisfied.
In our UltraClear Epoxy store, we offer Premium Resin Dyes by Pigmently. We chose these because we've worked with them many times, and they are both reliable and stunning.

In contrast, epoxy powder pigments are dry, shiny powders usually made from ground mica and a few other minerals.
They are available in a wide array of colors, and each pigment has its own unique formula that affects its sheen and reflectiveness.
Some powders seem to shimmer and sparkle, while others exhibit a subtler pearlescent luster. Several are particularly bright and vibrant, and a few even glow in the dark.
If you go the epoxy pigment route, you'll have a large selection to choose from, though quality can vary between brands.
Our UltraClear store offers Premium Epoxy Pigments by Pigmently, again due to their consistent results and wide variety of tones to choose from.

Our third choice is to use embedments, which are any small objects or items you might seal within the epoxy resin. This technique is a little trickier than using dyes or pigments, but they're delightful when applied properly.
For coasters, which are already quite small, you're limited to tiny things like coins, dry pressed flowers, stickers/tiny pictures, glitter, etc.
These items are added to the top of a partial epoxy layer, then left to cure for a few hours before being covered with the rest of the epoxy. Doing it that way ensures they stay in place during the pouring phases.
Decide which of these options (if any) you want for your resin coaster project.
If you're making multiple coasters, you may even want to try one of each to see which you prefer for the future.

Step #1: Gather your supplies.
The first thing we'll do is gather the right supplies for the resin coaster project.
You'll need the following items:
-
Epoxy resin: You'll want to use a two-part epoxy resin for this type of project. The amount you'll need is determined by how many coasters (or other things) you'd like to make; for just a few coasters, a quart is a good place to start. You can always obtain more later if you need to.
For resin coaster projects, we recommend our UltraClear Art & Craft Epoxy. It's designed for small artistic projects and is incredibly strong after curing (i.e., drying/hardening). It uses a 1:1 blending ratio, which makes it easy to measure each component for mixing.
You may also be able to find other brands of two-part epoxy at your local hardware, home improvement, or arts-and-crafts stores. If you decide to check locally, it's a good idea to call first so you don't waste your time traveling. -
Silicone coaster molds: These molds are what you'll pour your resin into, letting it set and cure until it has fully hardened. Silicone is used because it's a material that epoxy resin won't bond to. They're easy to clean as well.
Coaster molds come in a variety of shapes, most often circles or squares.
You can find suitable molds in a lot of places online, and some arts-and-crafts/hobby shops carry them as well. -
Disposable plastic cups/containers: These are used to measure and mix the epoxy in. For resin coasters, disposable plastic drinking cups will usually do, but if you need something a little bigger, our store carries 1-quart sized containers with graduated measuring lines for high accuracy.
Mixing containers and cups should never be reused, so you'll need one container for each pouring you'll be doing.
For regular coasters, this is just one each; however, for coasters with embedments, you'll need two. One for the initial layer, then one for the followup layer that seals the embedments and fills the rest of your silicone mold. -
Stir sticks: These are used to mix the epoxy components together until they've been well blended. Small stir sticks (wooden or plastic) are fine and available at many arts-and-crafts stores.
If you're making a larger batch to fill in several molds at once, we offer high quality reusable stir sticks. They're designed to reduce air bubble formation and feature oval-pass molded holes for smooth blending. -
Basic protective gear: This includes disposable gloves, an N95 or KN95 face mask, and protective goggles.
For the gloves, we recommend nitrile. You can also use latex, which are less resistant, but should suffice for a small project like this. These will protect your skin from resin contact, which some people have a mild allergy to. If you do get epoxy on your skin you can usually wash it off with soap and water.
If you're already familiar with epoxy, you can opt to skip the goggles, but we recommend using them for your first time. It's always good to be safe when learning something new. -
A heat gun: This will be used to remove air bubbles after each layer you pour into your mold. For most coasters this will happen once each. For coasters with embedded items, you'll do it twice: once after the initial layer, then later after you finish filling the mold.
We offer a reliable heat gun in our store, and you can also find them in many home improvement and hardware stores. -
Rubbing alcohol and a lint-free cleaning cloth: These are used to clean your silicone mold prior to pouring in the resin.
Using these to wipe out any dust or unexpected residue before you begin will help ensure you don't end up with subtle imperfections in your epoxy coaster. - (optional) Resin dyes/epoxy pigments: These are used for adding colorful effects and tones to your resin during the mixing process. On our website, you'll find a large selection to choose from.
-
(optional) Items/objects to embed: Instead of colorants, you can choose to embed a few small items into your epoxy coaster. Since coasters are small, stick with small objects like stickers, dry pressed flowers, coins, sequins, glitter, etc.
For any absorbent items such as paper, you should apply a layer of Mod Podge around it so that they don't absorb the resin and become distorted. -
(optional, but recommended) Painters plastic sheeting: You can use this to cover your work surfaces. If any accidents or spills occur during the project, the plastic will keep the resin contained for cleanup.
We particularly recommend this if your workspace is in an area with furniture you don't want epoxy sticking to. It can be quite difficult to remove epoxy resin from most materials, especially wood. - (optional) Rubber spacers: Some people prefer the added friction of rubber spacers on the bottom of their coasters. If you want to make sure your coaster doesn't slide around much, you can place some of these on it after the resin coaster has fully cured and been removed from the mold.

Step #2: Prepare your workspace.
Now that you've acquired the supplies you need, your next task is to prepare a place for you to work in.
Most epoxy cures best in a warm room, around 75°F. Try to condition your work environment as close to that as possible. A well ventilated space is also good since some people have unexpected sensitivity to epoxy fumes.
Choose a stable and sturdy surface, such as a large table or workbench. You can make these coasters in your own home, but if you do, we recommend you cover the surfaces around you with plastic sheeting to catch any accidental spills or drips.
Lay out your supplies so that they're easy to reach and interact with but won't get in the way of your movements. This will make things easier and further reduce the chance of mistakes.
Finally, make sure your silicone molds are clean. You can use the rubbing alcohol and lint-free cloth if they aren't, then just let them finish drying before you move to the next step.

Step #3: Mix your epoxy resin.
From here, we'll begin the crafting process. There will be optional instructions for colorants and embedding objects.
-
Mix your epoxy resin. Using your stick sticks, follow the directions for your chosen brand of epoxy and mix together a small batch of epoxy resin.
Some brands differ in their instruction, but this will probably involve about 2-3 minutes of manual stirring, and you can use a timer to keep track.
Be sure to measure the appropriate ratio (usually either 1:1 or 2:1)
Note: If you plan to embed objects, make a smaller batch. You only need enough to fill the mold about 1/3rd of the way. We also recommend keeping the epoxy clear if you're embedding objects, unless you're already familiar with the process of using colorants. -
(optional) Add colorants. Now is the time to add your resin dyes or epoxy pigments. Use a small amount, then add more if you want it more vivid or opaque.
Once you've achieved a satisfying tone, move to the next step.

Step #4: Pour your resin.
The next step is determined by whether you'll be embedding objects into your epoxy or not:
If you're not embedding objects, follow Step 4a.
If you are embedding objects, follow Step 4b.
Step #4a: Pouring your resin without embedding objects.
- Pour your epoxy resin into the mold. Carefully fill the mold interior. Epoxy is self-leveling, so it should be fairly easy. You may notice some air bubbles as it fills—don't worry, we'll deal with that next.
- Use your heat gun to remove air bubbles. Hold the heat gun a few inches away from the epoxy, and briefly pass over it. Move back and forth until you've passed over the entire resin surface (which in this case is quite small), and try not to linger over any spot for more than a second.
-
Examine the resin surface for remaining air bubbles. If there are any, you can do a second pass with the heat gun. Most likely they will be gone after this.
After you finish pouring, move to Step 5.
Step #4b: Pouring your resin with the intent to embed objects.
- Pour your epoxy resin into the mold about 1/3rd of the way. Epoxy is self-leveling but you can get it to smooth out a bit faster by moving around as you pour.
- Use your heat gun to remove air bubbles. With the heat gun held several inches away from the surface, briefly pass over the epoxy resin. Move back and forth smoothly until you've passed over the entire surface. Try not to linger over any spot for more than a second
- Carefully add your objects to the epoxy layer. You can use tweezers to place and reposition fine objects. Just rinse and wipe them off when you're done so that the resin doesn't cure to the tweezers.
- Wait four hours for the resin to partially cure. This will secure the objects in place for your final resin layer.
- Mix up a second batch of epoxy resin. This will be a bit larger than the first, because you'll be filling the remaining 2/3rds of the mold.
- Pour your resin into the mold. Carefully fill the mold the rest of the way.
- Use your heat gun again to remove any new air bubbles. Do it the same way as previously.
- Examine the resin surface closely for remaining air bubbles. If you see any, do another heat gun pass.

Step #5: Let your epoxy cure.
From this point, you'll need to let the resin cure. This can take 2 to 3 days (about 72 hours), but the timing will vary by resin type and the environmental conditions (temperature, humidity) of the epoxy
Check your epoxy instructions to find the right times.
If you're using our UltraClear Table Top Epoxy, UltraClear Art & Craft Epoxy, or our Deep Pour Epoxy, you can also find digital instructions in our Additional Resources section below.
And that's it! Once your resin has cured you can remove it from the silicone mold. From there you can add rubber spacers to the bottom if you'd like, otherwise you can use your new resin coasters as is.

Additional Resources
Here's a small list of additional resources that you may find helpful:
- Our guide to coloring epoxy resin: An article on how to color resin using resin dyes and epoxy pigments.
- Epoxy: Proper storage, shelf life, and preventing "yellowing": Tips on how to store excess epoxy when you're done with your project.
And here are links to digital instructions of the epoxies we recommend for resin coaster projects:
- UltraClear Table Top Epoxy instructions
- UltraClear Art & Craft Epoxy instructions
- UltraClear Deep Pour Epoxy instructions

Have questions? Want advice? Contact us!
At UltraClear Epoxy, we pride ourselves on providing exceptional support and customer service to epoxy beginners, enthusiasts, and professionals alike.
If you have questions about making resin coasters, or if you would like help with project planning, you can contact us via phone or email here. Our resin experts are ready to assist you with your epoxy concerns.
You can also text chat online during business hours with an epoxy specialist by clicking the help button at the bottom-right of your screen.
UltraClear Epoxy—Trusted by over 1 Million+ Happy Customers


