Making resin jewelry can be a lot of fun—as long as you're aware of what to do and what not to do.
To help you understand the process and avoid common mistakes, we’ve written this beginner's guide. Read carefully, and by the end you’ll know how to make resin jewelry of your own!
Step-by-step guide: How to make resin jewelry
If this is your first time crafting resin jewelry, we want you to read this guide carefully. This type of project is easy to learn as long as you follow the instructions.
To make things easier, we’ll go over each part of the process, step-by-step, teaching you how to avoid common mistakes while getting the most out of your time and effort.
With that said, let’s get started!

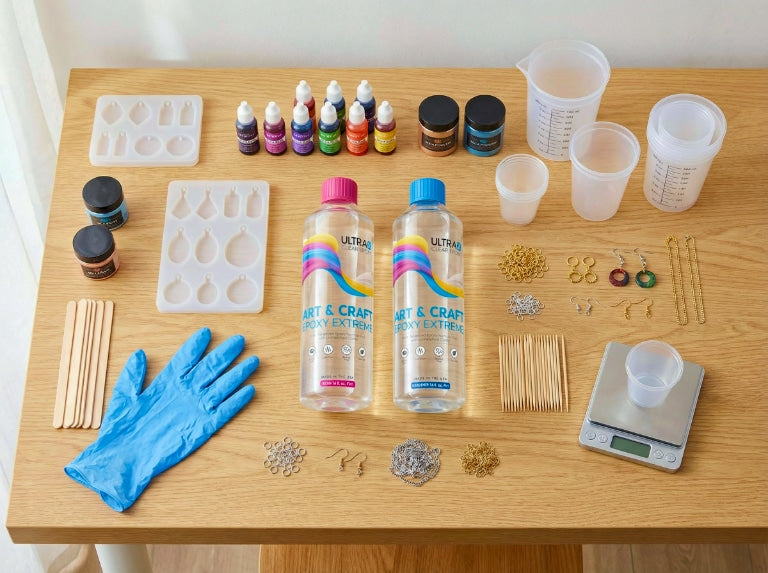
Step #1: Gather the necessary supplies.
Before you begin your project, you’ll need to acquire the right supplies. For this guide, we’ll be using epoxy resin, as it is the safest and most resilient option for resin jewelry. There are other options, but they either don’t hold up as well, can’t be colored, or aren’t as safe (e.g., nasty fumes, poisonous to skin contact, etc.).
Here's a list of the tools and supplies you'll need:
- Two-part epoxy resin: If you don’t already have epoxy resin, consider ordering one of our two best-suited epoxies from our online store.
- UltraClear Art & Craft Epoxy. Our specially designed craft resin. This is the best option for most resin art projects, including small jewelry.
-
UltraClear Deep Pour Epoxy. Our deep-layer casting resin. This is a pure, high-quality two-part casting resin suitable for resin jewelry, along with many other arts and crafts. It’s also very easy to use, which is especially nice when you’re learning and is most effective when
It's good to have enough for your project and at least a little extra to compensate for any mistakes. -
Small mixing containers: These are for measuring and mixing resin batches in. The scale of your jewelry project will determine what size containers you'll need.
The smallest containers we offer in our store are our one-quart containers. If your project is tiny, you may want something smaller, in which case you might find something suitable at your local arts and crafts store or the crafts section of a department store.
Choose something with volume measurements listed on the sides so you can mix the exact ratio required by your resin.
Each resin jewelry piece will be created using a two-layer pouring process. You'll need at least two mixing containers (one for each batch) for your project.
We don’t recommend trying to complete resin jewelry with a single pour, as you may end up with tiny air bubbles trapped within the finished piece. However, if you want the air bubbles for aesthetic reasons, you can try doing a single full-size pour instead.
Note: Do not reuse mixing containers. Residual resin buildup happens anytime you mix epoxy together; it’s important to use a clean container for each batch to prevent impurities. - A stir stick or small mixing spoon: You’ll need one of these to mix up your epoxy resin batches. We sell reusable oval-pass stir sticks in our online store, which are great if you’re using the one-quart containers mentioned above. For smaller containers, however, you can use a little plastic mixing spoon.
-
Molds or open bezels: You’ll pour resin batches into these after mixing. There are many places on the internet and locally that carry them, so choose what you want based on personal preference.
During your search, consider the size and shape of the jewelry you want to make.
Note: It’s possible to make your own resin molds. However, doing so is complicated and goes beyond the scope of this guide. -
Nitrile or butyl gloves: Safety is important when working with uncured resin. These gloves will prevent your skin from absorbing any resin that happens to get on your hands during the project.
We don’t recommend latex gloves as they are less chemically resistant than nitrile or butyl; however, they can be used for short periods of time if you already have them. -
A heat gun or propane torch: This is used to remove air bubbles from the resin after pouring it. Though some resin enthusiasts choose not to use these for small projects like jewelry, we’ve found that it’s the best way to guarantee you don’t end up with numerous tiny air bubbles.
We offer a reliable heat gun in our store, and you can also find an adequate heat gun or propane torch at many hardware and home improvement stores. -
Painters plastic: Use this to cover your floor and any other surfaces you want to protect from spilt resin. It’s a lot easier to prevent resin accidents than it is to clean them—Trust us, we know!
You can find this at many hardware and home improvement stores. -
(optional) Jewelry pliers and related components: This is a broad category and includes things like necklace chains, jump rings, earring hooks, etc.
You’ll use these at the end to finish your project once the resin has cured and been removed from the mold.
Choose what you need for the type of jewelry you wish to create. These items can be found at many internet stores and arts and crafts stores. - (optional) An apron: We recommend wearing older/cheaper clothes you don’t care much about while working on your resin project. That way, if you have a spill or accident, you can just toss the old clothing after you’re all done. With that said, you can also wear an apron if you have one to spare. Just remember, that resin can’t be cleanly removed from clothing, so try not to wear anything you value.
-
(optional) An N95 mask and safety goggles: When working with any type of resin, it’s a good idea to wear a mask, unless your environment is incredibly well ventilated. Some resins release fumes that can irritate the lungs or worse if you have a respiratory ailment.
We also suggest wearing safety goggles if you’re not familiar with resin crafting. Even the pros make mistakes occasionally, and getting resin in your eyes is an experience best avoided! -
(optional) Resin dyes or pigments: If you intend to color the resin itself, you’ll need either resin dye or pigment powder.
We offer resin dyes and powder pigments by Pigmently in our online store, though you can find many other brands elsewhere. We use Pigmently because it’s a quality brand that’s been consistent for us and provides clean, reliable results.
You can learn more about resin dyes and powder pigments from our "How to color epoxy" guide. -
(optional) Decorative objects: These are small things like tiny carvings, shells, pressed flowers, gold flakes, etc. that can be embedded within your resin or used as a garnish on the exterior.
They’re not essential, so it’s entirely up to your artistic preference which you choose to use, if any.

Step #2: Setup your resin jewelry workspace.
We recommend choosing a climate-controlled area to perform your project. Epoxy resin cures best in a range of 75°F to 80°F, so if you can maintain that, it will help ensure that your resin cures optimally.
Once you’ve decided on a location, cover your floor and any other relevant surfaces with the painters plastic you brought. This will protect them from accidents, and if none occur, you can probably preserve the plastic for your next project!
Gather your remaining supplies in a convenient location so they’re easy to reach without being in the way of your movements.
Equip your gloves and any other protective gear (mask, goggles, etc.) you brought for this project.
Double-check that you have everything from your list, and make sure to keep your project surface to avoid particles or significant dust from getting into the resin while you’re working.

Step #3: Mix your first resin batch.
Next, you'll be mixing up a batch of epoxy, enough to fill each mold/bezel/casing halfway. This will be the first of two epoxy resin layers.
-
Add the epoxy components to the mixing container.
Start with the hardener component, then add the resin component. Measure the proportions as indicated by your epoxy resin brand.
Only mix what you’ll need for the first layer—this should be about half of the total necessary for the entire project. It’s okay if you end up with a little too much.
Note: If you’re using our UltraClear Deep Pour Epoxy, the ratio is 1-part hardener to 2-parts resin. For instance, if you wanted a 12 oz batch, you’d add 4 oz of hardener first, then 8 oz of resin. -
(optional) Add resin dye/pigment to the mixing container.
Remember, these products are potent, so only use a tiny amount. You can add more after mixing it a bit until it looks just right.
If you add too much dye or powder pigment, the final result may end up being too dark or opaque for your tastes, so start small. -
Mix the epoxy resin.
If you follow the instructions included with your epoxy, you shouldn’t have any issues.
Our deep pour epoxy includes a detailed set of instructions. You can also view a digital version here.

Step #4: Pour your first epoxy layer.
Now that you’ve mixed your first batch, it’s important to pour it right away. Two-part resins have a “working time”, which is the amount of time after mixing that the resin can be poured before the curing progresses.
For UltraClear Deep Pour Epoxy, the working time is about 20 minutes after mixing.
-
Fill each mold, bezel, and casing halfway.
Take your time and don’t overfill—you’ll be adding the other half later. -
(optional) Add your embedments into the resin.
If you have any decorative objects you want to embed within the resin jewelry, now is the time to do so.
Gently place them within the half-filled mold/bezel, but don’t press them down with force, otherwise you might accidentally push them to the edge where they will stick out a bit.
The second layer of resin later will cover them the rest of the way.
Note: You can reposition these objects with a fine instrument such as a pair of tweezers, a wire, a needle, or a pin. -
Remove any air bubbles that form.
Briefly pass over the epoxy with your heat gun or propane torch to remove any initial air bubbles that emerge.
Keep the tool several inches away from the epoxy resin, and don’t linger for more than a second. You can wait a few minutes and do another pass to catch any that appeared after that.
Note: If you’re using a propane torch, make sure to not let the flame touch anything, especially the resin, otherwise, you may cause heat damage—It’s actually not the flame that removes the bubbles, but the heat generated by it. -
Wait four hours for the first layer of epoxy resin to partially cure.
This is a necessary step before applying the second layer to prevent air bubbles. It will allow any air left within the epoxy to surface and be released as the epoxy resin cures.

Step #5: Mix and pour your second layer.
You're almost there! This step involves the second layer of epoxy, which will fill the mold and seal in any objects you embedded into the first layer.
-
Mix up a second batch of epoxy resin.
Use the same mixing guidelines from the first batch here. -
Pour the second layer over the first.
Do this carefully until the mold/bezel is full. Repeat for each mold/bezel you're working with. -
Remove any air bubbles that form.
Once again, you’ll need to use your heat gun or propane torch to briefly pass over the resin. This will remove air bubbles that have formed due to your second layer.
After this, wait a few minutes and do a second pass to make sure you get the rest.
If you want, you can try to look closely at a low angle (near eye-level) to see if there are any air bubbles left.

Step #6: Allow the resin to cure.
Each brand of epoxy has its own recommended curing time. For UltraClear Art & Craft Epoxy and our UltraClear Deep Pour Epoxy, it takes 72 hours to properly harden. You can safely remove the epoxy from the mold after 24 hours if you’re gentle.

Step #7: Finish your jewelry pieces.
This final step is determined by the type of jewelry you’re making.
If it’s a necklace, for example, you might use your jewelry pliers on a necklace chain and jump ring to secure your resin piece to the chain. Or if your goal was to make earrings, you could take earring hooks and use some memory wire (also known as memory metal) to secure the resin piece to the hooks to create an attractive set of earrings.
Whichever type of jewelry you’re crafting, your resin is now ready for the final part.
And that’s it! If you’ve followed the steps in this guide from beginning to end, you’ll have created your very own unique resin jewelry. Great job!
If you found this article helpful, consider sharing it with someone you know who might also benefit.

Have questions? Need advice? We’re here to help!
If you have questions about epoxy resin, or if you’d like advice in planning a resin jewelry project, we at UltraClear Epoxy would like to hear from you.
You can reach us via phone or email here, or you can contact us through online text chat by clicking the help button at the bottom-right of your screen.
Our epoxy resin experts are ready to assist you with your needs!


