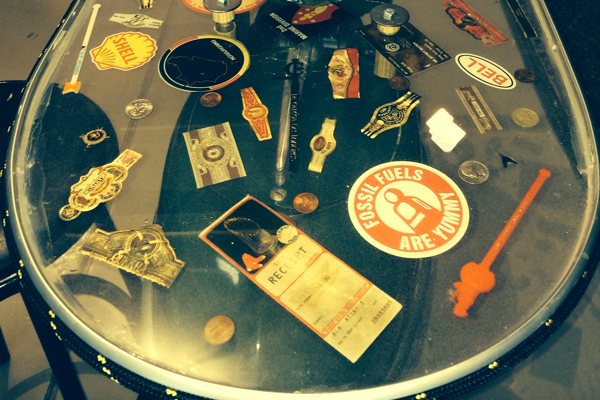
While epoxy is best known for its purpose as a durable sealant for conventional table tops, it's versatile nature leads to many other possibilities within table top design. Indeed, one of its most compelling uses involves embedding and preserving collectibles and mementos.
From coins and sports memorabilia to comic book clippings and travel souvenirs, epoxy lets you turn your table top into a personalized display case—with few limitations and stunning visual depth. Better still, it's much more manageable than it might seem, even for newcomers!
In this beginner-friendly article, we'll cover how to embed collectibles in epoxy table tops, potential issues to be mindful of, and how to get professional-quality results—especially by avoiding low-cost epoxies and choosing a premium option like UltraClear Epoxy.

Why Epoxy Is Ideal for Displaying Collectibles
Epoxy resin is an incredibly durable, clear-coating material that creates a smooth, glass-like surface once fully cured. Its self-leveling and high-gloss characteristics make it perfect for showcasing collectibles with clarity and protection.
Unlike glass, epoxy won’t shatter, and unlike basic varnishes, it fully encases objects, locking out moisture and air with a waterproof seal. Whether you're embedding coins into a bar table or showcasing vintage playing cards, epoxy preserves both the appearance and physical integrity of your keepsakes.

Types of Collectibles You Can Embed
Here are some commonly embedded items that epoxy can preserve beautifully:
-
Coins and currency: A common choice for history buffs or world travelers or people who just like shiny metal things.
-
Trading cards or comic clippings: A great way to emphasize the painstaking art of comics or the deliberate design of trading cards—or just embed a selection of your favorite classic newspaper comics and give your guests a laugh.
-
Dried flowers or leaves: Natural items like these add an organic and decorative element. Just be sure to prepare them first!
-
Shells, pebbles, and sand: Great for beach-themed tables or vacation souvenirs. Epoxy ocean art is quite diverse; take a look at our guide for more info.
-
Tickets, postcards, and letters: Perfect for memory-rich keepsakes.
Always ensure that the items are completely dry and sealed (if porous or absorbent) to avoid issues like air bubbles or discoloration.

How to Embed Collectibles in an Epoxy Table Top
Embedding collectibles in epoxy involves several steps that ensure the items are protected, well-positioned, and clearly visible. Here's a step-by-step breakdown:
-
Choose a Base Material: Begin with a flat wood slab, MDF board, or another solid surface as your table top base. Make sure it's level and sealed if it’s porous.
-
Plan Your Layout: Arrange your collectibles in the desired position before pouring any epoxy.
- In some situations, you can simply adhere the items to the substrate now using a conventional glue (such as Elmer's); the glue just needs to hold them in place until your epoxy coating immerses them.
-
Otherwise, you can choose to place the items in later, after the seal coat.You can use a pencil or painter’s tape to mark where each item will go. Take photos of the layout so you can reference them later.
- In some situations, you can simply adhere the items to the substrate now using a conventional glue (such as Elmer's); the glue just needs to hold them in place until your epoxy coating immerses them.
-
Seal Absorbent Items: Porous collectibles like paper, fabric, or natural wood need to be sealed before embedding. Use a sealant like Mod Podge to coat them. This prevents epoxy from soaking in and creating a dark, wet appearance.
-
Apply a Seal Coat of Epoxy: Brush a thin layer of epoxy onto the surface to seal the substrate. The seal coat of epoxy can also be used to adhere your embedments to the substrate surface.
-
Place the Collectibles: Once the seal coat is tacky but not fully hardened, place your collectibles onto the surface (if you haven't already adhered them). This prevents them from floating or shifting during the final pour.
-
Pour the Flood Coat: After the seal coat has cured, pour your final layer—known as the flood coat—to cover the collectibles. Pour slowly and evenly. Use a heat gun to remove bubbles as they rise to the surface.
-
Cure and Finish: Allow the epoxy to cure, which can take 72 hours for a hard finish. Once cured, sand the edges if needed, and polish or wax the surface for added sheen.

The Importance of Sealing Absorbent Items
When embedding paper clippings, fabric swatches, or even certain dried flowers, their absorbent surfaces can cause issues. These materials may darken or appear “wet” under the epoxy.
To avoid this, use a brush-on sealant like Mod Podge or a similar clear-drying medium. Apply at least two thin coats and allow them to dry completely before placing the items on your table top. This preserves the original color and texture of your collectibles under the epoxy.

The Problem with Low-Cost Epoxies
The epoxy resin market has seen an influx of budget options that appear attractive due to lower price points. These products are imported from overseas locations where they've been produced under shoddy quality control—and they come with serious trade-offs:
-
Yellowing Over Time: Many low-grade epoxies are not UV-stable and will yellow, especially when exposed to sunlight.
-
Poor Clarity: Inexpensive epoxies often cure with a hazy or cloudy finish.
-
Curing Issues: Subpar resins may remain soft or develop surface imperfections like dimples and fisheyes.
-
Increased Bubbles: Cheap epoxies often lack the proper formulation to release air bubbles effectively.
These flaws can ruin the presentation and longevity of a table top designed to highlight meaningful collectibles.

Why Choose UltraClear Epoxy for Collectibles?
UltraClear Bar & Table Top Epoxy is specifically engineered for clarity, durability, and ease of use—even for beginners. It offers:
-
A crystal-clear, glass-smooth finish
-
Excellent UV resistance to prevent yellowing
-
Superior self-leveling and air release properties
-
100% made in the USA for quality assurance
Whether you're preserving rare coins, family keepsakes, or handcrafted artwork, UltraClear Epoxy ensures your finished table top looks professional and lasts for years.

FAQs: Embedding Collectibles in Epoxy Table Tops
Question #1: Can I use photos in my epoxy table top?
Yes, but seal them first with a clear-drying product like Mod Podge to prevent the ink from bleeding or the photo from appearing wet.
Question #2: How do I prevent my items from floating in the epoxy?
Let your seal coat become tacky before placing your collectibles, or use a light adhesive to secure them in place temporarily.
Question #3: What’s the best epoxy for thick pours with large items?
For thicker pours, use UltraClear Deep Pour Epoxy, which is designed for deep-set applications, embedding larger items, and river tables.
Question #4: Can I fix an epoxy pour if bubbles form over my collectibles?
If air bubbles aren't removed after pouring your epoxy, they may cure into the surface. To remove them, you'll likely need to sand the area lightly and apply another thin layer of epoxy.
Question #5: Is epoxy safe for preserving valuable items?
Epoxy is safe for preservation if applied properly and if the items are sealed beforehand. For irreplaceable valuables, consider scanning or photographing them and embedding reproductions instead.

Have Questions? Want Advice? We're Here to Help!
If you have any questions about embedding items within epoxy resin, or if you'd like assistance in planning an epoxy project, please reach out to us at UltraClear Epoxy—our epoxy experts are ready to assist!
You can contact us via phone or email here. During business hours, you can also text chat online with one of our resin specialists by clicking the Help button at the bottom of your screen.
In our online store, you'll find a variety of useful tools and supplies, ideal for resin projects, plus our award-winning UltraClear Bar & Table Top Epoxy and our UltraClear Deep Pour Epoxy.


