Of the many varieties of epoxy art, ocean resin art might be one of our favorites. It's flashy, beautiful, and easy to teach others how to do. It also employs several handy techniques that can increase the scope of your artistic abilities and enable you to flourish as a creator.
In this article, we'll be covering how to create ocean resin art, including resin waves. We'll start by explaining in more detail what the concept is, then cover the materials you'll need for a typical project, before providing a step-by-step guide to crafting your very own.
Whether you're an epoxy beginner or a seasoned resin artist, ocean resin art is a great way to create something eye-catching that leaves plenty of room to customize the art in a way that satisfies your creative desires.
What is ocean resin art?
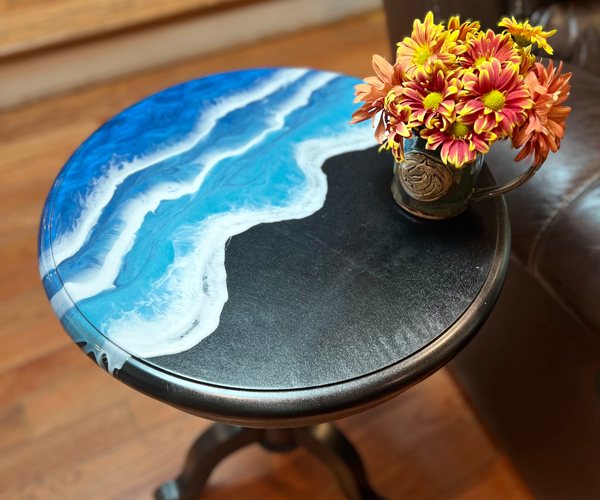
Ocean resin art, as the name suggests, is a kind of art that attempts to evoke the wistful beauty of the ocean in the form of epoxy resin. It's a relatively recent concept but has gained considerable popularity over the years due to its mesmerizing aesthetics and the gratifying process of creation.
The beauty of ocean resin art lies in the fact that no two pieces are alike. During each step of creation, there are numerous elements that subtly affect the outcome to make each wave unique.
In the end, every ocean art project results in a one-of-a-kind piece of resin art that evokes the image and ephemeral presence of ocean waves in a way that represents the artist's particular interpretation of the sea.
Be wary of low-quality brands which use substandard materials during production.

What is resin art?
Before we begin gathering materials, we want to explain a little more about resin art, to clarify the concept for those who aren't already familiar.
Resin art is a type of epoxy project in which the primary goal is often creative expression. It involves using epoxy resin to produce something symbolic or aesthetically pleasing—or even as a demonstration of one's artistic talent/skill.
As a medium, epoxy resin is admired and valued for its glasslike appearance, its long-lasting resilience, and its receptiveness to embedded objects and colorants, providing great creative flexibility.
The reason this works so well is because most epoxies start off as two separate liquid components. When these components are combined, they being to harden. It's during this slow hardening process that epoxy can be manipulated in different ways to generate stunning effects. That trait is what facilitates most resin art.
Working with resin does require some attention to detail and understanding of the material's properties. For example, the temperature and humidity of your workspace can drastically affect the curing time and the final result. It's also essential to get the mix ratio right to ensure a successful cure.
To learn more about curing, see our Curing Phase FAQs article.
Materials Required for Creating Ocean Resin Art
To start creating your own ocean resin art, you'll need some basic materials.
Here's a convenient list of materials needed for ocean resin art:
-
Art and craft epoxy: Choose a high-quality resin to ensure clean, consistent results. Our UltraClear Art and Craft Epoxy is exceptional for ocean resin art.
-
Mixing cups: You'll mix the epoxy in these. Unless your project is sizable, small cups should suffice. In our store, we have one-quart containers. You can also use small disposable plastic cups for mixing tiny batches.
-
Stir sticks: Use these to mix the epoxy. Small wooden stir sticks will do, or for bigger batches you can try our reusable Poly Pro Stir Sticks.
-
A heat gun: This will allow you to spread out the epoxy, generating the wave effect. It will also enable you to remove air bubbles from the resin after it begins curing. We have a high-quality heat gun available in our store.
-
Ocean-themed epoxy pigments: You'll need at least 3 colors. We recommend Porcelain White, Real Royal Blue, and River Table Turquoise from our collection for a beach-theme. For a deep ocean theme, you can substitute Deep Blue Wonder for the Turquoise.
-
A substrate for the resin: You'll pour the resin onto/into this. This can be almost anything. A smooth piece of glass, a wooden board or tray, canvas, etc.
To create the oceanic effect, you'll use a white pigment to create foamy waves, with different shades of blue to represent the water's depth.
For safety and cleanup purposes, we recommend you wear gloves and a mask during the process. We also suggest using plastic sheeting to protect your workspace in the case of an accidental spill.
In addition, you might want to consider using objects like shells, sand, or glitter to add depth and interest to your resin ocean. Remember that anything you embed in the resin will remain visible, so it's a great opportunity to get creative.

Step-by-Step Process to Create Resin Waves
Creating resin waves is a multi-step process that requires some patience but is otherwise straightforward and beginner-friendly.
Here's our step-by-step guide to creating ocean resin art:
-
Mix up an epoxy batch. Measure and mix carefully, according to the instructions from the manufacturer of your chosen epoxy resin.
-
Add the first pigment. Once your resin is ready, you can start adding your colors. Start with your base color, which should be the deepest shade of blue you want in your ocean.
-
Pour the batch onto the surface. Pour your colored resin onto the substrate surface, tilting it to spread the resin around.
-
Add additional layers. Next, using additional pigmented resin batches, layer on lighter shades of blue, creating a gradient effect. For a beach-theme, the lightest shade should be near the shore, while the deepest shade should be at the furthest point from the shore.
-
Create the waves. To create the waves, mix a small amount of white pigment with resin and pour it along the edge of the different shades of blue. Use a heat gun or a torch to spread and blend the white resin, creating a lacing effect that mimics the frothy waves of the ocean.
-
Remove any air bubbles that form:. You can use your heat gun afterward to remove air bubbles that show up. Take a look at our air bubble guide for more information.
- Let the resin cure. The exact curing time will vary, based on the type of epoxy and the environment it's curing in. Typically this is between 24 to 72 hours, depending on the size of the piece.

Techniques for Perfecting Epoxy Resin Art
As with any form of art, perfecting epoxy resin art takes practice.
One of the key techniques in creating beautiful ocean resin art is learning how to create depth. This can be achieved by layering multiple pours of resin, allowing each layer to cure before pouring the next. This technique creates a 3D effect, making your ocean look deep and realistic.
Another important technique is learning how to control the lacing effect, which creates the appearance of waves. This requires a delicate balance of heat and movement, and each artist develops their own unique method through repeated experience.
Safety Tips While Working with Resin
While working with resin is a lot of fun, it's also important to keep safety in mind.
- Always work in a well-ventilated area, as the fumes from some resins can be harmful if inhaled.
- Wearing protective gear, such as gloves and a mask, can help protect you from any potentially irritating effects of your chosen resin.
- It's also wise to protect your workspace with plastic sheeting or newspaper, as resin can be very difficult to remove once it has cured. Mistakes do sometimes happen, so it's good to be prepared.
- Lastly, always remember to follow the manufacturer's instructions when mixing and curing your resin.

Have questions? Want advice? Contact us!
Creating ocean resin art is a rewarding and therapeutic process that allows you to express yourself creatively and bring a piece of the ocean into your home.
Still, if you're relatively new to resin art, we know it may seem like a daunting challenge—and we at UltraClear would like to alleviate those concerns.
If you have any questions or concerns about making ocean resin art, or if you'd like help in planning your resin art project, please reach out to us. Our epoxy experts are happy to assist.
You can contact us via phone or email here. During business hours, you can also text chat online with one of our resin specialists by clicking the Help button at the bottom right of your screen.
Don't be afraid to give epoxy resin art a try—you may find that you have a hidden talent!


