Making an epoxy tumbler is a great way to express your artistic side, even if you're new to resin crafting. They're portable, not as time consuming as other resin projects, plus you end up with something useful to drink from or to gift to a friend.
However, if you're unfamiliar with this type of art project, you might find it a bit daunting. Don't let that discourage you—it's not as complicated or difficult as it may seem!
In this beginner friendly guide, we'll be providing step-by-step instructions on how to make an epoxy tumbler.
We'll explain what tools and supplies you should gather, as well as how to prepare your workspace to make the process as enjoyable and convenient as possible.

What exactly is an epoxy tumbler?
Well, a tumbler is basically a large drinking cup.
Most people are familiar with metal and plastic tumblers. These are often vacuum insulated, which allow them to preserve the temperature of the liquid inside for extended periods.
An epoxy tumbler is a tumbler that has been given a smooth coating of epoxy resin on its exterior.
Many arts-and-crafts enthusiasts like to make these in the comfort of their own home, though it's not uncommon to learn the process in a resin art class or workshop.
What makes epoxy tumblers exciting is how you can apply all sorts of colors and patterns along with as stickers and decals to the epoxy or tumbler surface. These then get sealed inside the resin coating, which eventually hardens into a tough, durable plastic that can last for many years.
For making an epoxy tumbler, we'll be using an insulated metal tumbler as our base.
In the next section, we'll go over the full list of essential and recommended supplies.

Decorating options for your epoxy tumbler
Epoxy tumblers can be decorated in several different ways, such as:
- Mixing epoxy pigments or resin dyes into the epoxy itself to create vivid tones and stunning patterns.
- Using Mod Podge and glitter to make your tumbler sparkle.
- Applying decals to put text or imagery between your resin layers.
- Spray painting your tumbler (often a prerequisite for glitter tumblers)
What are epoxy pigments and resin dyes?
Epoxy pigments are multi-tone colorants that are preserved in powder form. They are typically made from ground mica and similar minerals—usually natural, occasionally synthetic.
Because epoxy pigments are made of many fine particles, they often have a shimmering, sparkling, or pearlescent effect. Some pigments contain fine glitter as well, and a few can glow in the dark.
Resin dyes, on the other hand, are single-tone colorants produced in liquid form. They are highly potent, meaning just a few drops will infuse resin with a strong hue, while still allowing the resin to be translucent.
More dye can be added to make the tone deeper and more vivid; with enough dye added, the resin can be made fully opaque (meaning you won't seen what's behind it).
Either type of colorant is easily applied by mixing small amounts into the resin and manually blending the components together.
At UltraClear Epoxy, we offer premium Resin Dyes and Epoxy Pigments by Pigmently. We like Pigmently colorants because they are reliable, high quality, and available in a wide array of shades and textures.
How to make epoxy tumblers
There are three primary phases to this project:
- Gathering what supplies you need.
- Preparing your workspace for safety and convenience.
- Making your epoxy tumbler.
Let's get started!

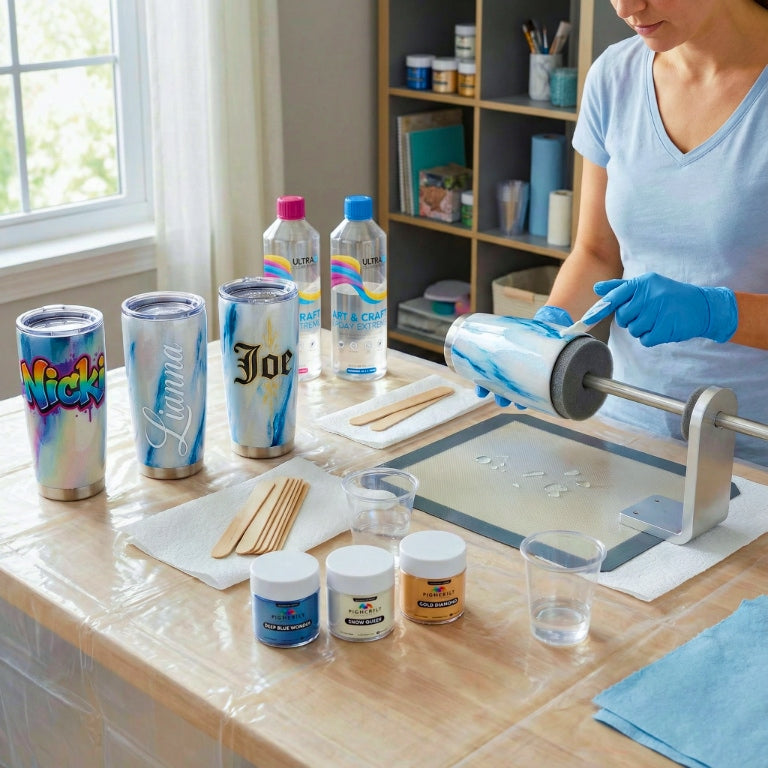
Step #1: Gather your supplies.
Below is a list of what you'll need to complete this project.
Some items are listed as optional; these are things which aren't technically essential, but most people use them anyway, either for artistic reasons or because it helps keep things safe and easy to clean.
- An insulated stainless steel tumbler: These are sometimes called double walled tumblers. They're available in many shapes and sizes, so choose what you like.
-
Art and craft epoxy resin: This is epoxy designed for small resin projects including tumblers, resin art, and similar items. It's food safe once cured and easy to apply to a rotating tumbler.
Our UltraClear Art and Craft Epoxy Resin is high quality, durable, and long-lasting, guaranteeing years of use. Your local arts-and-crafts stores may carry different brands. - Wooden/plastic stir sticks: These are for manually mixing small batches of epoxy for your tumbler.
- A tumbler cup turner: This is a machine that slowly rotates the tumbler, which keeps the resin from pooling and dripping at below the cup. It's possible to make epoxy tumblers without one of these, but that method can be tedious and is prone to mistakes.
- Wet/dry sandpaper: We recommend something between 220 to 400 grit sandpaper. You'll use this to manually sand the first layer of epoxy after it has partially cured. This will make it more accepting of the second, final resin layer. The sanding marks will disappear when the new layer bonds with the previous.
- A heat gun or propane torch: This is used to remove air bubbles from the resin right after applying it to your tumbler. We offer a reliable heat gun in our store.
- Painters plastic sheeting: You'll use this to cover your work area so that any spilled resin doesn't bond with your furniture, floor, or other surfaces.
- Nitrile/latex gloves: You'll wear these when working with epoxy to protect your skin. Some people have a sensitivity to epoxy, and it also makes cleanup a bit easier.
- N95 or KN95 respirator: Always wear a respirator when working with epoxy resin. The fumes are faint compared to most resins, but they can still cause minor respiratory issues, and most people who have allergies don't realize it until too late. It's always good to be safe when working with any powerful chemicals.
- (optional) A utility knife: This is very useful for removing any resin that gets onto the top rim of your tumbler. You can shave it away from the steel after it has had time to cure.
-
(optional) Painter's tape: For glitter tumblers, this is used to cover the upper and/or lower rims of your tumbler during the decorative phase. Many people prefer to leave a small section of the steel visible at the top or bottom of their tumbler.
If you like that aesthetic, you'll need this tape. - (optional) Epoxy pigments or resin dye: Epoxy pigments and resin dyes are colorants that you can mix into your resin to give it a deep or vibrant tone.
-
(optional) Spray paint: Spray paint is often used with glitter tumblers, as it will help mask any spots where the glitter didn't cover completely.
If you're methodical, you can do without this and still fully cover your surface with glitter. Choose a spray paint that is suitable for metal/stainless steel. -
(optional) Glitter: This is used for glitter tumblers. Choose whichever glitters appeal to you. You can use as many you'd like, and they can be applied in different ways to cover the surface completely, sporadically, etc.
You can also just use epoxy pigments or resin dye to color the resin itself. This can save you a lot of hassle and is more appealing for many users.
This is entirely up to personal preference. - (optional) Vinyl decals: You can apply these to the resin surface after the first layer has partially cured and been sanded. They will then be sealed within the second layer of resin.
-
(optional) Mod Podge and a small flat paintbrush: Some resin hobbyists prefer to use Mod Podge for applying glitter to their tumbler's surface. It can make things a little easier since you'll be able to apply it by hand before you get the tumbler spinning.
We offer Mod Podge in our store, and you can also get it from most hobby shops and arts-and-crafts stores.
Step #2: Prepare your workspace.
The next thing we'll do is set up a workspace to craft your epoxy resin tumbler.
If you can, try to meet the following conditions:
- A sturdy table or workbench that you can craft at.
- A room that you can condition to keep the temperature in the optimal range for your epoxy brand (usually about 75°F)
- A place with a bit of space to maneuver, so you don't have to cram your supplies too closely together.
At whichever spot you've chosen to craft, place your sheeting over any important surfaces to protect them from possible resin dripping, spills, and minor accidents. Even the pros make mistakes sometimes, so it's good to be prepared.
The sheeting will prevent it from bonding with materials like wood or laminate, etc., and make clean up a lot easier, too.
You'll want to organize your supplies so that they're conveniently within reach while also not being in the way of your movements. This will help you knocking anything over while working.
The next step is only for making glitter tumblers. If you're doing a clear resin tumbler or using resin colorants, skip to Step 4.

Step #3: Use Mod Podge to apply glitter to your tumbler.
Next, you'll be preparing your tumbler for the resin. There are several things you can do here, depending on how you want your tumbler to look and what kind of tumbler you intend to craft.
Before you begin, clean your tumbler thoroughly. You can use dish soap and water, or just use rubbing alcohol. You just want to remove residue, skin oils, and other things before you start working working on your tumbler.
To start a glitter tumbler using Mod Podge:
- (optional) Spray paint your tumbler. Choose an open area outside or a well-ventilated room while wearing a mask and follow the directions on your spray can to apply it safely. Then let the tumbler fully dry. Finally, give it another good cleaning.
-
(optional) If you want to keep some of the metal visible at the upper or lower rim:
Place some painters tape around either rim. The width of the taped section is what will be visible at the end of the project.
For example, if you cover half-an-inch of the exterior from the rim, you will have a half-inch of steel still visible when you're done. - Apply a layer of Mod Podge. Use the small flat paintbrush to brush it onto the tumbler where you want your glitter to be. Use long, smooth strokes from top to bottom. Don't forget to do the bottom of your tumbler if you want glitter there.
-
From there, you'll add the glitter. There are a few different ways to do that.
First, hold the tumbler from the inside. You can just use your arm or you can be creative with some round foam pierced by some PVC pipe to make a handle.
With the glitter, some people like to scoop and dump it on while holding the tumbler over a container (to catch what falls), while others prefer to sprinkle it with their fingers.
Some glitter containers have a "shaker" cap that allows you to shake it out gradually onto the surface.
Use whichever method suits you. When you're satisfied, move on. - Shake your tumbler and tap a clear section a few times. Loose glitter should fall off. Return the excess glitter to its storage container.
- Examine your tumbler. If you're satisfied with the glitter layout, move on. If it seems like you missed a few spots, you can wait at least 4 hours, then apply a second layer of Mod Podge and more glitter.
-
Remove any rim tape and wait for the tumbler to dry. We recommend at least 4 hours. Many users choose to wait until the next day just to be sure.

Step #4: Set up your cup turner and mix your resin.
From here, you'll be working with art and craft resin, so be sure to read the instructions that came with your epoxy.
- Set up your cup turner. Make sure the tumbler is fitted properly, is rotating, and isn't drooping—then put on your gloves and respirator.
-
Mix your epoxy resin. The amount you need for this is determined by the size and shape of your tumbler. Typically, this will be between 1 fl oz (about 30 ml) to 1.5 fl oz (about 45 ml) combined. If you're not sure, just make a little extra. You can dispose of excess later.
Make sure you follow the mixing instructions for your brand of epoxy. -
(optional) Add colorants to your resin. If you intend to use epoxy pigments or resin dye to decorate your tumbler, now is the time to add those to your resin.
Start with a small amount and add more as desired. Once you're satisfied with the look, move on.

Step #5: Apply the first layer of epoxy resin to your tumbler.
-
Starting at the lower rim of your tumbler, carefully pour some of the resin onto your tumbler as it rotates.
You can keep the side of your index finger near the tumbler to smooth out the epoxy on it as it rotates. This will give you some control over how the epoxy spreads and prevent it from dripping before it has a chance to thin out a bit.
Continue doing this and working your way toward the upper rim, but stop a little short so you don't get epoxy into the interior.
Once you get closed to the upper rim, pour a bit of epoxy below it, then use your finger to gently smooth it out toward the upper rim. Doing it this way makes it easier to avoid epoxy getting inside the cup.
Note: If epoxy does get inside your tumbler, that's okay. You'll just have to remove it later. -
(optional) Finish up by coating the bottom. You can use your finger to add the resin to the bottom of your tumbler. Just smooth it out a bit and make sure there's enough on there. The epoxy will also self-level as the tumbler rotates, so you just want to try to spread it enough so it doesn't drip a lot.
Note: Some people choose not to coat the bottom of their tumbler. If you applied glitter there, you'll definitely want to, but otherwise it isn't essential.

Step #6: Remove air bubbles.
In this step, we'll deal with air bubbles, then let the epoxy resin dry before doing the final layer.
-
Use your heat gun or propane torch to remove heat bubbles. Keep either device several inches away from the resin, and do smooth motions back and forth as the tumbler rotates. Continue until you've passed over the entire resin surface.
Note: Don't linger over any spot for more than a second, and if you're using a torch, be absolutely certain not to let the flame touch the resin. You should be several inches away—well out of range for that to happen. - Examine the tumbler closely for remaining air bubbles. Try to look at it from different angles. If you see any, do a second pass. Otherwise, continue.
-
Allow the resin to partially cure. Follow the instructions of your resin brand.
If you can't find them, we suggest letting the tumbler spin for 12 hours, then letting it sit for an additional 12 hours to make sure. - Check the top of the tumbler rim for resin. You can use your utility knife to very carefully shave away any resin that got over the surface there. This will prevent any resin buildup from obstructing the lid for the tumbler.

Step #7: Sand your tumbler, then apply any decals.
-
Sand the resin surface of your tumbler. We recommend wet sanding, but you can also dry sand, which tends to be easier but can create more epoxy dust for you to clean up later.
Don't sand too much—you just want to prime the resin surface for bonding with a new layer of resin. Any scratches from the sanding will disappear when you add a new layer. - Wipe away any dust from your tumbler, then apply any decals you want onto your surface.

Step #8: Mix and apply the second layer of epoxy resin.
We're almost done. This step is very similar to the previous resin step.
- Place the tumbler back onto the cup turner.
- Mix up another batch of epoxy. You should use about the same amount as before.
-
Apply the epoxy to your tumbler surface in the same way. Give extra attention to the decal areas. You want to make sure they get covered properly and the epoxy doesn't pool on them.
Ultimately, the epoxy resin should be uniformly smooth, and the decal area shouldn't protude at all. The rotation of the cup turner will do most of the work for you.
Step #9: Remove air bubbles from the second layer.
Remove any bubbles in the same way as earlier, then examine the surface for more. If there are any, do a second pass.
Otherwise, let the epoxy cure for as long as your brand requires. Again, if you're unsure how long to cure and can't find the instructions, giving it 12 hours while rotating, then another 12 hours while motionless should be adequate.
And that's it! If you followed this guide from start to finish, you should have your very own epoxy tumbler. Congratulations!

Additional Resources
Here are some additional articles and links you may find useful:
- UltraClear Art and Craft Epoxy Instructions - A digital version of our art and craft resin instructions.
- Epoxy: Proper storage, shelf life, and preventing "yellowing" - Our article on storing epoxy when not in use.
- How to make resin jewelry - Our step-by-step to crafting your own resin jewelry.
Frequently Asked Questions
Are epoxy tumblers dishwasher safe?
No. You should hand wash epoxy tumblers. This is because insulated tumblers are double-walled and the seal will break over time when exposed to the high heat used by dishwashers.
Additionally, epoxy also has heat limitations (about 135°F before heat damage), and some dishwashers go above that temperature to ensure the items they're cleaning get sanitized through sheer heat.

Have questions? Want advice? Contact us!
If you have any questions about epoxy tumblers or other resin related topics, reach out to us at UltraClear Epoxy. Our epoxy resin experts are ready to assist you with your epoxy concerns and project planning.
You can contact us via phone or email here. You can also text chat online during business hours with a resin specialist by clicking the help button at the bottom right of your screen.


