How to polish resin and epoxy.
[This guide is for small projects such as resin art. For larger projects e.g., epoxy table tops and countertops, click here.]
We’ve been asked a number of times about whether epoxy resin can be polished, and how to do so.
Today, we’ll be diving into the pros and cons of polishing resin, including a step-by-step guide to two methods on how to polish resin that will work in most cases (especially for smaller resin art).
These methods will work whether your resin has a traditional transparent finish or a colored finish made using powder pigments or resin dyes.

Method One: Use a resin-suitable polishing compound
The first technique is to use a polishing compound suitable for resin to renew a lackluster finish. Unlike with typical cleaning of resin surfaces, the goal here is to restore the natural sheen and clearness of your resin.
Only use this method on pieces that are—at most—lightly scratched and exhibiting a cloudy/murky finish.
With a polishing compound and some careful, deliberate force, you’ll be able to clear away surface-level dullness from things like resin jewelry, coasters, keychains, etc.

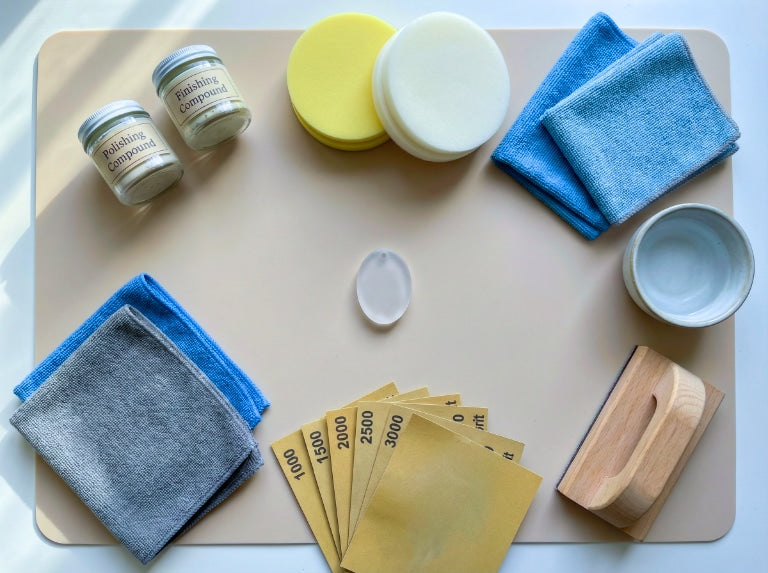
Step #1: Gather what you’ll need.
- A resin-suitable polishing compound: There are a number of these available in hardware/home improvement stores, both locally and on the internet. If you need something non-abrasive and non-toxic, you can also try Flitz Polish Paste.
- Microfiber cloths: These are used to apply the polish to the resin surface.
- Nitrile gloves: These will protect your skin from the polishing compound.
-
(optional) A wet-dry sanding sponge: You’ll use this before polishing if your resin has significant clouding or light-scratching.
Wet sanding is useful because it picks up the epoxy dust created by the sanding itself and keeps it from being reabsorbed and creating blemishes in your resin finish. - (optional) An N95 or KN95 respirator: If you’re sanding your resin, you may want to wear a mask to avoid breathing in any dust. Wet sanding greatly reduces dust kick-up, but it never hurts to be cautious.

Step #2: Prepare your workspace.
You’ll need a nice, clean workspace to do your polishing.
Choose a table or similar surface that won’t wobble when you apply heavy pressure, because you’ll need to use significant force while polishing to properly restore your resin.
Place your supplies and resin pieces in a nice convenient spot at your table.

Step #3: Polish your resin.
Next you’ll be polishing your resin pieces. Make sure you put your gloves on, as well as your mask if you’ll be using one.
(optional) Moisten the wet-dry sanding sponge, then sand the surfaces you’ll be polishing. This is necessary if your pieces have light scratching or have particularly dull/murky surfaces.

2. Apply a dab of the polish to your surface, and gently spread it around with your finger to the rest of the surface—Don’t rub it in heavily, this is just to distribute it somewhat evenly.

3. With a microfiber cloth, intensely rub in the polish on the resin surface. Use smooth, circular motions, and be sure to apply a lot of force. Do this for a minute or two, then check to see how it’s looking.
You can make this easier with some pieces (generally flat pieces) by laying the cloth on your workspace and applying pressure using some of your body weight. Just keep rubbing for a minute, then check to see how it’s coming along.
4. Repeat the process for a second polishing attempt. Most pieces will take at least two attempts, and maybe a third one. The process is the same—a dab of polish and smooth, circular motions with force behind them.

5. Wipe away any residue with a second cloth or clean section of the first. You can rinse with cool water as well, then dry the pieces.
And that’s it for this method! Hopefully your pieces are now looking much shinier and clearer. If not, it may mean you didn’t apply sufficient force, or you used too much or too little polishing compound.
It’s also possible that the pieces were more scratched than they appeared to be.
Regardless, if your pieces are still not looking quite right, your best bet will be Method Two, explained below.

Method Two: Apply a thin new layer of epoxy resin.
For pieces that are significantly scratched or damaged in some other way, the best option is to apply a new layer of resin. This will restore the surface area and make it look completely renewed. It takes a little more patience and care than Method One, but the results are generally longer-lasting and more impressive.

Step #1: Gather what you’ll need.
-
Epoxy resin: Try to use the same brand you applied originally for consistent results.
If you don’t have that brand or can’t get more, you can also use our UltraClear Art & Craft Epoxy. This is a premium casting resin suitable for resin art and jewelry and is a good option for renewing the resin surfaces of those pieces. -
Plastic stir sticks: Choose a size appropriate for your project. If you're working with small art pieces, you'll only need to make a tiny batch of epoxy, so use small plastic stir sticks.
If your project is substantial in size, you may want something larger. For larger projects, we offer Poly Pro Stir Sticks. These reusable stir sticks contain molded pass oval holes for smoother, more consistent blending. -
Small angled brush: This will be used to apply the epoxy carefully to the surface area to be restored. Angled brushes allow for finer motions and provide better control when applying epoxy resin to irregular shaped pieces.
These can be found at many hobby stores, art stores, and of course online stores. - Nitrile gloves: When working with epoxy resin, it’s a good idea to wear gloves to protect your skin and to prevent natural skin oils from contaminating the resin.
- An N95 or KN95 mask: Wear this while working with epoxy resin. Epoxy is the resin with the least concerning fumes, but some people have a high sensitivity to epoxy, so we recommend staying safe by equipping a mask whenever you’re handling resin.
-
A heat gun, propane torch, or lighter*: You'll use one of these to remove air bubbles from the epoxy after applying it.
*Note: For little resin pieces, some users have found ordinary butane lighters to be effective at clearing away bubbles. You can try this if your project is small enough. - (optional) Thin, clear tape and tools to remove hooks/chains, etc.: These are only needed if you're restoring resin pieces that have hooks, chains, or similar components, such as with charms and jewelry. The tape is to cover the hole they occupied.
-
(optional) A silicone drying mat/trivet: You can place your resin pieces on this during or after you apply the epoxy resin. They’ll allow excess epoxy to drip into the space below if you accidentally add too much.
They also make it easier to reach edges of flat resin pieces without having to hold the piece manually. You’ll let your pieces cure on this after the reapplication.
There are quite a few places online where you can find these. -
(optional) A wet/dry sanding sponge: This will be used to sand the resin pieces before you apply the epoxy, serving two purposes.
The first purpose is to smooth out imperfections before applying the epoxy, and the second is to enable the epoxy to better cling to the intended area, allowing you to avoid overflow onto other areas.
You can find these in various online stores as well as in some home improvement or hardware stores. -
(optional) Painters plastic sheeting: You can use this to cover nearby surfaces that you want to avoid getting resin on. If you’re careful, this won’t be an issue, but it never hurts to be prepared for possible spills or accidents.
Painters plastic is often found in home improvement stores, and you can also buy it online and have it delivered.
Step #2: Prepare your workspace and resin pieces.
It’s time to set up your workspace for your restoration project. You can handle this in different ways.
The recommended way is to cover nearby surfaces with plastic sheeting to prevent any resin spills from getting onto these surfaces and curing. This takes a little more preparation time, but is the most cautious route.
Otherwise, you can just cover your table/work area with something less comprehensive.
Either way, you’ll want to choose a clean, sturdy table or something similar to work at.
Afterward, do the following:
- Place your tools and supplies in a convenient location. Choose a spot where they’re easy to reach but won’t get in the way of your movements.
-
(optional) Remove any hooks or attachments from your resin pieces if they have them. For any resin pieces with hooks or attachments that you don't want epoxy on, remove them temporarily and put a trimmed piece of clear tape over the holes where they were to prevent resin from entering that space.
This is to make it easier to reattach these components later, after the epoxy has cured.
The tape will remain so make sure it’s clear and not opaque or tinted. - (optional) Wet sand the surface you’ll be recoating. This will help the epoxy to cling only to the areas you’re restoring. The moisture from wet sanding also helps pick up epoxy dust that sanding naturally generates.
Then you’re ready to begin.

Step #3: Mix up and apply a batch of epoxy resin.
It’s time to get started. First, equip your gloves and mask, then do the following:
-
Make an appropriate sized batch of epoxy. It’ll be a tiny batch if you’re renewing small resin pieces like jewelry, coasters, etc. Be sure to follow the instructions intended for your epoxy brand.
If you’re using our UltraClear Art & Craft Epoxy, you can also find the digital version of our instructions on our support website here. -
Apply the blended epoxy resin: For smaller pieces, carefully use your angled brush to cover the original coats of resin.
Take your time as you apply it to avoid coating unintended areas. Brush strokes will go away after you apply a certain amount.
For larger projects you can pour it on and allow it to self-level. Just be mindful as you pour and try to distribute it evenly across the intended surface.
Step #4: Remove air bubbles and allow it to cure.
You're almost done. Next, you'll be removing air bubbles. The infographic below should serve as a visual aid to complement the more detailed instructions underneath it.

-
Use a heat gun or propane torch (or lighter*) to remove air bubbles. This step sometimes seems more intimidating than it is.
Simply hold your heat gun or propane torch several inches away and do a brief pass over the new resin layer. Don't linger for more than a second, just make smooth back-and-forth motions until you've passed over the entire surface.
Caution: If you're using a propane torch, be absolutely sure not to let the flame touch the curing epoxy, as it will likely cause heat damage that will show up later.
*For small resin pieces, you can try using a simple butane lighter instead. We don't recommend this, but some users have reported success with this method, and it will save you the effort of acquiring a torch or heat gun if you don't have one. -
Wait a few minutes, then look closely for remaining air bubbles. Try viewing the resin from a low angle. Light tends to behave differently against bubbles and makes them more apparent.
If you see more air bubbles, do a second pass over the resin with your heating tool. - Allow the epoxy to cure. The time you wait is determined by the brand you're using, though most brands will suggest at least 24 hours for touch and 72 hours for a proper hardened cure.
-
(optional) Reattach any components to your resin pieces.
You may need to use a tool (such as a fine hand drill) to reopen the holes, but that should be pretty easy if you blocked them with tape, as you'll only need to pierce the thin layer of resin you just added.
And that's it! At this point, you should be done.
If you've followed the directions here as well as those included with your epoxy resin, your pieces should now look much better than they did.

Additional Resources
Here are some additional articles you may find useful:
- How to wash away resin and epoxy on your hands and skin - Our guide to keeping your skin clean and free of resin.
- Epoxy: Proper storage, shelf life, and preventing "yellowing" - A brief explainer on how to properly store excess or unused epoxy resin.

Have questions? Need advice? Contact us!
At UltraClear Epoxy, we strive to provide comprehensive customer service and support.
If you have any questions about polishing resin and our Art & Craft Epoxy, or if you'd like advice on planning an epoxy resin project, please reach out to us.
You can contact us via phone or email here, and you can also text chat with an epoxy expert online by clicking the help button at the bottom-right of your screen.


