[This guide is for sanding small projects such as resin art. For sanding larger projects e.g., epoxy table tops and countertops, click here.]
Resin art and jewelry can be a joy to craft, but sometimes things don't go as smoothly as planned, and you end up with a rough or bumpy surface when you wanted something smooth and sleek.
That's when sanding can help fix things.

What is sanding?
When resin pieces cure, sometimes their surface isn't as smooth as intended. Often the cause is an imperfect mold; other times the resin may not have blended quite right. Perhaps you even have air bubbles.
Either way, the end result is a rough or jagged surface that needs to be sanded down (and often polished or recoated afterward).
Normal sanding can be accomplished manually or with the assistance of power tools. However, power sanders are large and flat, making them impossible to use on resin art pieces with irregular shapes, grooves, and curves.
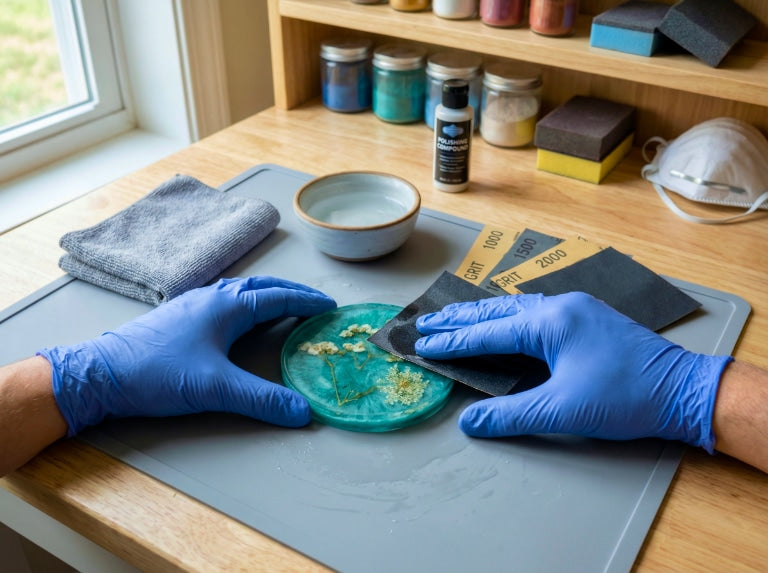
For small resin projects, we prefer manual sanding—that is, sanding done by hand without the use of power tools. This gives you greater control over your sanding and allows you to carefully scuff only the places you want to.

Two methods: Wet sanding and dry sanding
There are two common styles of sanding.
The first is dry sanding, which is as it sounds. You sand something that is completely dry. The upside to dry sanding is that it makes it a bit easier to sand away surface imperfections. The downside is that it creates a lot of dust that then disperses into the air.
Because epoxy resin dust is particularly unsafe for breathing, we'll be using wet sanding instead.
Wet sanding involves moistening your resin surface or sanding abrasive to greatly reduce the amount of dust. As you sand, the dust is collected by the water and clings to the abrasive's surface.
Many wet sanding abrasives can then be washed after use and are reusable up to a point.
In this beginner-friendly guide, you'll learn how to sand your epoxy resin art.
Below, we've included a list of necessary supplies and a few things to be aware of before you begin.

How to sand resin art
Before we begin, you should know that sanding resin is a time consuming task. Epoxy resin is very resilient—being one of its most appealing traits—but that means it's difficult to whittle away through sanding.
Still, if you're willing to put in the effort, sanding resin is absolutely possible. It's not complicated, either, but it will take some exertion, because you'll have to apply significant force while manual sanding to really sand away the blemishes.
The good news is that you don't have to get it all done at once. Since sanding is only done to epoxy that has fully cured, you can work on your project a little at a time, as your schedule permits, or you can dedicate a large block of time and get it done in one session.

Step #1: Gather the necessary tools and supplies.
Your first task is to obtain everything you'll need for sanding, including:
-
Sandpaper (400, 600, 800, and 1000-grit): You'll need sandpaper in several grit sizes. The sizes needed are determined by how rough the surface is.
We'll be using 400-grit, 600-grit, 800-grit, and 1000-grit. You can find these at many home improvement and hardware stores.
Make sure to choose sandpaper suitable for wet sanding. Look for terms like Wet/Dry, WetOrDry, etc. in the description or name.
For 1 or 2 small resin pieces, you'll probably only need 1 or 2 of each sandpaper grit, but usually these are sold in packs of 5 or 10, so you may end up with plenty of extra which you can share or save for future projects.
If you already have some experience with sanding, and you believe you can safely start at a higher grit, you may be able to skip the 400-grit.
If you're not sure where to start, we recommend getting all four types and working your way up to the super fine 1000-grit. -
An N95 or KN95 mask/respirator: Resin dust is no joke. Sanding can create a lot of it, and it's unsafe to breathe.
To avoid getting it into the air while working, we use wet sanding. However, we also recommend wearing an N95 or KN95 mask or respirator while working with resin. This will filter out any small particles that get missed.
After you're finished with your project, the dust will eventually settle, and you can give your workspace a final cleaning. - Water: Just a small cup of water to wet your sandpaper and resin.
-
(optional) Wet/dry ultra fine sanding pads: Sanding pads are thick meshes used for hand sanding. They feel soft and pliant and will conform to your resin surface, which is good for resin art.
If you want to go the extra mile, you can use an ultra fine sanding pad to prime your resin surface for polishing. -
(optional) A sanding block: If the resin pieces you'll be sanding are round or flat and relatively big, you can try using a sanding block to make things easier.
A sanding block is a grip that you can attach sandpaper to. It helps make your sanding more consistent by evenly applying the pressure you exert onto your resin surface.
Step #2: Prepare your workspace
Next, you'll want to set up your work area. We recommend a sturdy table or work bench that allows you to apply a lot of pressure so you can really put some force into your sanding.
The ability to use your body weight as leverage to help you sand will make the process a little easier.
Place all of your supplies in a convenient spot nearby where they won't get in the way of your movements.

Step #3: Sand your resin art.
Now it's time to sand. Make sure to equip your mask before you begin.
-
Start with the 400-grit sandpaper. Wet the sandpaper, then apply a lot of pressure to the resin while moving it in small circular motions.
If the shape of your piece prevents circular motions, you can try a back-and-forth motion, while changing the angle every so often. The goal here is to apply the 400-grit sandpaper until your surface feels smoother.
There's no set amount of time for sanding, since it is affected by the shape of your piece as well as how much pressure you can apply, but you can use your fingers to feel how smooth it's becoming. View it from different angles to locate delicate bumps or blemishes that need more work.
For really rough spots, you can leverage your work surface by placing the sandpaper rough-side-up and rubbing the resin piece against it in a circular motion.
If you get some dust buildup on your resin, you can use a clean microfiber cloth to wipe it away.
Keep at it until the surface starts to feel the way you want it to.
-
Next, work with the 600-grit sandpaper. Once you're satisfied with the 400-grit, you'll move onto the 600-grit. The idea is mostly the same. Moisten it first, then start rubbing away.
This time, though, focus on replacing the 400-grit finish with a finer 600-grit finish. Work on your surface until the scratches left by the 400 have been replaced by the 600. -
Third, we'll be using the 800-grit sandpaper. We're already getting close to the finish.
800-grit sandpaper is a super fine grit that some people prefer to stop at. For resin art, though, you probably want to go all the way.
So—much like with the 600-grit—moisten the sandpaper and rub in circular motions (or alternating back-and-forth motions) until you've replaced the 600-grit finish with an even finer 800-grit finish. -
Finally, we use the super fine 1000-grit sandpaper. This is your final sanding phase (unless you plan to polish), so keep at it until you've smoothed out the surface to a satisfying degree.
If you're not polishing, you may choose to stop here, otherwise, move to the optional instruction below. - (optional) Use your ultra fine sanding pad to further smooth your resin surface. This will also prime your resin surface for polishing.
And that's it! If you've followed the guide up to this point, your surface should be well sanded and even primed for a new resin coat or a polishing finish.

Final notes and additional resources
After sanding, many users choose to add a new epoxy coating or apply a polishing finish to their surface to make the resin shine.
For epoxy coatings, our UltraClear Art & Craft Epoxy and our UltraClear Table Top Epoxy are exceptional for this. They're both premium-grade resins crafted from pure ingredients and 100% produced in the USA.
A lot of resin enthusiasts also make use of resin dyes and pigments, which you can learn more about here.
For polishing finishes, consider taking a look at our step-by-step guide to polishing resin art.

Have questions? Want advice? Contact us!
At UltraClear Epoxy, we strive to provide comprehensive customer support and service.
Whether you're new to us or a familiar face, our epoxy experts are available to assist you with your project needs and address any questions or concerns you may have.
You can reach us via phone or email here, or text chat online with one of our resin specialists during business hours by clicking on the Help button at the bottom-right of your screen.


