Epoxy resin coasters are one of the best beginner projects for anyone new to resin crafting. These compact, easy-to-manage creations offer an ideal way to build confidence and gain experience with epoxy in a controlled, repeatable way. Coasters require only a small amount of materials, have quick setup and cure times, and allow for creative experimentation with colors and embedded elements.
In this guide, we’ll walk you through how to make your own resin coasters from start to finish. You’ll learn about the supplies you’ll need, different methods for customizing your coasters, which type of epoxy to use, and step-by-step instructions for beginner and intermediate techniques. We'll also include helpful tips and answers to common questions along the way.
Contents |
|
Creative Elements in Resin Coasters How to Make Resin Coasters: Step-by-Step Guide Beginner Tips for Resin Coaster Projects Why Cheap Epoxy Can Ruin Your Project |

Creative Elements in Resin Coasters
Resin coasters can be visually striking, thanks to the wide range of customizations available through colorants and embedded materials.
Using Pigments, Dyes, and Inks
Epoxy Powder Pigments: Powder pigments are an excellent choice for achieving bold, opaque colors with subtle shimmer or pearlescent effects. You can mix them thoroughly for a consistent color or swirl them into your resin for dynamic patterns. Pigmently mica powders are highly recommended for their premium quality and vivid colors.
Resin Dyes: These liquid colorants are great for transparent or translucent coasters. Pigmently’s line of resin dyes mixes easily with UltraClear Art & Craft Epoxy, giving rich tones without disrupting the resin's clarity.
Alcohol Inks: For coasters with blooming or marbled effects, alcohol inks can create dramatic abstract designs. A drop or two can spread and shift, producing unique organic shapes and subtle gradient patterns.
Embedding Small Objects
Small decorative items can be sealed within the epoxy to customize the appearance of the coaster. Common examples dried flowers and leaves, glitter/sequins (or almost anything shiny), even photos or other paper memorabilia.
Learn more about embedding techniques here.

Types of Resin Coasters
There are a few primary approaches when it comes to crafting resin coasters. Here’s how they differ by skill level:
For Beginners: Simple Clear or Tinted Coasters
One of the simplest types of resin coaster uses a basic silicone mold filled with clear or lightly colored epoxy. Coasters like this typically include a few decorative elements like glitter, powder pigments, or simple embedded objects such as leaves or pressed flowers, but they usually don't incorporate more advanced coloring techniques such as swirling.
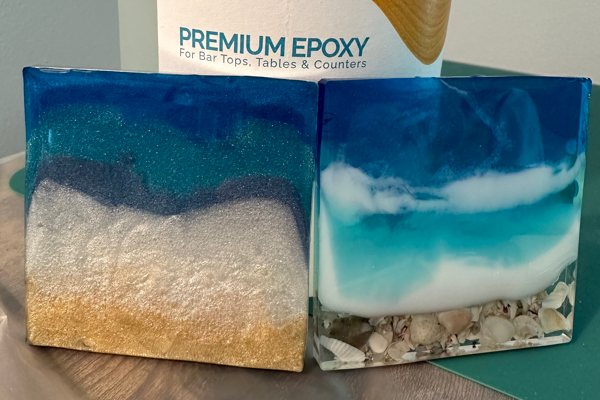
For Intermediate Users: Layered or Embedded Designs
Bolder or more experienced crafters may expand on the basic design by attempting layered pours to suspend objects at different depths, or by adding in more complex elements like beach scenes, geode patterns, or resin swirls. These methods require greater control over timing, mixing, and layering.

Supplies Needed for Resin Coasters
For Beginner-Level Coasters
-
UltraClear Art & Craft Epoxy—Designed for smaller projects, it cures crystal-clear and is easy to work with in molds.
-
Silicone Coaster Molds—Available in square, round, hexagonal, and custom shapes. Flexible and reusable.
-
Mixing Cups & Sticks—For accurate measuring and thorough blending.
-
Protective Gear—Nitrile gloves and a respirator or mask if working in an enclosed space.
-
Optional Add-ins—Pigmently epoxy powders or dyes, glitter, dried flowers, or other decorations.
For Intermediate-Level Coasters
-
UV-Resistant Sealant (optional)—Used if adding elements that may discolor over time, like real flowers.
-
Heat Gun or Torch—For removing surface bubbles and achieving a smooth finish.
-
Tweezers—For precision placement of small embedded items.
-
Layering Tools (optional)—Toothpicks or silicone sticks for swirling designs or layering resin.

How to Make Resin Coasters: Step-by-Step Guide
Step #1: Gather your materials and prep your space.
- Set up a clean, level work surface in a well-ventilated, temperature-controlled area.
- Lay down a protective layer like a silicone mat or plastic sheeting to catch drips.
- Gather your UltraClear Art & Craft Epoxy, silicone molds, mixing tools, measuring cups, gloves, and any decorative materials (like pigments, glitter, or inclusions).
Learn more about setting up your epoxy workspace here.
Step #2: Measure and mix your epoxy.
- Using a 1:1 ratio (for UltraClear Art & Craft Epoxy), measure equal parts of resin and hardener into a clean mixing container.
- Mix slowly and thoroughly for 3 to 5 minutes, scraping the sides and bottom of the container as you stir.
Step #3: Add colorants or decorative elements.
-
For color: Once mixed, you can carefully divide the epoxy into smaller cups to mix in pigments, dyes, or alcohol inks. Stir gently to blend colors evenly.
- Keep in mind that these colorants are typically very concentrated, so start with a small amount and add more if needed.
- For embedding small objects: You can prep dried flowers, small beads, or other inclusions to be embedded into the resin during the pour.
Step #4: Pour the epoxy into your molds.
- Pour slowly into the center of each mold cavity, allowing the resin to spread naturally.
- If you're layering different colors, pour them one at a time or swirl gently for desired effects. Fill the molds to your desired thickness, typically around 1/4 inch for coasters.
Step #5: Remove surface bubbles.
- Use a small heat gun or torch to pass over the surface and eliminate air bubbles. Hold it 4 to 6 inches above the resin and keep it moving—never linger for more than a second over any one spot.
- Avoid overheating, which can deform your molds or damage the resin surface.
Step #6: Cover and cure.
- Place a dust cover over your molds to protect them during curing. Allow the epoxy to cure undisturbed for at least 24 hours at a stable room temperature.
- Avoid touching or moving the molds during this time to prevent warping or surface imperfections.
Step #7: Demold and finish.
- Once fully cured, carefully remove the coasters from the silicone molds. If the edges are sharp or uneven, you can sand them gently using fine-grit sandpaper.
- If needed, apply a clear topcoat of UltraClear Art & Craft Epoxy to restore gloss after sanding.
Step #8: Let the coasters fully cure.
- Even after demolding, it's a good idea to allow the coasters to sit for a few more days to reach full hardness internally. This post-cure period ensures maximum durability and heat resistance.
- Either way, once complete, your coasters are ready for use or gifting!

Beginner Tips for Resin Coaster Projects
Measure your epoxy precisely.
Always follow the recommended 1:1 ratio when working with UltraClear Art & Craft Epoxy. Accurate measuring ensures the resin and hardener react properly and cure completely.
If your ratio is slightly off, the epoxy may end up tacky, soft, or improperly cured, which can ruin the finish of your coasters.
We recommend using graduated containers for measuring and mixing—and we offer two sizes in our store—1-quart and 5-quart.
Mix thoroughly and scrape your container.
Improper mixing is a leading cause of curing issues. Mix your epoxy for 3 to 5 minutes, scraping the sides and bottom of your mixing container throughout the process.
If you leave unmixed material along the walls of the container, it may pour into your mold and leave sticky or soft spots on your coasters.
When pouring, never scrape out excess resin onto the surface; whatever stays in the container was likely not blended right.
Pour slowly to reduce bubbles.
When filling your coaster molds, pour the mixed epoxy slowly and steadily. Pouring too quickly can trap air in the resin and lead to unsightly bubbles.
Slower pours give the resin time to settle and spread naturally, reducing the need for excessive bubble removal later.
Use heat sparingly to remove bubbles.
After pouring your epoxy into the molds, use a small heat gun or a kitchen torch held a few inches away to gently remove surface bubbles. One or two light passes is usually sufficient. Just don't linger for more than a second over any spot.
Overheating can cause ripples or burns, especially with thin molds like coasters.
Protect your curing space from dust.
Dust and debris can easily settle on your curing epoxy, leaving imperfections in your finished coasters.
Use a plastic bin, cardboard box, or other clean covering to shield your molds during curing. This keeps your coasters smooth and professional-looking.
Work in a temperature-controlled space.
For best results, work in an environment where the temperature is between 72°F and 78°F—ideally 75°F.
Epoxy that is too cold will be thicker and harder to work with, while epoxy that is too hot can cure too quickly and lead to surface defects. Maintaining a consistent temperature helps ensure a smooth, even cure.
Choose molds with clean, smooth surfaces.
The texture of your mold will transfer to your finished coaster. Silicone molds are ideal because they provide a non-stick surface and release easily once cured.
Always inspect your mold for dust, oils, or scratches that could affect the surface of your coaster.
We've written a guide to cleaning resin molds here.
Plan your colors and additions ahead of time.
If you're using pigments, dyes, or embedded materials, plan your design before mixing your epoxy. This reduces the time the epoxy spends sitting in the container and helps you work more efficiently once it’s ready to pour.
The more prepared you are, the more control you’ll have over the final look of each coaster.

Why Cheap Epoxy Can Ruin Your Project
When it comes to DIY resin crafting, it might be tempting to buy a lower-priced epoxy, but using cheap, imported resin comes with serious risks. Budget epoxies are typically produced overseas with less oversight, leading to inconsistencies in quality. These products can result in poor curing, yellowing, or surfaces that never fully harden.
Many low-cost epoxies reach that price by using low-grade ingredients or poorly measured formulas. This can cause bubbling, surface pitting, or unexpected cloudiness, which is frustrating when you’ve invested time and effort into a craft.
Additionally, imported epoxies sometimes lack proper safety data, and working with unknown chemical mixtures could result in respiratory irritation or skin exposure to harmful compounds.
Learn more about the importance of your epoxy choice here.

UltraClear Epoxy: For Clean, Long-Lasting Results
In contrast to budget-brand epoxies, our UltraClear Art & Craft Epoxy is 100% made in the U.S.A. under strict quality controls. It’s food-safe once cured, crystal clear, and designed for consistent performance. This epoxy is easy to work with, durable, and ideal for crafting small to medium resin art.
When you choose UltraClear, you’re choosing peace of mind, a reliable finish, and a professional-grade product that will last for many years.

FAQs: Resin Coasters & Epoxy Tips
What epoxy should I use for resin coasters?
UltraClear Art & Craft Epoxy is the best choice for coasters. It cures quickly, works well in silicone molds, and provides a clear, smooth finish, and is highly receptive to embedments and epoxy colorants.
How thick should resin coasters be?
Standard coasters are around 1/4 inch thick. Thicker designs are possible, but ensure the resin is suited for that depth—UltraClear Art & Craft Epoxy is ideal up to 1/4 inch.
Can I use dried flowers in resin coasters?
Yes, but make sure they are fully dried to avoid moisture-related issues. Use a sealant spray before embedding them to preserve color and prevent clouding.
Learn how to prepare flowers and similar items in our guide on the subject.
What’s the best way to clean resin coasters?
Use a soft cloth and mild soap with warm water. Avoid abrasive scrubbing pads or strong solvents, which can dull the finish.
Our guide to cleaning epoxy surfaces has more methods.
How do I get rid of bubbles in resin?
Use a heat gun or torch immediately after pouring to remove surface bubbles. Mix slowly and carefully to avoid introducing too much air in the first place.
See our guide to removing bubbles for more details.
Why didn’t my resin cure properly?
Improper ratios, under-mixing, or incorrect temperatures are common causes. Always mix thoroughly and maintain a workspace around 75°F.
For advice on these issues, see our guide (or contact us):
- Heat & Moisture: A Comprehensive Epoxy Guide
- The 4 biggest mistakes people make when measuring epoxy
- 5 common slip-ups to avoid when mixing epoxy resin

Have Questions? Want Advice? We're Here to Help!
If you have any questions about crafting resin coasters, or if you'd like assistance in planning an epoxy project, please reach out to us at UltraClear Epoxy—our epoxy experts are ready to assist!
You can contact us via phone or email here. During business hours, you can also text chat online with one of our resin specialists by clicking the Help button at the bottom of your screen.
In our online store, you'll find a variety of useful tools and supplies, ideal for resin projects, plus our award-winning UltraClear Bar & Table Top Epoxy and our UltraClear Deep Pour Epoxy.
UltraClear Epoxy—Trusted by over 1 Million+ Happy Customers


