Despite its reputation primarily as a protective sealant, epoxy is also a great medium for artistic endeavors. In its liquid state, epoxy can be shaped and molded in a wide variety of ways, allowing for different creations such as resin coasters, jewelry, sculptures and figurines, and much more.
In this article, we'll be discussing epoxy geode art. Specifically, we'll describe what it is and why many epoxy artists find it appealing. Then we'll provide a basic step-by-step guide to creating some resin geode art of your art.
What is epoxy geode art?
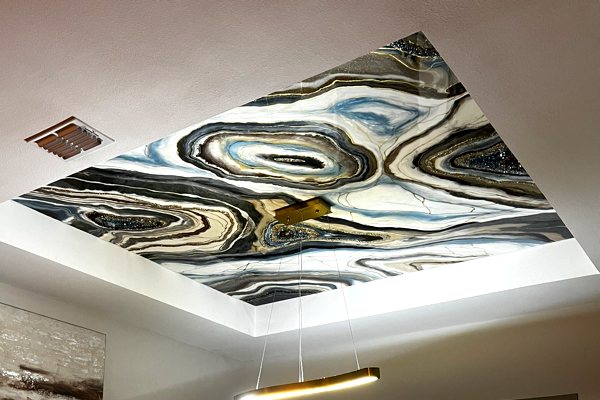
Epoxy geode art is a stunning and creative form of artwork inspired by the natural beauty of geodes—crystalline rock formations often found in nature. There are several aspects that lend to its appeal, such as:
- Aesthetic Beauty: The combination of shimmering metallics, translucent layers, and intricate textures produce striking, eye-catching effects.
- Customizability: Artists can experiment with colors, textures, and embellishments to create unique pieces tailored to their tastes or their clients' preferences.
- Depth and Dimension: The layered nature of epoxy resin gives geode art a three-dimensional appearance, mimicking the structure of real geodes.
- Creative Expression: This art form blends abstract design with the natural inspiration of geodes.
- Versatile Form: Geode art can be created on various surfaces, including canvases, tables, coasters, or wall art, making it suitable for both functional and decorative purposes.
- Sparkling Elegance: The option to use glitter, mica powders, metallic pigments, and crushed glass enables a glamorous, sparkling finish.

What type of epoxy is best for creating geode art?
The ideal type of epoxy for creating geode art depends on the specific requirements of the project, but art epoxy is generally the most suitable option. Here's why and what to look for:
- Medium Viscosity: Art epoxy strikes a balance between flow and control, allowing for easy manipulation of colors and textures without them blending too much or spreading uncontrollably.
- Extended Working Time: A good art epoxy provides enough time (30–45 minutes) to create intricate designs, blend pigments, and position embellishments like crystals and crushed glass.
- Pigment Compatibility: Art epoxy is formulated to work well with a variety of additives, including mica powders, alcohol inks, glitter, and metallic pigments, which are key components of geode art.
- Thin Layer Application: It's also suitable for thin layers—typically between 1/8 to 1/4 of an inch—and can be built up in multiple stages, essential for creating depth in geode designs.

UltraClear Art & Craft Epoxy: A premium epoxy for geode art crafting
When it comes to art epoxy, there's none better than UltraClear Art & Craft Epoxy. Manufactured in the USA, this high-grade art epoxy is produced using premium ingredients to deliver a high-clarity, long-lasting resin that's malleable and easy to work with.
With high production standards and a meticulous production process, UltraClear Art & Craft Epoxy is:
- Crystal-Clear: It cures to a cleanly transparent solid, without cloudiness or discoloration.
- Receptive to Colorants: Users can easily imbue this epoxy with deep or vibrant shades of color, from lowkey neutral tones to bright neons.
- Easy to Use and Maintain: Crafting is a breeze with this epoxy, which uses a streamlined application process that reduces complexity while delivering commercial-grade results.
- Long-Lasting Resilience: Once cured, it becomes waterproof and highly resistant to physical and chemical damage.
For more information, check out the store page of UltraClear Art & Craft Epoxy.

A step-by-step guide to creating epoxy geode art
Before you begin, it's worth noting that this guide is just one of many ways to perform a geode art project. Epoxy is quite versatile, so feel free to diverge from some of the creative aspects of this guide, and remember that practice makes perfect. Don't be disheartened if you make a mistake.
Here's what you'll need to get started on your epoxy resin geode art project:
- UltraClear Art & Craft Epoxy
- Canvas, wooden board, or another sturdy surface
- Acrylic paints or resin pigments (variety of colors)
- Mica powders, glitter, and metallic pigments
- Crushed glass, rhinestones, or crystals (e.g., quartz)
- A heat gun
- Mixing cups and stir sticks
- Painter’s tape (optional)
- Gloves, apron, and safety goggles (recommended)
- Plastic sheeting or a drop cloth for your workspace
Once you've gathered the supplies you need you can get started!

Step #1: Prepare Your Workspace
- Start by choosing a well-ventilated area, free from dust and debris.
- Cover your workspace with plastic sheeting or a drop cloth to protect against spills.
- We recommend that you wear gloves, an apron, and safety goggles to protect yourself during the process.
Step #2: Prepare Your Surface
- For your substrate, select a sturdy base, such as a wooden board or canvas. If desired, tape the edges of the surface to create clean lines and prevent drips.
- Apply a base coat of paint or gesso to prime the surface, then allow it to dry completely.
Step #3: Plan Your Design
It's often very helpful to sketch out your design lightly on the surface using a pencil or chalk. You can outline the “geode” shape and sections where you plan to place different colors, textures, and embellishments.
Step #4: Mix Your Epoxy Resin
- Measure and mix the epoxy resin and hardener according to the manufacturer’s instructions. Stir slowly to avoid bubbles.
- Divide the mixed resin into smaller cups and add your desired pigments, mica powders, or acrylic paints. Stir each color thoroughly.
For a detailed guide plus tips on mixing epoxy, check out our guide.

Step #5: Create the Base Layer
- Pour the pigmented epoxy onto your surface, following your design plan. Use different colors to create the base layer of the geode.
- Blend the colors at the edges using a gloved hand, stick, or brush to mimic natural transitions.
Step #6: Add Veining and Details
- Mix metallic pigments (e.g., gold, silver, or bronze) into the epoxy and use a stick or thin brush to create vein-like lines. These mimic the mineral veins found in real geodes.
- You can soften the veins with a heat gun or hairdryer for a more organic look.
Unfamiliar with epoxy colorants? Check out our FAQs article for answers to common questions.
Step #7: Incorporate Crystals and Textures
- Sprinkle crushed glass, rhinestones, or crystals along certain sections of the design to add depth and texture.
- Gently press them into the epoxy to ensure they adhere as the resin cures.

Step #8: Add Highlights and Glitter (Optional)
- Use glitter or fine mica powders to add highlights and sparkle. Apply these sparingly to avoid overwhelming the design.
- Metallic highlights along the edges of veins or around the crystals enhance the realism.
Step #9: Layer for Depth
- Once the first layer has cured (usually 24 hours), add additional layers of epoxy to create depth. Repeat steps 4–8 with the same or new colors and designs. Each layer adds dimension, giving a three-dimensional effect to your geode.
Step #10: Final Clear Coat
- After all layers have cured, apply a clear epoxy topcoat to seal the design and enhance the glossiness. You can choose to fully cover the textured elements or leave them partially exposed (perfect for wall art that doesn't need to be touched)
- Allow the piece to cure fully, 72 hours minimum.
Step #11: Finishing Touches
- Remove the painter’s tape if used, and sand any uneven edges if necessary.
- Polish the edges or frame the piece for a professional finish.

Tips for Success
- Work Quickly: Resin has a limited working time, so plan and prepare your materials in advance.
- Avoid Bubbles: Use a heat gun or torch to eliminate bubbles in the resin after pouring.
- Experiment: Try different textures and embellishments to find a style that suits you.
- Safety First: Always use resin in a well-ventilated area and follow the manufacturer’s safety guidelines.
Have questions? Want advice? Contact us!
If you have any questions about creating epoxy geode art, or if you'd like assistance in planning an epoxy project, please reach out to us at UltraClear Epoxy—our epoxy experts are ready to assist!
You can contact us via phone or email here. During business hours, you can also text chat online with one of our resin specialists by clicking the Help button at the bottom of your screen.
In our online store, you'll find a variety of useful tools and supplies, ideal for resin projects, plus our award-winning UltraClear Bar & Table Top Epoxy and our UltraClear Deep Pour Epoxy.


