Epoxy That Lasts—And Can Last Even Longer
Epoxy is known for its striking clarity, durable finish, and resistance to daily wear and tear. But even the best coatings—after years of use—can begin to show signs of aging. The good news? You don’t need to start over from scratch.
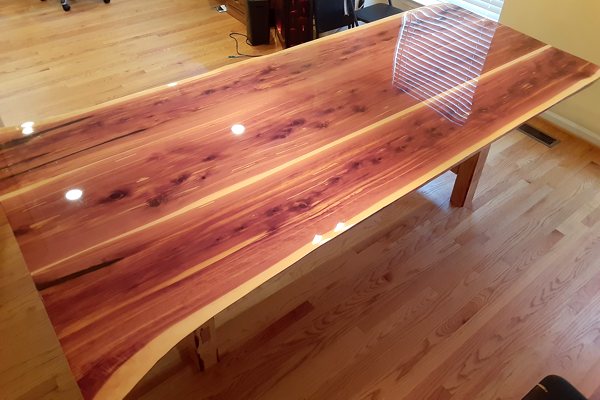
Whether you’re maintaining a busy commercial bar top, a frequently used dining table, or a piece of intricate resin art, epoxy surfaces can be refreshed with a new coating to restore their original shine and strength.
In this guide, we’ll explain:
- Why a refresh might be necessary.
- When the right time is to do it.
- And how to complete the process successfully—step by step.
You'll also learn how to make your new finish last even longer with proper maintenance and why using a high-quality product like UltraClear Epoxy can significantly reduce how often restorations are needed in the first place.

Why You Might Need to Refresh Your Epoxy
While epoxy surfaces are built to endure, they aren’t immune to time, environment, or use. Below are common reasons people choose to apply a fresh epoxy coat, listed roughly in the order they tend to appear over the lifespan of a typical epoxy surface.
#1: Minor Surface Scratches
After several months to a couple of years—depending on use—you may start to notice light scratches, especially on table tops that see regular foot traffic, serveware, or bar activity. These marks don’t always need a full refinishing, but if they accumulate, a refresh can bring back that original smoothness and clarity.
#2: Dulling or Loss of Gloss
Gloss loss usually shows up in medium-use areas after a few years. This isn’t damage, but simply wear on the surface that diffuses light instead of reflecting it. A new topcoat will restore the luster.
#3: Cloudiness from Moisture or Heat Exposure
Improper maintenance or use of low-quality epoxies may lead to hazing or clouding, especially near hot appliances or in high-humidity environments. In these cases, sanding and recoating can restore transparency.
#4: Surface Yellowing from UV Exposure
Low-quality epoxies tend to yellow over time when exposed to sunlight. While this happens more slowly with UV-resistant options like UltraClear Bar & Table Top Epoxy, it can still occur. A fresh layer of clear epoxy can help restore brightness—especially if UV-blocking additives are used.
#5: Chipping or Gouging
After years of heavy use—or an accidental impact—your epoxy surface might show chips or gouges. These are deeper issues, but they can still be repaired and recovered with proper sanding and a new coating.
#6: Outdated or Faded Art in Resin Pieces
For resin art or creative trays and surfaces, sometimes you just want to refresh the look. If the design is intact but faded or coated in a yellowed layer, you can sand the old finish and apply a new, clear topcoat. In most cases, this will renew the appearance, making it look good as new.
Using a premium product like UltraClear Art & Craft Epoxy makes a big difference in how soon and how often you'll need to consider refreshing. Its advanced UV-resistance, high durability, and superior clarity make it ideal for both residential and commercial environments.

Step-by-Step: How to Refresh Your Epoxy Surface
Refreshing your epoxy finish is a straightforward process if done with care. Here’s how to do it right:
Step #1: Clean the Surface Thoroughly
Before anything else, clean the surface with warm water and a mild dish soap to remove grime, grease, or residue. For stubborn areas, use isopropyl alcohol.
Step #2: Assess the Surface
If there are only light scratches or dullness, a light sanding may suffice. But if there are deeper imperfections like gouges or bubbles, you’ll need a more aggressive sand and a full new coat.
Step #3: Sand the Entire Surface
Use 220-grit sandpaper for a light refresh or 120-grit for deeper flaws. The goal is to scuff the surface uniformly so the new epoxy layer can bond. For complex surfaces or resin art, sanding by hand may be needed to preserve contours or embedded materials.
Step #4: Clean Again After Sanding
Use a vacuum or tack cloth to remove sanding dust. Then wipe the surface with isopropyl alcohol and allow it to fully dry.
Step #5: Mix and Apply the New Epoxy Layer
Prepare your epoxy according to the product’s instructions. For most surfaces, UltraClear Bar & Table Top Epoxy is ideal. Pour and spread the resin evenly, then use a torch or heat gun to remove bubbles.
Step #6: Let the Epoxy Cure
Allow the new coat to cure fully—typically 72 hours in stable, climate-controlled conditions. Avoid touching or disturbing the surface during this time.
Special Cases:
-
For Resin Art: Mask off surrounding areas before sanding and pour carefully to preserve fine detail.
-
For Trays and Non-Flat Surfaces: Use a brush or foam roller to apply epoxy evenly. Prop trays at an angle to prevent pooling along the edges.

Maintaining Your Epoxy Finish
Want to delay the need for a refresh? Proper care is key.
-
Avoid Harsh Cleaners: Use mild soap and water or a non-abrasive surface cleaner. Learn more here.
-
Use Heat Protection: Place trivets under hot items—epoxy is heat-resistant, not heatproof. Read about epoxy's handling of heat and moisture here.
-
Minimize UV Exposure: Use UV-blocking window films or avoid direct sunlight where possible. Epoxy can do fine outside with a few safety measures. Click here for more details.
-
Polish Occasionally: Use a plastic polish or automotive-grade compound to restore gloss without recoating. Learn how and when you should polish here.
Following these steps will help your epoxy surface look great for years before needing any restorative work.

The Pitfalls of Budget Epoxies
Choosing a cheap epoxy might save money at first, but it often leads to major issues down the road. Here’s why:
#1: Inconsistent Formulas
Low-cost epoxies, especially those manufactured overseas, often lack quality control. This leads to surfaces that don’t cure evenly or discolor prematurely—especially under heat or sunlight.
#2: Poor Longevity and Finish
Budget brands use lower-grade resins and hardeners that are more likely to yellow, crack, or become cloudy. They may also be prone to peeling or delaminating when another layer is added.
#3: Health and Safety Concerns
Many imported epoxies contain higher levels of VOCs or unregulated additives that can be hazardous during application and curing. This not only increases odor but poses long-term risks in closed environments.\
Learn more about the importance of your epoxy choice here.

The UltraClear Difference—Premium Resin for Premium Results
By contrast, UltraClear Epoxy is made in the U.S.A. and formulated for maximum clarity, longevity, and safety. It’s a superior solution for both initial applications and refinishing work.
Here’s a quick guide to choosing the right UltraClear product when refreshing your epoxy surface:
-
UltraClear Bar & Table Top Epoxy—Ideal for surfaces like dining tables, coffee tables, and bar tops. It cures to a tough, glossy finish that stands up to regular use.
-
UltraClear Deep Pour Epoxy—Best for projects involving thick pours, such as river tables or art with embedded objects. Offers superior depth and clarity.
-
UltraClear Art & Craft Epoxy—Perfect for smaller, detailed work such as trays, coasters, and resin art. Easy to handle and excellent for precision applications.
Each one is engineered for professional-grade results and long-term performance.

FAQs: Epoxy Surface Refreshing
How often should I refresh my epoxy surface?
Most high-quality epoxy finishes last 7 years or more. You should only refresh when the surface shows visible wear like dulling, scratches, or chips.
Can I recoat an epoxy surface without sanding?
No. Even if the surface looks clean, sanding is necessary to create a mechanical bond for the new epoxy layer.
What epoxy should I use to refresh my finish?
For table tops and similar projects, use UltraClear Bar & Table Top Epoxy. For artwork or smaller trays, UltraClear Art & Craft Epoxy is often better suited due to its handling characteristics.
Is polishing better than recoating?
Polishing works for mild dullness or fine scratches. But for deeper flaws, recoating is the only way to fully restore the surface.
Can I change the color or design during a refresh?
Yes! After sanding, you can add new pigments or embedded items before applying the new layer—just make sure everything is clean and dry before pouring.
Have Questions? Want Advice? We're Here to Help!
If you have any questions about refreshing your epoxy finish, or if you'd like assistance in planning an epoxy project, please reach out to us at UltraClear Epoxy—our epoxy experts are ready to assist!
You can contact us via phone or email here. During business hours, you can also text chat online with one of our resin specialists by clicking the Help button at the bottom of your screen.
In our online store, you'll find a variety of useful tools and supplies, ideal for resin projects, plus our award-winning UltraClear Bar & Table Top Epoxy and our UltraClear Deep Pour Epoxy.
UltraClear Epoxy—Trusted by over 1 Million+ Happy Customers


