Capturing the Ocean in Resin
Epoxy is a splendidly versatile material among creatives, capable of transforming any surface into a vivid, high-gloss canvas. One of the more popular artistic uses of epoxy is the ocean wave effect—fluid, motion-rich designs that mimic the look of waves crashing onto shorelines or abstract currents in water.
Whether used to depict detailed seascapes or bold, abstract impressions of nature, this effect taps into epoxy’s unique properties of clarity, depth, and color blending.
In this article, we’ll explore how these epoxy ocean effects are made, what types of UltraClear epoxy are best suited for this style, and the core techniques that artists use to bring waves to life.

The Aesthetic: Color and Motion in Resin Form
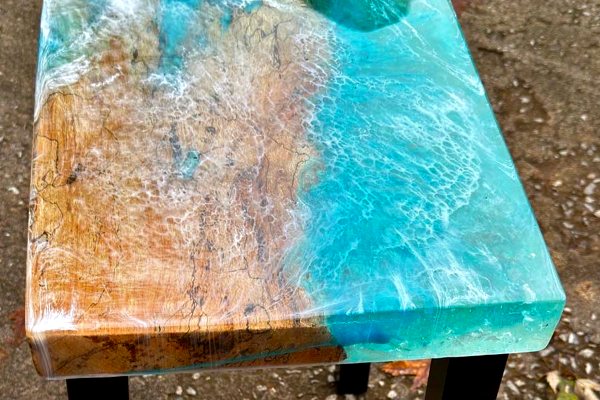
Epoxy ocean wave effects evoke the beauty and energy of the sea, using fluid motion, foamy highlights, and translucent color gradients to create dimension and depth.
While many resin wave projects take inspiration from real-world coastlines—with blues, teals, and whites flowing over sandy beiges—there are no hard rules about color. Resin artists often experiment with bolder palettes: deep purples, iridescent greens, or metallic turquoise hues for fantasy waterscapes.
The layering of colorants, control of flow, and careful use of white pigments to simulate wave crests and lacing are what define the style. Each project is distinct, and this art form gives creators a vast amount of freedom while still remaining visually cohesive and recognizably "oceanic."

Techniques for Creating Epoxy Ocean Effects
Below are the most common techniques artists use to achieve ocean wave effects with UltraClear epoxy resins:

Method #1: Simple Ocean Pour
What It Is:
This technique involves pouring tinted layers of resin to mimic ocean water, using gradual blends from dark to light blues to create a sense of depth. A white wave line is added on top to simulate the crest of a crashing wave.
Steps:
-
Prepare your surface with a seal coat of Table Top Epoxy or Art & Craft Epoxy. The art epoxy may be a better choice for its longer working time. Both are viable, though.
-
Mix separate batches of the same epoxy for each color you want represented (e.g., dark blue, medium blue, turquoise, white).
-
Pour the darkest color at the "deepest" end of your piece and gradually pour lighter shades moving toward the shore.
-
Add a line of white near the lightest blue edge.
-
Use a heat gun to gently blend the transition areas and move the white resin to form natural wave crests.
-
Tilt the surface slightly to control flow and create motion.
-
Allow to cure completely before applying a final clear coat if desired.

Method #2: Lacing (for Foamy Wave Texture)
What It Is:
Lacing refers to the cellular, foamy look created with white resin over colored layers, commonly used to mimic the frothy crest of a wave.
Steps:
-
Begin with a background pour using ocean-toned colorants in UltraClear Art & Craft Epoxy.
-
Mix a small batch of white-tinted epoxy and add a dash of isopropyl alcohol (90% or higher).
-
Pour a thin line of this white mixture where you want the wave crest.
-
Use a heat gun or small torch to stretch and fan out the white resin until cells begin forming.
-
Let the piece rest to allow the lacing to settle.
-
Repeat the wave crest in layers for depth.

Method #3: Resin Beach Scene (with Sand and Texture)
What It Is:
This method includes embedding real or faux sand and building an entire beach scene, complete with shorelines and shallow water.
Steps:
-
Apply a thin base layer of any UltraClear craft epoxy and embedded sand.
-
Once cured, add layers of blue-tinted epoxy for water depth, starting from the edge of the sand.
-
Add a line of white pigmented resin at the shoreline to mimic foam and blend it with a heat gun.
-
(Optional) Embed shells or small beach items in earlier layers before the final pour.
-
Finish with a glossy coat using UltraClear Bar & Table Top Epoxy or UltraClear Art & Craft Epoxy.


Colorant Tips for Ocean Effects
To get the best visual results, use premium pigments designed for epoxy work. Here are some recommendations from Pigmently:
-
Deep Blue Wonder: For deep blue base layers.
-
River Table Turquoise: Adds vibrancy to shallow water sections.
-
Porcelain White: Essential for lacing and crest details.
-
Translucent Resin Dyes: Perfect for building layered transparency.
Other powders, such as Real Royal Blue, can also work to convey those ocean tones. Stick to high-quality pigments to prevent clouding, fading, or chemical reactions that can compromise your finish.

The Budget-Brand Epoxy Problem
Using inexpensive or off-brand epoxy might seem cost-effective at first, but it introduces several significant problems. Budget epoxies—which are typically manufactured overseas—often suffer from poor clarity, unpredictable yellowing, and shorter working times. These products frequently lack quality control and may contain inconsistent resin-to-hardener ratios, leading to failed cures or brittleness over time.
Beyond quality concerns, imported low-cost epoxies can pose health risks. Some contain unknown chemical additives that may release volatile organic compounds (VOCs) during the curing process, especially if not formulated to U.S. standards.
Learn more about epoxy safety and making the right choice here.

UltraClear Epoxy: Premium Resin for Strong, Safe Results
UltraClear Epoxy eliminates these risks. Every batch is made in the U.S.A. under strict quality controls, ensuring reliable results, brilliant clarity, and long-term durability. Its safe and easy to work with, and the resulting cured surface is both easy to clean and resistant to damage—ideal for decorative or functional ocean-themed pieces.
You'll find our resins on the following pages:
- UltraClear Bar & Table Top Epoxy—Our classic epoxy is also the strongest. Featuring a crystal-clear finish and unmatched durability, this is the go-to for all high-traffic surfaces and projects with a large surface area, including countertops, bar tops, conference tables, and more.
- UltraClear Art & Craft Epoxy—This specialized craft epoxy is formulated for small-to-medium projects. It is slightly less viscous than our Table Top Epoxy, allowing users to more easily produce intricate patterns and designs.
- UltraClear Deep Pour Epoxy—Our deep casting resin for thick pours of up to 2 inches. It features a much lower viscosity, allowing it to conform and fill in spaces without trapping in excessive air.

FAQs: Resin Ocean Effects
Question #1: What kind of epoxy is best for ocean effects?
All UltraClear Epoxy resins are viable for ocean effects.
- For small-to-medium projects, UltraClear Art & Craft Epoxy is the best for wave designs due to being easier to manipulate and excellent pigment handling.
- For large projects, such as bar tops and table tops, UltraClear Bar & Table Top Epoxy can also be used.
- For base pours or deeper scenes, UltraClear Deep Pour Epoxy works well.
Question #2: How do you create realistic wave lacing?
Use a white pigmented epoxy with a small amount of alcohol, then stretch it with a heat gun to encourage cell formation. A torch can also be used for a finer effect but requires more care to not damage the resin.
Question #3: Can I add real sand or shells into the resin?
Yes, embed them in a first epoxy layer, then pour subsequent resin layers to build the scene. Ensure everything is dry and clean before embedding.
Question #4: What colorants should I use for ocean tones?
Use Pigmently's mica powders and resin dyes—particularly Deep Blue Wonder, River Table Turquoise, and Porcelain White. Other similar combinations using darker or lighter blue tones work well, too.
Avoid water-based pigments, which don't mix well with epoxy.
Question #5: How long should I wait between resin layers?
Wait until the previous layer is tack-free (typically 4–6 hours), then apply your next layer. In some cases, it's better to let it fully cure, depending on the depth and epoxy type used, at which point you can sand the cured surface and resume the layering.
Question #6: Will the epoxy yellow over time?
High-quality epoxy kept away from regular sun exposure shouldn't yellow over time.
For indoor settings: Low-grade epoxy often yellows even in indoor settings. To avoid this and many other issues, stick with high-quality resins like UltraClear Bar & Table Top Epoxy, which are formulated to not yellow indoors, even after years of use.
For outdoor settings: Any epoxy will eventually yellow if exposed to consistent sunlight without a UV-resistant topcoat (e.g., urethane), though this occurs faster with lower quality resins. UltraClear Epoxy products are designed to resist yellowing for longer.
Question #7: What tools are used to shape waves?
Heat guns and small torches are commonly used to move epoxy and create foam-like patterns. Brushes and silicone sticks can also be used for detail work.
Question #8: Can I use ocean techniques on any surface?
Yes, but it’s best to work on sealed, non-porous surfaces like MDF, wood panels, or primed canvas. Always seal porous surfaces to prevent air bubbles.

Have Questions? Want Advice? We're Here to Help!
If you have any questions about creating resin waves and epoxy ocean art, or if you'd like assistance in planning an epoxy project, please reach out to us at UltraClear Epoxy—our epoxy experts are ready to assist!
You can contact us via phone or email here. During business hours, you can also text chat online with one of our resin specialists by clicking the Help button at the bottom of your screen.
In our online store, you'll find a variety of useful tools and supplies, ideal for resin projects, plus our award-winning UltraClear Bar & Table Top Epoxy and our UltraClear Deep Pour Epoxy.
UltraClear Epoxy—Trusted by over 1 Million+ Happy Customers


