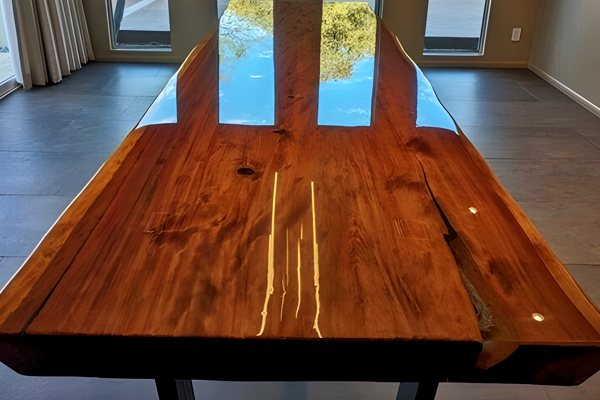
Combining wood and epoxy is a visually striking and practical way to create a table top that blends natural beauty with modern durability. The organic textures of wood pair beautifully with the glossy depth of epoxy resin, resulting in furniture that stands out while standing up to everyday use.
In this guide, we'll explore why these materials work so well together, compare epoxy to other finishes, and explain to you how to build a wooden epoxy table top—even if it’s your first time.

Why Wood and Epoxy Make a Great Pair
Wood offers warmth, grain variation, and natural contours, making each piece distinct. Epoxy complements wood’s organic features by:
-
Sealing and protecting the wood from moisture and wear.
-
Filling cracks, voids, or gaps while maintaining a smooth surface.
-
Highlighting natural grain with enhanced depth and clarity.
-
Adding strength to irregular or reclaimed wood slabs.
Used together, these materials allow you to preserve and celebrate natural imperfections, turning them into visual focal points.

Epoxy vs. Common Table Top Sealants
When sealing a table top, epoxy isn’t the only option—but it often outperforms the rest. Here’s how it compares to other popular finishes:
| Finish Type | Durability | Clarity | Water Resistance | Application |
|---|---|---|---|---|
| Polyurethane (Oil) | Moderate | Warm | Moderate | Brush-on |
| Polyurethane (Water) | Moderate | Clear | Moderate | Brush-on |
| Shellac | Low | Warm | Low | Quick-dry |
| Lacquer | Moderate | Glossy | Low–Moderate | Spray-on |
| Varnish | Good | Yellowish | Good | Brush-on |
| UltraClear Epoxy | Superb | Clear | Waterproof | Pour-on |

Common Styles of Wood-Epoxy Tables
Wood-epoxy tables come in several forms, each offering different aesthetics and construction styles:
-
Clear-Fill Tables: This involves natural slabs with knots and cracks filled with clear epoxy. This type of table focuses on preservation of the wood’s raw appearance while strengthening it.
-
River Tables: A river table is typically two or more live-edge slabs separated by flowing “rivers” of tinted epoxy. A deep pour epoxy like our UltraClear Deep Pour Epoxy is usually needed for thick river veins.
-
Embedded Tables: Wood with embedded objects (e.g., stones, shells) sealed under epoxy for texture and visual depth.
-
Color-Poured Tops: Wood combined with a heavily pigmented epoxy pour, creating contrast or abstract effects. This one is a bit trickier than the others.
-
Conventional Wood-Epoxy Table: The classic epoxy table—a single flat section of wood sealed with clear epoxy for a durable, polished finish.


Step-by-Step: How to Build a Conventional Wood-Epoxy Table
This guide is for a basic wood slab table top sealed with epoxy. It’s ideal for newcomers who want a polished, protective finish without deep pours or complex molds.
Materials:
-
A wooden slab or used table—Oak, walnut, cherry, or maple are good choices.
-
UltraClear Bar & Table Top Epoxy—Our recommend epoxy for most epoxy table projects.
-
Sandpaper between 80 and 220 grit—Using an orbital power sander can make sanding much easier.
-
Plastic sheeting or tarp—For protecting your surfaces during application and curing.
- Paint brush—This is for applying an epoxy seal coat. Any decent brush with around a 2 to 3 inch width will do as long as it doesn't easily shed. We offer a seal coat brush in our store if you're not sure what to use.
-
Mixing containers and stir sticks—Used in preparing each epoxy batch.
-
Nitrile gloves—These will help prevent skin contact with uncured epoxy.
-
Heat gun or propane torch—You'll use this to remove air bubbles right after pouring.
-
Painter’s tape—This can be used to contain the epoxy to where you want it and prevent runoff.
-
Leveling blocks or sawhorses—You can use these to keep the table top even for better self-leveling of the epoxy.
Instructions:
Step #1: Prepare the Wood
-
Dry your slab if it’s not already kiln-dried.
-
Sand both sides of the slab, progressing from 80-grit to 220-grit. If you're using an already constructed table top, just prepare it with a cleaning and light sanding.
-
Remove all dust using a tack cloth or vacuum.
Step #2: Set Up Your Workspace
-
Place your slab on a flat, level surface protected with plastic sheeting.
-
Use painter’s tape to mask off the edges if you don’t want epoxy dripping.
Step #3: Seal the Surface
-
Apply a seal coat using UltraClear Bar & Table Top Epoxy.
-
Brush it on evenly to prevent air bubbles from porous spots.
-
Let it cure for 4–6 hours (until tacky but not fully hardened).
Step #4: Mix the Epoxy
-
Mix a flood coat batch of UltraClear Bar & Table Top Epoxy in a 1:1 ratio.
-
See our mixing guide for detailed advice on preparing epoxy.
Step #5: Pour the Flood Coat
-
Pour the epoxy evenly over the slab or table top.
-
If necessary, you can use a spreader or even gloved hands to distribute it across the surface.
-
Run a heat gun or torch 6–8 inches above the surface to remove air bubbles.
Step #6: Let It Cure
-
Protect the table from dust with an enclosure or dust shield while it cures.
-
Allow 24–72 hours to cure, depending on temperature and humidity.
-
For best results, let it cure for 7 days before heavy use.
Step #7: Final Touches
-
Sand the edges or apply a second coat if needed.
-
Attach legs or mount to the base.

Avoid Budget-Brand Mistakes—Use UltraClear Epoxy
Many budget epoxy brands are inconsistent, yellow with time, or fail to cure evenly. For a professional result that lasts, we recommend using our premium UltraClear Epoxy, which is:
-
Made in the USA
-
Crystal-clear and UV-resistant
-
Incredibly durable with unmatched strength
-
Self-leveling and easy to clean
For surface coatings, use UltraClear Bar & Table Top Epoxy. For deeper pours, such as in river tables, opt for UltraClear Deep Pour Epoxy.

FAQs: Wood and Epoxy Table Tops
Question #1: Can I use softwood for an epoxy table top?
You can, but hardwoods are more stable and durable. Softwoods may require extra sealing to prevent bubbles or movement. Once cured, the superb durability of an UltraClear Bar & Table Top Epoxy finish will compensate for softwood's lower strength.
Question #2: How thick can I pour epoxy?
Different types of epoxy support different layer depths. Here are a few tips:
- For seal coats, which are brushed on and benefit from high viscosity, use UltraClear Bar & Table Top Epoxy.
- For flood coats, which benefit from the highest durability, use UltraClear Bar & Table Top Epoxy.
- For higher-depth epoxy layers—greater than 1/4 of an inch—use UltraClear Deep Pour Epoxy, which can be poured in layers up to 2 inches thick without problem.
Question #3: Will the epoxy change the color of my wood?
Clear epoxy may deepen or slightly enhance the tone, especially with darker woods. Always test a small area first.
Question #4: Do I need to sand between coats?
If more than 12 hours passes between coats, lightly sand the surface to ensure adhesion.
Learn more about applying multiple epoxy layers here.
Question #5: Can I use epoxy on reclaimed wood?
Yes, but ensure the wood is dry, clean, and well-sealed to prevent trapped air or moisture.

Have Questions? Want Advice? We're Here to Help!
If you have any questions about epoxy wooden tables, or if you'd like assistance in planning an epoxy project, please reach out to us at UltraClear Epoxy—our epoxy experts are ready to assist!
You can contact us via phone or email here. During business hours, you can also text chat online with one of our resin specialists by clicking the Help button at the bottom of your screen.
In our online store, you'll find a variety of useful tools and supplies, ideal for resin projects, plus our award-winning UltraClear Bar & Table Top Epoxy and our UltraClear Deep Pour Epoxy.


