Welcome to our guide for basic tools and supplies of epoxy projects!
When planning an epoxy project, you'll want to make sure you have all of the necessary tools and supplies for whatever your goals are.
Each type of epoxy project will have different needs; for instance, an epoxy jewelry project probably won't require a mixing drill bit designed for stirring gallon-sized resin batches, as batches of that size are mostly used for large projects such as interior decor (e.g., an kitchen epoxy countertop).
In this article, we'll be covering some of the most common tools and supplies, explaining their purpose and listing some of the typical project types that make use of them.
Basic tools for epoxy projects
There are actually only a few must-have tools for most projects:

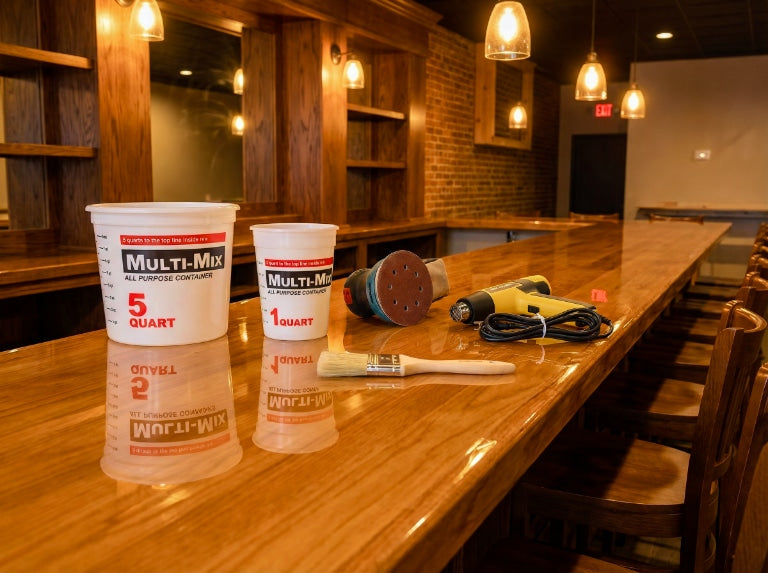
An orbital (electric) sander - Though technically you can sand manually (and this is preferable in rare cases), it's much easier to sand epoxy with an orbital sander.
- Why it's used: The sander is typically meant for preparing a substrate or a partially-cured epoxy surface for another epoxy coating, whether it's our Deep Pour Epoxy or a final flood coat of our Table Top Epoxy. Sometimes you may have blemishes that you need to sand away, as well.
- Additional info: You'll generally want sandpaper meant for your sander with a grit of 200 to 320. These will prepare the epoxy surface best for bonding with additional coats.
- Types of projects it's used in: Epoxy bar tops, table tops, countertops, and generally larger epoxy projects. You wouldn't see this for tiny casting mold projects or items with intentionally bizarre shapes.

An electric drill with a mixing bit - Used for mixing large gallon-sized batches.
- Why it's used: When combining the resin and hardener components of your epoxy at gallon-sized amounts, there simply isn't adequate time to manually stir the epoxy; at the very least, it would take a lot of physical stamina to mix such a large batch in less than five minutes by hand without blending issues. The drill and mixing bit make this much easier.
- Additional info: The drill bit we sell is ideal for this purpose. It's designed for mixing gallon-sized batches, and it doesn't need to be cleaned to be reused for additional batches.
- Types of projects it's used in: Any large project that will require mixing a batch of one gallon in an appropriately large container.


A clean, tight paintbrush - For seal coats—choose one that won't lose bristles.
- Why it's used: The paintbrush is perfect for applying a seal coat to your substrate before you do any deep pours or flood coats. It seals the porous surface area and prevents most of the air bubbles from forming in the thicker coats. When you finally pour you'll have a lot fewer bubbles to pop and deal with.
- Additional info: Make sure you buy a paintbrush that's firm and solid. You don't want to have bristles breakaway and get stuck in the epoxy. They can be removed if you catch it before it hardens, but it's better to just avoid that concern entirely. We sell an appropriate two-inch brush and three-inch brush on our website.
- Types of projects it's used in: Any project that has a surface you need to seal. This is most projects, but especially those made of very porous materials like wood or granite.

A propane torch (or a heat gun) - This will enable you to pop air bubbles that form at the surface of your epoxy flood coats and deep pours.
- Why they're used: When you pour a flood coat or deep pour epoxy layer, there will almost always be some air bubbles that form just at the surface level. This is normal, and they can easily be removed with a propane torch briefly hovering above them.
- Additional info: We recommend the propane torch over the heat gun. Don't linger with the flame or heat gun, as it can cause heat damage to the epoxy; make sure the flame never touches the epoxy directly. If you're uncomfortable using a propane torch, you can use a heat gun instead.
- Types of projects they're used in: Almost all of them. Air bubbles can manifest as a result of stirring, pouring, or improperly sealing your substrate.

Stir sticks - These will help with mixing small batches.
- Why they're used: When you're ready to mix a batch, if it's less than one gallon total, you'll want to use stir sticks. A drill is too forceful at smaller amounts and will pull in air and ruin your batch, so stir sticks are used.
- Additional info: The seal coat is never mixed in a gallon sized batch, so these are perfect for mixing your epoxy seal coat batches. Even when you need a gallon of epoxy to seal a very large project, you'll only mix small batches for seal coats because you need the time to manually brush it on, and a large batch will start curing before you can finish it in one go.
- Types of projects they're used in: All of them. There's almost no project that won't require stir sticks to effectively mix small amounts of epoxy, whether for a seal coat or a small arts and crafts concept.

Space heaters - These are used to provide adequate heating.
- Why they're used: Every epoxy project needs to be climate controlled as much as possible. It's important to maintain a temperature of 75°F while working with epoxy and during curing time.
- Additional info: The heated environment allows the epoxy to properly cure and fully harden. Without it, it may not fully cure, or it won't be as strong when it does.
- Types of projects they're used in: Any project constructed in an uncontrolled climate environment. Space heaters give you the control you need when you don't have central heating available or consistent ambient temperatures in your work area.
Basic supplies for epoxy projects

Here's a list of other supplies that can come in handy:
Graduated mixing containers - These are for mixing the epoxy in.
- Why they're used: Graduated mixing containers have measurement lines on the sides to make it easy to add the correct proportions to your mix.
- Additional info: Containers are not reusable. Each batch you mix needs to be stirred together in a clean, new container to prevent blending or curing problems. We sell five-quart containers for gallon-sized batches and one-quart containers for small batches (such as for seal coats)
- Types of projects they're used in: All of them. Every epoxy project will need containers to mix the hardener and resin components in.
Tyvek tape - Tape like this is used to seal certain surfaces, preventing epoxy from seeping through or bonding with those surfaces.
- Why it's used: Generally, Tyvek tape is used when constructing a temporary dam to control the flow of epoxy and prevent it from flowing onto unintended surfaces. You can peel the tape off later and that area will be clear.
- Types of projects it's used in: Any project that needs to prevent epoxy contact with part of its surface or the surrounding area (e.g., an epoxy penny floor or the sides of certain types of furniture)
Mod Podge - This is used for sealing and protecting embedded objects.
- Why it's used: When you want to embed objects like photos, you'll apply Mod Podge after gluing them to your substrate to protect their appearance. This prevents the objects from absorbing the epoxy directly, like paper tends to do.
- Types of projects it's used in: Projects with fragile embedded objects like photos or paper can benefit from Mod Podge's protective seal.
Silicone caulk - This is used as part of a temporary dam.
- Why it's used: In addition to Tyvek tape, you'll want silicone caulk to fully seal your temporary dam if your project calls for one. This will make sure no epoxy leaks through to surfaces you don't intend to coat.
- Additional info: You can order a solid brand of Silicone caulk from our website.
- Types of projects it's used in: Any project with a temporary dam requirement.
Acrylic caulk - This is for raised edges on countertops, bar tops, or table tops.
- Why it's used: This will allow you to prevent epoxy from leaking through tiny spaces in your raised edges as you pour and allow for curing. It will dry clear, so you can't even see it when the project is finished.
- Additional info: Make sure you let it fully dry (it will be clear at that point). This can take 7-14 days, so plan ahead. You can order acrylic caulk from our website.
- Types of projects it's used in: Projects with raised edges like some epoxy bar tops, table tops, countertops, etc.
Osmo TopOil - This product will be useful for maintaining food-safe wooden surfaces.
- Why it's used: Osmo TopOil can protect wooden surfaces that aren't covered by epoxy (e.g., the food side of an epoxy charcuterie board)
- Additional info: We offer Osmo TopOil on our website.
- Types of projects it's used in: Epoxy charcuterie boards, cutting boards, and similar projects.
...But the most important supply is a good epoxy resin.
These tools are all useful in various ways, but it's the quality of your resin that will determine what you can achieve.
Many resin brands aren't up to par. Some manufacturers cut corners, frequently importing low-quality epoxy resin from places with lax regulatory standards. To avoid ending up with a failed project, it's important to know how to spot these shady dealers so you can avoid them.
Our free ebook, The Ugly Truth About Epoxy Resin: What Companies Don't Want You to Know, explains the different claims and marketing schemes that dishonest sellers use to offload flawed epoxy resin onto unsuspecting customers. By informing yourself on these practices, and learning what to look for, you can make sure you get a high-quality resin that best suits your needs.

Have Questions? Want Advice? We're Here to Help!
If you have any questions about epoxy resin, or if you'd like assistance in planning an epoxy project, please reach out to us at UltraClear Epoxy—our epoxy experts are ready to assist!
You can contact us via phone or email here. During business hours, you can also text chat online with one of our resin specialists by clicking the Help button at the bottom of your screen.
In our online store, you'll find a variety of useful tools and supplies, ideal for resin projects, plus our award-winning UltraClear Bar & Table Top Epoxy and our UltraClear Deep Pour Epoxy.
UltraClear Epoxy—Trusted by over 1 Million+ Happy Customers


