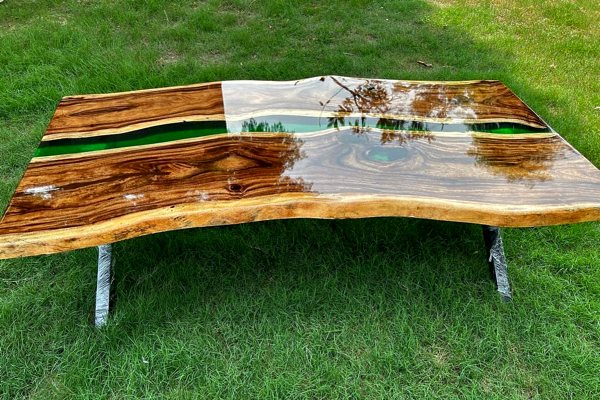
An epoxy coffee table can be a splendid addition to any room, providing comfort and visual appeal. It's also a great choice for your first epoxy table top. Because they're generally smaller than dining tables, they require less work and less epoxy to finish, and they also tend to have a convenient shape that can be handled even by epoxy beginners.
Despite the convenience and elegant simplicity of an epoxy coffee table, we do receive questions about epoxy coffee tables. These questions might be related to planning a project, to performing or customizing one, or perhaps to maintaining an epoxy coffee table once it's finished.
In this article, we'll provide answers to many of these questions. We'll also provide additional resources when possible as we go through each question.

Frequently Asked Questions About Epoxy Coffee Tables
Below is a list of the questions we'll be answering. You can click any of them to jump straight to the answer part.

Question #1: What type of epoxy is best for a coffee table?
For a coffee table, table top epoxy is typically the best choice. It is designed for thin, clear pours and provides a smooth, durable finish that is ideal for furniture surfaces. We recommend UltraClear Bar & Table Top Epoxy. It's a commercial-grade table top epoxy that provides exceptional protection but is also beginner friendly—great for first timers and experienced professionals alike.
If you're creating a design with a thicker epoxy layer, such as a river table effect, you may want to use a deep pour epoxy such as UltraClear Deep Pour Epoxy for the bulk of the pours, followed by a tabletop epoxy for finishing.


Question #2: How do I prepare the wood for an epoxy coffee table?
If the coffee table you'll be finishing is (or will be) made of wood, you can prepare it to achieve a better good epoxy bond. Start by sanding the wood to remove rough spots and create a smooth surface. If using live-edge wood, make sure the edges are sealed with a thin layer of epoxy or wood finish to prevent the resin from soaking into the wood. Clean the wood thoroughly after sanding to remove dust or debris before applying epoxy.
Learn more about using epoxy on wood here.
Question #3: How do I prevent air bubbles in my epoxy pour?
Air bubbles are a common issue when working with epoxy. To avoid them, mix the epoxy slowly and carefully to prevent air from being incorporated into the mixture. After pouring, use a heat gun or torch to pass over the surface and release any trapped bubbles. Make sure to move the tool quickly to avoid overheating the epoxy.
We've written a guide to preventing or removing air bubbles here.

Question #4: How thick should the epoxy layer be for a coffee table?
For a coffee table, the epoxy layer should typically be around 1/8 inch to 1/4 inch thick. This provides a smooth, glossy finish without the need for excessive amounts of resin. For most projects, 1/8 of an inch is perfect, and a single coating of UltraClear Bar & Table Top Epoxy is all that's needed, as it self-levels to 1/8 of an inch naturally. A second layer can be added as desired to achieve a 1/4 inch thickness.
If you're pouring a deeper layer, perhaps for a river effect or a special design, you can use UltraClear Deep Pour Epoxy. It supports up to 2-inch pours and combined total of 6 inches.
For more information on epoxy layer thickness, click here.

Question #5: Can I add color to the epoxy for my coffee table?
Yes, you can customize the color of your epoxy by adding pigments, dyes, or mica powders. Common colors for coffee tables include clear, translucent hues or vibrant pigments for a river table effect. Be sure to mix the colorant thoroughly to avoid streaks, and test a small batch before pouring the full amount to ensure the desired color effect.
Check out our article on mica powder pigments and liquid dyes for a better understanding.

Question #6: How do I ensure a smooth and glossy finish?
Once your epoxy has cured, sand the surface using progressively finer grits of sandpaper, starting from a lower grit (like 120) and moving up to a higher grit (such as 2000) for a smooth finish.
After sanding, use a polishing compound and a soft cloth or variable-speed polisher to achieve a glossy shine. If necessary, apply a final thin layer of epoxy as a topcoat and allow it to cure for an even shinier finish.
You can read our step-by-step guide to polishing epoxy for detailed instructions.

Question #7: How long does it take for an epoxy coffee table to cure?
Epoxy typically takes about 24 to 72 hours to fully cure, depending on the type of epoxy used, the thickness of the pour, and the temperature of the environment. Always follow the manufacturer's guidelines for curing time. It’s important to allow the table to cure in a controlled environment with stable temperature and humidity levels.
Want to achieve a perfect cure? Check out these 5 tips!

Question #8: How do I maintain and clean my epoxy coffee table?
Maintaining your epoxy finish once it has cured is easy. Simply wipe it down regularly with a soft cloth and warm, soapy water to remove dust and debris. Avoid using abrasive cleaners, as they can scratch the surface. If the table is exposed to heavy use and features exposed wood, you may want to apply a wood conditioner or oil to maintain the wood's finish. Finally, be cautious not to place very hot items directly on the table, as high heat can damage the epoxy and wood.

Question #9: Can I use a heat gun or torch on my epoxy coffee table after it’s cured?
After the epoxy has fully cured, it’s generally best to avoid using a heat gun or torch on the surface. However, a heat gun can be used for a final step in removing minor air bubbles during the application process, just after pouring but before the epoxy sets. Once the epoxy is cured, excessive heat can distort the finish or cause damage, so use caution when exposing the cured surface to heat.
When planning a project, it's wise to use high-quality epoxy such as UltraClear Bar & Table Top Epoxy to ensure a clean and strong finish that resists all forms of damage.

Question #10: Can I pour multiple layers of epoxy for my coffee table?
Yes, you can pour multiple layers of epoxy, especially if you're using deep pour epoxy for a thicker river effect. For each layer, ensure that the epoxy is allowed to cure slightly before applying the next to avoid mixing the layers. After the final layer has cured, you may need to sand and polish the surface to achieve a smooth, uniform finish.

Question #11: How do I add a design or decoration into my epoxy coffee table?
You can add various elements like pressed flowers, metal flakes, stones, or even photographs to your epoxy coffee table. Make sure the items are dry and clean before embedding them. Place the items in the epoxy when it is still in its liquid form but before it begins to harden. If you want to layer the design, you may need to pour the epoxy in stages, letting each layer cure slightly before adding the next.
Discover 3 different embedding techniques in this guide!

Have questions? Want advice? Contact us!
If you have any questions about epoxy coffee tables, or if you'd like assistance in planning an epoxy project, please reach out to us at UltraClear Epoxy—our epoxy experts are ready to assist!
You can contact us via phone or email here. During business hours, you can also text chat online with one of our resin specialists by clicking the Help button at the bottom of your screen.
In our online store, you'll find a variety of useful tools and supplies, ideal for resin projects, plus our award-winning UltraClear Bar & Table Top Epoxy and our UltraClear Deep Pour Epoxy.


