A good epoxy normally cures to a transparent solid with glasslike clarity. For most people, this is ideal—something strong and formidable yet also crystal clear, perfect for a range of projects including table tops, bar tops, and more.
However, most epoxy is also highly receptive to colorants, allowing for a wide range of customization through the use of various pigments and dyes. While basic methods for achieving this are straightforward enough, there are also several more in-depth techniques (such as the ocean-wave method) that you can use to create something even more striking or distinctive.
In this article, we'll explain 10 different epoxy coloring techniques, describing how they look, what you'll need, and how to produce them. In the contents below, you'll see a list of all each subject covered in this article. You can jump straight to any technique by clicking on its name.

Achieve amazing color with UltraClear Epoxy
Before you start coloring, you'll need to acquire some epoxy. These days, there are numerous epoxy brands to choose from. Some are great—and some aren't. When selecting an epoxy brand, it's a good idea to choose something reputable and of high quality. Low-quality epoxies—also known as budget brands—are made by compromising on clarity, strength, and longevity.
To ensure a beautiful, long-lasting epoxy creation, we recommend UltraClear Epoxy products. Not only are they designed to last for many years, but they're also made to high standards in durability and clarity, giving you everything you need as a base for customizing to your preferences.
For more information on any UltraClear Epoxy product visit the pages, which are located here:
- UltraClear Bar & Table Top Epoxy—Most conventional projects (table tops, bar tops, countertops) use this type of epoxy, which provides the utmost in protection. Not only is it perfect for high-traffic commercial environements such as restaurant bars, but it's also easy to use, perfect for epoxy DIYers!
- UltraClear Deep Pour Epoxy—This deep casting resin is perfect for producing super-thick epoxy layers, which are especially common in the creation of epoxy river tables.
- UltraClear Art & Craft Epoxy—A specialty epoxy designed for artistic epoxy creations. It's more versatile and less viscous than Table Top Epoxy but doesn't quite reach the same peak strength.

10 Techniques for Applying Color to Epoxy
Technique #1: Solid Color Pours
Perhaps the most common coloring method, the "solid color pour" exhibits a uniform, opaque color across the surface or within a mold. This technique is often used to create bold, vibrant finishes on surfaces like table tops and countertops, or even small items such as coasters.
Colorants Needed:
Epoxy pigments, acrylic paints, or epoxy dye.
How to Achieve:
Mix your chosen colorant thoroughly with the epoxy resin until you achieve the desired color. We recommend starting with a small amount, then adding more until you achieve the desired color—a little goes a long way. Keep in mind that the resulting color may not seem quite as dark after you pour it, as the epoxy will be spread out more.

Technique #2: Translucent or Transparent Layers
Creating a translucent layer of color is typically done with epoxy dyes, though it's feasible with alcohol inks or mica powders as well. When handled properly, the result is a a see-through layer of color that allows the texture or pattern underneath to show through.
Colorants Needed:
Epoxy dye, alcohol ink, or mica powders (in smaller amounts).
How to Achieve:
Add a small amount of dye or ink to the epoxy resin for a subtle, translucent effect. The more you add, the darker and more opaque the epoxy will become.
This is ideal for creating depth and dimension, such as in river tables where the wood grain is meant to be visible beneath the resin.

Technique #3: Marbled or Swirling Effects
This techique can be used to realistically imitate marble patterns or to create vibrant swirls or veins of color that move and blend together, creating a dynamic, fluid appearance.
Colorants:
Mica powders, alcohol ink, or pigment pastes.
How to Achieve:
Pour or drizzle multiple colors of resin onto the surface and use a spatula, heat gun, or torch to manipulate the colors into a swirling motion. You can also layer the colors and allow them to mix naturally or use different pouring techniques to create movement.
Technique #4: Cell Effects
This technique involves generating small, circular patterns (cells) that appear within the resin, often creating a marbled or bubbly texture.
Colorants:
Silicone oil (to create the cells), alcohol ink, and mica powders.
How to Achieve:
Mix alcohol ink or mica powder with epoxy, then add a few drops of silicone oil. Pour the resin, and heat it with a heat gun or torch to create the characteristic cells. This effect is often used for abstract art, coasters, or geode-style designs.

Technique #5: Metallic and Shimmering Effects
Use this method if you want your epoxy to have a metallic sheen. When performed correctly, your finish will have a shiny, reflective surface that catches the light and creates a luxurious look.
Colorants:
Mica powders, metallic pigments, or pearl pigment.
(You can find each of these in the pigment section of our store)
How to Achieve:
Mix metallic mica powders or pigments into the epoxy resin to create a reflective surface. These metallic effects work well for river tables, jewelry making, and any project where you want a high-end, shiny look.

Technique #6: Ocean or Water-Like Effect
This popular coloring technique allows users to give their epoxy a flowing appearance that mimics the look of water, often using different shades of blue or green.
Colorants:
Epoxy dye or alcohol ink in shades of blue, turquoise, or green, along with white or cream for foam effects.
If you're not sure what to use, we suggest:
- Porcelain White—A white pigment perfect for the appearance of wave foam.
- Real Royal Blue—A vivid blue tone to create the appearance of water on the ocean.
- River Table Turquoise—A turquoise tone to give the waves a gradient and a dynamic effect.
For deeper, darker waves, you can use Deep Blue Wonder instead of Real Royal Blue.
How to Achieve:
Layer different colors of blue, green, or white to simulate the look of water, adding some white ink to create foamy or frothy areas. Use a heat gun to help the colors blend naturally. This technique is perfect for river tables, ocean-inspired art, or creating waves in coasters.
We've written a guide specifically for this well-known technique, which you can read here.
Technique #7: Glow-in-the-Dark Effects
A technique similar to the solid color pour, using pigments that glow in the dark after being charged by light.
Colorants:
Glow-in-the-dark pigments or powders.
How to Achieve:
While preparing an epoxy batch, mix some glow-in-the-dark pigments into the resin. These pigments absorb light and emit a glow when the lights go out. This effect can be used for fun, creative projects like night lights, furniture, or custom pieces with a hidden glow.

Technique #8: Gradient or Ombre Effects
This tricky technique use multiple colors, with a smooth transition from one color to another, such as from light to dark or from one hue to another.
Colorants:
Epoxy dyes or alcohol inks in complementary colors.
How to Achieve:
Pour the epoxy in layers, gradually changing the color from one side to the other. You can also tilt the piece to allow the colors to mix and create a gradient effect. This is popular for abstract art and table tops with subtle, gradual color shifts.

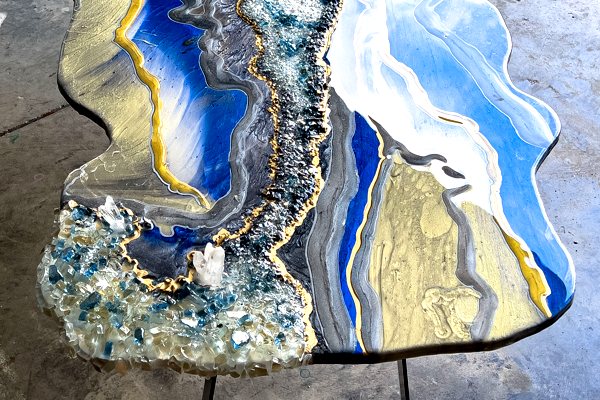
Technique #9: Crackled or Crushed Ice Effects
The crackled or crushed ice effect involves creating a textured, fractured appearance that resembles the look of cracked glass or crushed ice. It gives the epoxy a sense of depth and is often used in abstract art, table tops, coasters, and decorative pieces.
Essentially, the idea is to mimic the texture of ice or glass breaking apart, providing an organic and dynamic feel to the surface.
Colorants:
You can use epoxy dyes, metallic pigments (we have a variety in our pigments section), or crushed glass and other textured materials.
How to Achieve:
Use a base color (often white or clear) and allow the epoxy to partially cure before adding additional colored epoxy. When cured, the epoxy can form cracks or layers that resemble the crackled or frosted appearance.
Technique #10: Pearlescent or Iridescent Effects
Using this method, give your epoxy a soft, pearl-like shimmer with a subtle color shift depending on the light.
Colorants:
Pearlescent pigments or iridescent mica powders.
How to Achieve:
Mix pearlescent or iridescent mica powder into the resin to create a shimmering, light-reflective surface. This effect adds an elegant, sophisticated touch to projects like tabletops, coasters, and jewelry.

Have questions? Want advice? Contact us!
If you have any questions about adding color to epoxy, or if you'd like assistance in planning an epoxy project, please reach out to us at UltraClear Epoxy—our epoxy experts are ready to assist!
You can contact us via phone or email here. During business hours, you can also text chat online with one of our resin specialists by clicking the Help button at the bottom of your screen.
In our online store, you'll find a variety of useful tools and supplies, ideal for resin projects, plus our award-winning UltraClear Bar & Table Top Epoxy and our UltraClear Deep Pour Epoxy.


