Epoxy comes in a variety of different types, and each type is more suited to certain kinds of projects. One of these epoxy types is Art & Craft Epoxy, which is generally used for smaller epoxy projects with a greater focus on versatility and aesthetic design over sheer protection.
Among resins, art epoxy is relatively new, and it's less common than conventional table top epoxy, so it's not unusual for users to have questions about it. Being informed when working with any type of resin is useful, so we'll be answering questions about Art & Craft Epoxy in this article. We'll not only talk about what it is, but also what types of projects it's best for, how to take care of it, and more.

Questions and Answers for Art & Craft Epoxy
Below is a list of the questions answered in this article. You can click any question in the list to jump straight to the answer.

Question #1: What is art epoxy?
Art epoxy, often referred to as art resin or even just epoxy resin, is a clear, two-part liquid that hardens when both parts are mixed together. It's used in various art projects for creating glossy, durable finishes, embedding objects, and creating unique artistic effects. Art epoxy can be mixed with pigments, dyes, or other additives to achieve custom colors and effects.
Art epoxy has become a widely available epoxy product, in volumes both big and small, and of different levels of quality. But for clear, reliable, and long-lasting results, it's recommended that you select a high-quality epoxy such as UltraClear Art & Craft Epoxy to avoid problems brought about by subpar budget brand epoxies, which may cure with blemishes or even fail to cure at all.

Question #2: What are the common types of projects that use art epoxy?
Art epoxy is used in a wide variety of creative projects, including:
- Resin art: It can be used to create abstract designs and effects, often on canvas or wood.
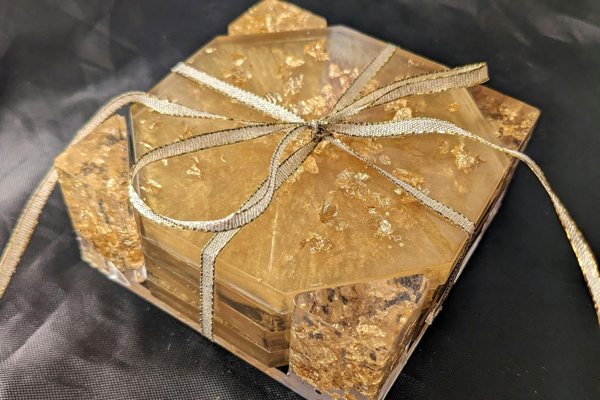
- Small trays and coasters: Epoxy coasters or small serving trays can be made using molds. They can be made solely of epoxy or involve additional materials such as wood. For a striking effect, some users opt to give their work an epoxy river vein as by applying the epoxy (often colored) between pieces of wood.
- Jewelry making: Casting small decorative pieces or embedding items like flowers or stones to create pendants, rings, earrings, etc.
- Coating and finishing: Applying a glossy, durable finish to wood, paintings, or other crafts. This is an effective way to enhance the visual appeal of a work and requires no prior experience.
- Molds and castings: Pouring epoxy into molds to create sculptures, coasters, trays, or other 3D objects.
- Cell art: Using resin with additives to create cells and patterns, often seen in abstract art pieces.

Question #3: How do I use art epoxy for a project?
Using Art & Craft Epoxy involves following some straightforward instructions and doesn't require prior experience.
Here's an example of how typical epoxy projects are performed; depending on your project goals, there may be additional steps to take (e.g., multiple layers):
-
Prepare your surface: Ensure your workspace is clean, dust-free, and at the right temperature (typically between 70-75°F or 21-24°C). Sand and clean any surfaces you’re working with.
-
Mix the epoxy: Follow the manufacturer’s instructions to mix the resin and hardender and hardener in the correct ratio, usually 1:1. Mix slowly and thoroughly to avoid air bubbles.
-
Add pigments or additives: If desired, mix in pigments, dyes, or mica powders for color and effect. (Learn more about mica powder here)
-
Pour and apply: Pour the mixed epoxy onto your project surface. High-quality art epoxy can self-level. However, if it doesn't, or if you want to manipulate the form of it, you can use a spatula or brush to spread it more evenly or reshape it a little. For casting, pour the epoxy into a mold.
-
Remove air bubbles: Use a heat gun or torch to gently pass over the surface to release any trapped air bubbles.
- Allow to cure: Let the epoxy cure according to the manufacturer’s instructions, typically 24-72 hours, before handling or finishing.

Question #4: What safety precautions should I take when working with art epoxy?
While a good quality epoxies are generally considered safe to work with, some users may experience mild irritation on skin contact or a respiratory reaction to any fumes the epoxy emits during curing.
Fortunately, staying safe and clean is easy. Just do the following:
- Wear protective gear: Always wear gloves and goggles to avoid skin and eye contact.
- Work in a well-ventilated area: Make sure you’re in a space with proper ventilation or use a fan to avoid inhaling fumes.
- Protect your workspace: Use a drop cloth or plastic sheeting to protect surfaces from spills and drips.
- Follow manufacturer’s instructions: Always read and follow the safety guidelines and curing times provided by the manufacturer.

Question #5: How do I maintain a project made with art epoxy?
Art & Craft Epoxy is quite resistant to most forms of damage, and maintenance is a simple affair.
Here are some tips:
- Clean gently: Use a soft, damp cloth to wipe away dust and dirt. For deeper cleaning, you can use mild soap and warm water. Avoid harsh chemicals or abrasive cleaners, as they can scratch the surface.
- Avoid extreme heat: Don’t place hot items, such as pots or pans, directly on an epoxy surface, as they can cause damage or discoloration.
- Protect from UV light: If the epoxy is exposed to sunlight, it may yellow over time. Consider using a UV-resistant topcoat to protect your pieces if they will be placed in direct sunlight.
- Restoring your epoxy surface: High-quality epoxies are designed to last for many years and almost never need reapplication. However, if the epoxy gets scratched or becomes dull, you might need to reapply a fresh layer of epoxy to restore the shine and durability of the surface.
Learn more about maintaining your epoxy here.

Question #6: Can I add color or glitter to art epoxy?
Yes, Art & Craft Epoxy is highly receptive to colorants and embedments and can be easily customized by adding pigments, dyes, glitter, or mica powders. These additives allow you to create a wide range of effects, from solid colors to shimmering or metallic finishes.
For colorants, start with a small amount and add more as desired. Always mix it in thoroughly to ensure even distribution throughout the resin.

Question #7: How long does art epoxy take to cure?
The curing time for Art & Craft Epoxy typically ranges from 24 to 48 hours, at which point it is safe to touch, but full curing can take up to 72 hours depending on the quality of the epoxy and the thickness of the pour. The curing time can also be affected by temperature and humidity. It’s important to allow the epoxy to cure fully before handling or applying additional layers.

Question #8: Can I fix mistakes or imperfections in cured art epoxy?
Yes, if you notice imperfections such as bubbles, cloudy spots, or uneven surfaces, you can fix them.
Once the epoxy has fully cured, sand the surface with progressively finer grits of sandpaper (starting with 120-grit and moving to 2000-grit) to smooth out any imperfections. After sanding, you can reapply a thin layer of epoxy to create a smooth, glossy finish. This will also help fill in any small scratches or blemishes.

Question #9: Can I use art epoxy on outdoor projects?
While art epoxy is durable, it's not always recommended for long-term outdoor use unless it is specifically formulated for outdoor exposure. Outdoor conditions such as sunlight, moisture, and temperature fluctuations can cause some epoxy to degrade, discolor, or lose its shine. If you plan to use art epoxy outdoors, use a premium epoxy such as UltraClear Art & Craft Epoxy, and consider providing shade or shelter to your resin art to protect it from direct sunlight.

Question #10: What are some tips for creating resin art on a canvas?
When creating resin art on a canvas, there are a few things you can try:
- Prime the canvas: Apply a base coat of paint to your canvas if you want a colored background before pouring the resin.
- Control the pour: Use a spatula or a brush to guide the resin onto the canvas. If you want to create cells or unique patterns, experiment with different pouring techniques or add silicone oil for special effects.
- Keep the surface level: Ensure the canvas is level while the epoxy cures to prevent uneven pooling or drips.

Question #11: How does art epoxy differ from table top epoxy?
Art & Craft Epoxy is slightly less viscous than Table Top Epoxy, allowing for slightly thicker layers and letting it flow more smoothly. Additionally, its different formulation results in less durability but more versatility.
Because it isn't as strong as table top epoxy, however, we don't recommend it for bar tops, table tops, or countertops. For those, table top epoxy is better.

Have questions? Want advice? Contact us!
If you have any questions about art epoxy, or if you'd like assistance in planning an epoxy project, please reach out to us at UltraClear Epoxy—our epoxy experts are ready to assist!
You can contact us via phone or email here. During business hours, you can also text chat online with one of our resin specialists by clicking the Help button at the bottom of your screen.
In our online store, you'll find a variety of useful tools and supplies, ideal for resin projects, plus our award-winning UltraClear Bar & Table Top Epoxy and our UltraClear Deep Pour Epoxy.


