Epoxy table tops have become a staple piece of furniture in many homes throughout the U.S. The combination of epoxy's unmatched durability and its crystal-clear transparency, along with a highly receptive nature to customization through colorants and embedments has provided users with many new ways to finish their table top surface, even with materials that were previously incompatible.
In this extensive guide, we'll explain the appeal behind epoxy finishes, comparing them to other conventional options in the process. We'll then provide a step-by-step guide to coating a table top of your own with epoxy—including how to choose a work area, what to expect and the supplies you'll need for a standard epoxy table project.
Finally, we'll also talk about the ideal epoxy to use for long-lasting results, provide some tips on maintaining your finish, then give answers to a variety of common questions about table top epoxy finishes.
An Introduction to Epoxy Finishes
Epoxy resin is a two-component system that cures into a hard, durable, and glass-clear surface when mixed together. It was originally developed for industrial applications in the 1930s but eventually found its way into furniture finishes in the late 20th century, where it became valued for its beautiful aesthetic and ease of application.
Today, epoxy is a top-notch solution for sealing and enhancing table tops due to its versatility, strength, and aesthetic qualities. It provides a modern finish that complements both rustic and contemporary designs, making it an increasingly popular choice among DIYers and professionals.

Why Choose an Epoxy Table Top?
Here are some key benefits that make epoxy an outstanding finish for table tops:
-
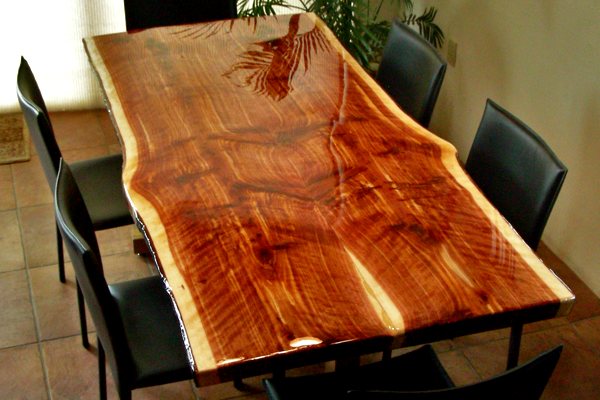
Crystal-Clear Finish – Epoxy creates a smooth, glass-like surface that highlights the natural grain and beauty of the underlying material. For example, wood with dramatic grain patterns or live-edge slabs are made more striking when coated in clear epoxy.
-
Durability – Once cured, epoxy is highly resistant to scratches, impact, and abrasion, making it ideal for everyday table use in households or commercial spaces.
-
Water Resistance – Unlike other finishes, epoxy creates a fully waterproof seal. Spills won't seep into the surface, preventing staining or warping over time.
-
UV-Resistant Formulas – High-quality epoxies, such as UltraClear Bar & Table Top Epoxy, include UV inhibitors that slow yellowing and preserve clarity even in bright environments.
-
Adhesion to Various Materials – Epoxy bonds well with wood, metal, concrete, and more. This makes it incredibly versatile for unique table top designs.
-
Ease of Cleaning – The resulting non-porous surface of epoxy allows for quick wipe-downs. Dirt, grime, and food residue are easily removed without heavy scrubbing.
-
Customizable Aesthetic – Epoxy can be left clear, tinted with dyes, or swirled with pigment powders for a stunning artistic effect.

Epoxy vs. Other Table Top Sealants
While epoxy is not the only finishing option for table tops, it outperforms most alternatives in several key areas. Traditional sealants like polyurethane, lacquer, and varnish offer some protection, but they fall short in terms of durability, moisture resistance, and clarity.
| Feature | Polyurethane | Lacquer | Varnish | Epoxy Resin |
|---|---|---|---|---|
| Durability | Good | Fair | Fair | Excellent |
| Water Resistance | Moderate | Low | Moderate | Waterproof |
| Finish Clarity | Slightly ambered | Often yellowing | Moderate | Crystal clear |
| Ease of Maintenance | Moderate | Difficult | Moderate | Easy |
Epoxy, particularly UltraClear Bar & Table Top Epoxy, delivers a superior all-around performance for both protection and visual appeal.


Customizing Your Epoxy Table with Colorants
By default, any decent epoxy will cure to a clear, transparent finish, without any color or tinting. For many users, that's the goal—a finish that showcases the underlying material (such as wood) without obscuring it. But epoxy can also be customized with deep or vibrant colors through the use of dedicated pigments and dyes.
Before we delve into the how-to section of this guide, it's worth taking a look two distinct ways you can infuse your epoxy finish with color.
There are two common types of epoxy colorant:
-
Epoxy Powder Pigments—These are mica-based powders that give the epoxy opaque tones with a gentle, light-reflecting shimmer. They're an exceptional option in river table projects or resin art and are also great for generating swirls, metallic finishes, and multi-color blends.
-
Resin Dyes—These liquid colorants provide epoxy with a solid yet translucent color tone. The opacity of this color is affected by how much dye is used—more dye results in a darker, more opaque tint. Resin dyes are perfect for uniformly tinting the entire pour without the shimmering effect inherent in powder pigments. They can be used in moderation to create a "see-through" stained-glass look or generously applied to produce opaque coatings for a bolder design.
In most cases, the chosen colorant is mixed directly into the epoxy batch just before pouring it. Both types are highly concentrated, too, so even a small amount can add a vivid splash of color to your epoxy batch.
In our store we offer the Pigmently Collection of powder pigments and resin dyes. All of them are compatible with UltraClear Deep Pour Epoxy and UltraClear Bar & Table Top Epoxy. When choosing, consider your aesthetic goals: use pigment powders for sparkle and visual movement, and resin dyes for strong, vivid color.
For more information on epoxy colorants, take a look at our guide here.

How to Finish an Epoxy Table Top from Beginning to End
Performing a DIY epoxy table project isn't necessarily complex or difficult, but it does require following each instruction to the letter. If you're new to epoxy, be sure to read over each section here to make sure you're prepared at every step of the way.
Materials and Supplies Checklist
Required:
-
UltraClear Bar & Table Top Epoxy—Provides a crystal-clear, self-leveling finish.
-
Mixing containers—Essential for accurate resin-to-hardener ratios.
- Two-inch or three-inch paint brush—You'll use this to apply an epoxy seal coat prior to the flood coat.
-
Stir sticks or a drill with a mixing paddle—For thorough blending.
-
Heat gun or propane torch—Used to remove air bubbles after pouring.
-
Painter's tape—Prevents spills and defines edges.
-
Protective gloves and goggles—For safety during mixing and pouring.
The Epoxy Tool Kit offered in our store is a convenient to get many of these supplies bundled together. You can also acquire them individually in many places, such as your local hardware store.
Optional:
-
Pigments or dyes—For creative coloring effects. You can obtain high-grade powder pigments and resin dyes from our online store.
-
Leveling device—Ensures your surface is perfectly flat.
-
Moisture meter—Checks wood moisture content before sealing.
-
Clamps or weights—Used in DIY table top construction.

Preparing Your Workspace
An ideal environment for epoxy work is a clean, enclosed, and temperature-controlled room (70–75°F). Good ventilation is essential, but avoid strong drafts that could stir up dust. A clean concrete floor or plastic sheeting can catch drips. For lighting, bright overhead lights are key to spotting bubbles or dust.
If you don’t have a perfect space, make do by using an enclosed garage or spare room. Avoid working outdoors unless it's dry, warm, and free of debris.
Here are some additional tips for preparing:
- Lay down a tarp, control the temperature with a space heater or AC, and use a fan-filter combo to minimize dust.
- Running a dehumidifier if you're in a humid climate.
- Creating a dust tent using plastic sheeting to minimize airborne particles.
-
Covering the poured epoxy during curing with a protective box or frame to keep debris off the surface.

A Step-by-Step Guide to Creating an Epoxy Table Top
Step #1: Prepare the Surface
Ensure your table top is clean, flat, and dry. Sand to 120–220 grit for optimal adhesion. Remove all dust with a vacuum and tack cloth.
Step #2: Seal Coat
Once your surface is ready, it's time to apply an epoxy seal coat. Simply brush on a thin layer of epoxy with a paintbrush. We recommend a brush with a two or three inch width.
The seal coat will greatly reduce air bubbles formation during the flood coat phase. This is especially helpful for porous materials like oak or pine that contain a lot of air.
Learn more about seal coats and why they matter so much here.
Step #3: Mix the Epoxy
Wait 4 to 6 hours for the seal coat to partially cure. If more than 10 hours pass after the seal coat application, lightly sand the surface before moving onto the flood coat phase.
Now, it's time to prepare your flood coat batch. Carefully measure out the amount of epoxy you need—make sure to follow the manufacturer’s ratio exactly. For instance, UltraClear Bar & Table Top Epoxy uses a 1:1 ratio of each component.
Once you've measured out your batch, begin mixing it. For batches of less than a gallon, do so manually using stir sticks. Mix slowly and gradually.
For large batches of a gallon or more, you can use a power drill with a mixing bit to reach an even blend without taking too long or becoming fatigued. Keep the drill bit fully submerged to avoid inducing air into the mixture.
Regardless of which method you use, you should scrape the sides and bottom of the mixing container with a stir stick occasionally (at least once a minute) to prevent any of the resin from settling.
Get tips on mixing and ways to avoid common mistakes here.

Step #4: Pour the Epoxy
Start at the center and work outward. UltraClear Bar & Table Top Epoxy is a self-leveling formula, and it will do most of the work for you.
You can use a notched spreader or trowel to achieve an even distribution faster if needed; this can be helpful for very large projects to avoid exceeding the working time (amount of time before the epoxy has started curing).
See our guide to pouring here for more details.
Step #5: Remove Bubbles
Once the flood coat has been applied, you can begin removing air bubbles from the coating. Guide a heat gun or propane torch over the entire surface from a distance 6–8 inches in smooth, gradual movements.
For optimal results, perform your initial pass immediately after pouring and a second pass after 10–15 minutes. After each pass, examine the coating closely and at different angles to see if you missed any bubbles. It's far easier to remove them early than after the epoxy has partially or fully cured.
We've written a guide to removing air bubbles—check it out here!
Step #6: Let It Cure
After performing bubble removal, allow the epoxy finish to cure in a dust-free area. A fully usable cure takes about 72 hours, sometimes more if the climate isn't right, but it becomes tack-free (touchable—not usable) in 12–24 hours.
Once the epoxy has hardened at surface level, it will continue to cure internally for about two weeks. Peak hardness is typically reached at this point.
For guidance to achieving a perfect cure, see our specialized guide.

Step #7: Optional Second Coat
Sometimes mistakes happen, or you want a thicker finish. In such cases, you can often just apply another layer of epoxy to fix defects or provide added depth.
For a thicker finish or if imperfections occurred, sand the surface lightly and reapply following the same steps.
Our in-depth guide to layering epoxy will help you through this process—and provide alternatives. See our troubleshooting guide for advice on fixing various epoxy problems.

Why Choice Matters: The Real Cost of Budget Epoxies
Throughout the epoxy industry are numerous low-cost "budget-brand" epoxy products. These resins are designed to appear attractive due to price, but they carry serious risks. These products often come imported from facilities lacking stringent quality controls, resulting in inconsistent hardening, strong odors, and yellowing over time. Some even contain unknown additives that can affect long-term safety and durability.
Many budget brands lack proper safety data sheets, raising questions about the ingredients used. Off-gassing can linger for weeks, and the final cured surface may remain tacky, soft, or brittle, making it unsuitable for table top use.

The Long-Term Benefits of UltraClear Epoxy
By contrast, UltraClear Bar & Table Top Epoxy is proudly made in the U.S.A. under strict production standards.
With any UltraClear Epoxy product, you can expect:
- A crystal clear, ultra-durable finish that resists clouding, yellowing, and chemical damage.
- A low-maintenance, waterproof seal with an easily cleaned surface that saves you time and energy.
- Reliable customer support from our resin experts, straightforward documentation, and peace of mind.

Tips for Finish Longevity and Surface Restoration
A properly applied epoxy table top can last 10–20 years with minimal upkeep. To keep your epoxy finish in pristine condition, you should:
-
Use non-abrasive cleaners to deal with messes. Epoxy's super-smooth surface can be easily cleaned with mild soap or cleaning products.
-
Wipe away spills quickly.
-
Keep the table out of direct sunlight if not UV-protected.
For restoration, lightly sand the surface and apply a fresh flood coat of UltraClear Bar & Table Top Epoxy. This restores the high-gloss appearance and clarity without requiring a full rebuild.
3 Methods for Maintaining Your Epoxy Table Top
Because of its smooth texture and waterproof seal, an epoxy surface rarely requires anything more than basic household cleaning supplies for maintenance.
The following three cleaning methods will cover nearly any situation:
For Routine Cleaning: Use a damp microfiber cloth and a mild dish soap solution. Avoid harsh chemicals like ammonia, bleach, or abrasive scrubs.
For Stubborn Messes: Apply isopropyl alcohol (70–90%) to a cloth for sticky residues. Let it sit for a minute before wiping.
For Deep Cleaning: Use a mix of warm water and white vinegar for a deep clean. Follow up with a dry microfiber cloth to avoid streaking.

Frequently Asked Questions for Epoxy Table Tops
Below, we've chosen a selection of common and some uncommon questions we've been asked about handling epoxy and its capabilities.
Question #1: Can I use epoxy on outdoor tables?
Yes, but use a UV-resistant epoxy or apply a protective topcoat if it will be exposed to harsh sunlight.
Discover other methods to preventing yellow and UV-damage here.
Question #2: How thick should my epoxy layer be?
A standard flood coat is 1/8 inch; this is the depth that UltraClear Bar & Table Top Epoxy self-levels to. If a thicker finish is needed, you can apply it in multiple layers.
For high-depth pours, use UltraClear Deep Pour Epoxy, which supports layers of up to 2 inches thick without curing problems.
Get more details about epoxy finish thickness here.
Question #3: What causes bubbles in the epoxy?
Mixing too quickly, pouring it over unsealed porous wood, or working in cold environments are common causes of bubbles.
To avoid these issues, always apply a seal coat to your substrate, adhere to proper mixing guidelines, and perform your project in a controlled environment.
Question #4: Is epoxy food-safe?
Once fully cured, UltraClear Epoxy products are food-safe.
Question #5: Can I use color pigments?
Yes, epoxy can be colored in a variety of ways.
The easiest methods are to use mica powders or resin dyes designed for epoxy. Simply mix these into your batch thoroughly before pouring. Start with a small amount, then add more until the desired tone is reached.
Question #6: Why did my epoxy stay sticky?
This most likely occurred due to an incorrect mixing ratio or using poor-quality resin. Always measure precisely and use a high-grade resin like UltraClear Bar & Table Top Epoxy.
Question #7: Can I epoxy over an old table top?
Absolutely—in fact, this is a very popular use for epoxy, allowing users to bring new life to beloved tables. Sand it thoroughly to remove any finish and ensure a good bond with the new epoxy layer.
Question #8: What's the best way to remove dust during curing?
Use a plastic tent or dust shield and avoid working in open, windy areas.
Question #9: Do I need to use a topcoat over epoxy?
Not usually, but for UV protection or added gloss, a urethane topcoat may help.
Question #10: How do I fix a scratched epoxy surface?
Sand lightly and buff with polishing compound, or apply a thin recoat of epoxy.
Question #11: How long should I wait before using the table?
Wait at least 72 hours for fully usable cure. For heavy use, allow 5–7 days. Epoxy will fully harden internally over the course of about 2 weeks.
Question #12: Can I install hardware or legs before curing is complete?
No. Wait for full cure to prevent impressions or bond failure.

Have Questions? Want Advice? We're Here to Help!
If you have any questions about epoxy table tops, or if you'd like assistance in planning an epoxy project, please reach out to us at UltraClear Epoxy—our epoxy experts are ready to assist!
You can contact us via phone or email here. During business hours, you can also text chat online with one of our resin specialists by clicking the Help button at the bottom of your screen.
In our online store, you'll find a variety of useful tools and supplies, ideal for resin projects, plus our award-winning UltraClear Bar & Table Top Epoxy and our UltraClear Deep Pour Epoxy.
UltraClear Epoxy—Trusted by over 1 Million+ Happy Customers


