The Beauty of Epoxy—and the Bubble Problem
Epoxy is a favorite among DIYers, artists, and professional craftspeople for its clarity, durability, and ability to elevate a surface with a polished, high-gloss finish. Whether you're coating a table top, pouring a river table, or creating fine detail artwork, epoxy delivers results that are both protective and stunning.
However, if not handled correctly, one common and frustrating problem can arise: air bubbles trapped in the finish. These bubbles can compromise the appearance and even the durability of your project.
This article will walk you through the causes of air bubbles in epoxy resin, how to prevent them from forming, and what to do if you notice them in a freshly poured or fully cured surface.

Contents(Click any link to jump to that section) |
Why Cheap Epoxies Are More Prone to Bubble Problems |

How Do Epoxy Bubbles Form?
Air bubbles in epoxy can originate from multiple sources, and understanding these is the first step toward preventing them. Some of the most common causes include:
-
Outgassing from wood or porous surfaces: If wood is not sealed properly before a pour, it can release trapped air into the epoxy.
-
Improper mixing technique: Mixing too vigorously or too quickly can introduce air into the resin.
-
Cold or fluctuating temperatures: Epoxy becomes thicker in cool temperatures, which makes it more likely for bubbles to become trapped.
-
Pouring too thickly with the wrong epoxy: Bar & Table Top formulas are only designed for 1/8 inch pours or less—pouring thicker than that can trap air and generate heat, leading to bubbling.
-
Moisture contamination: Pouring epoxy in high humidity or over damp surfaces can cause foaming or bubble formation.
-
Mixing incompatible additives: Some colorants, metallics, or foreign materials can react with the resin or introduce bubbles. Stick with compatible options like epoxy powder pigments or epoxy resin dyes. Learn more in our coloring guide.
These bubbles aren’t always just a cosmetic flaw—they can weaken the structure of a finish or lead to future chipping and delamination.

How to Prevent Bubbles from Forming
To stop bubbles before they start, you need to take a proactive approach throughout the preparation and application process. Prevention is always easier and more effective than repair when it comes to epoxy finishes.
Seal Porous Surfaces
Our first—and arguably most important— advice is to seal your substrate surfaces.
Wood and other porous materials tend to release trapped air when epoxy is applied. This is known as outgassing. To prevent it, apply a thin seal coat of UltraClear Bar & Table Top Epoxy before your main pour; UltraClear Art & Craft Epoxy will also work. This coat acts as a barrier, soaking into the pores and hardening to block future air release.
Allow the seal coat to cure partially (to a tacky state—not fully hardened) before continuing with the main layer; this is typically 4 to 6 hours. This give the seal coat time to seep in and displace the air within the pores of the substrate material.
The seal coat process is especially important for live-edge slabs, reclaimed wood, or softwoods like pine or cedar, which will contain numerous pores.

Mix Slowly and Thoroughly
When combining the resin and hardener, mix at a slow and steady pace for 3 to 5 minutes. Use a flat-bottom stir stick—such as a paint paddle, silicone spatula, or dedicated plastic stir stick—and consistently scrape the sides and bottom of the container to ensure complete incorporation.
While blending, avoid whipping or rapid stirring, which can induce tiny air pockets into the mixture. Proper mixing not only prevents bubbles but also ensures the chemical reaction is balanced for optimal curing and strength.
Warm the Resin (Slightly) If Needed
If your environment is below room temperature (typically under 70°F), your epoxy will be more viscous and prone to trapping air. To reduce this risk, place your sealed resin and hardener bottles in a warm water bath (90°F–100°F) for 10 to 15 minutes before mixing. Doing so thins the formula, allowing bubbles to escape more easily during the mixing and pouring stages.
Be sure to dry the bottles thoroughly before opening them to prevent introducing moisture into the mix.
Learn more about how temperature affects epoxy at each stage of the process here.
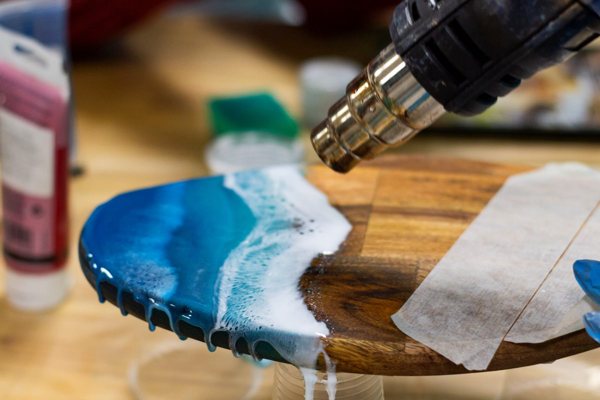
Use a Proper Heat Source
Once you’ve poured the epoxy, pass a propane torch or heat gun over the surface to remove surface bubbles. Use smooth, sweeping motions about 6–8 inches above the resin. The heat causes the bubbles to expand and rise, where they then pop at the surface.
It’s best to do this a few times within the first 30 minutes after pouring. Avoid holding the heat source in one spot too long (no more than 1 second), which could scorch the resin or cause uneven curing.

Pour in Ideal Conditions
Your working environment has a big impact on epoxy behavior.
- Aim to pour in a clean, dust-free area with stable temperatures between 70°F and 80°F.
- Avoid pouring when humidity exceeds 60%, as moisture in the air or on surfaces can cause bubbling, haziness, or poor adhesion.
- If needed, use a space heater or dehumidifier to stabilize the environment. Proper ventilation will also help disperse fumes and reduce curing irregularities.
A good environment helps achieve that iconic pristine finish—get advice here.

Avoid Overmixing or Mixing Too Vigorously
One of the most common beginner mistakes is mixing too quickly in an attempt to save time. This traps air and creates a frothy resin mixture that can be hard to de-bubble later.
Instead, pace yourself and stick to the recommended mixing times provided by the manufacturer. It's far better to mix a bit longer at a slow pace than to rush and compromise the finish.
Let the Resin Sit Before Pouring
In some cases, after mixing, it can be good to let the epoxy sit for 2 to 3 minutes in the mixing container before pouring. This short resting period gives many of the microbubbles a chance to rise to the surface and pop on their own. This works better with epoxies that have longer working times such as our UltraClear Deep Pour Epoxy and our UltraClear Art & Craft Epoxy.
You can also use this time to check the viscosity and ensure the resin is flowing well before applying it to your surface.

How to Remove Bubbles Before Curing Is Complete
If you catch the bubbles early—within the first few hours of pouring—you can usually fix them with ease:
Option #1: Apply Heat Again
Use a heat gun or torch to re-pass over the surface in overlapping strokes. This reintroduces gentle surface tension disruption, encouraging any air bubbles that may have developed after the initial pass to rise and burst.
Focus on trouble spots with visible bubbles, and avoid lingering in one place for too long—excess heat can lead to yellowing or uneven texture.
Option #2: Pop Bubbles Manually
For isolated bubbles that resist popping with heat—especially those near embedded items or edges—use a toothpick, fine pin, or small detailing tool to pierce the bubble carefully. This breaks the bubble's surface tension manually.
After doing so, follow up with another quick heat pass to help the resin level out over the area.
Option #3: Wait and Watch
Air bubbles often continue to rise for the first 30 to 60 minutes after the pour. During this window, monitor your project closely. Periodically apply a heat pass to help address newly surfaced bubbles.
This watchful approach increases your chances of catching issues before the epoxy begins to harden, and even though it does add more work into the process, it's worth it for those projects you want to keep around for a long, long time.

How to Remove Bubbles After the Epoxy Has Cured
If bubbles are discovered after the epoxy has hardened, your repair method will depend on the severity and location of the bubble.
Option #1: Spot Sand and Recoat
Try this technique if your issue is surface bubbles or dimples:
-
Lightly sand the area using 320- to 600-grit sandpaper to remove the blemish and "feather" the surrounding surface.
-
This means gradually blending the edges of the sanded area into the surrounding, unsanded epoxy. Doing so helps ensure a smooth, seamless transition between the repaired area and the rest of the surface so that no sharp ridges or visible borders are left after recoating.
-
You'll want to sand slightly beyond the actual defect or bubble, applying lighter pressure as you move outward. The goal is to avoid creating a noticeable patch once the new layer of epoxy is applied—ensuring it levels evenly and appears uniform once cured.
-
-
Wipe the surface clean with a lint-free cloth dampened with isopropyl alcohol.
-
Apply a thin flood coat of UltraClear Bar & Table Top Epoxy to restore the gloss. This fresh layer will level out the surface and hide the previously sanded area.
This method works best for small, shallow bubbles that do not penetrate multiple layers.
Option #2: Deep Sanding and Layering
For larger bubbles or voids that penetrate deeper:
-
Begin with a coarser grit, such as 120 or 150, to grind down to the base of the bubble.
-
Clean the area thoroughly and ensure it's dust-free.
-
Apply a small amount of UltraClear Deep Pour Epoxy if depth is needed, or patch the area with UltraClear Bar & Table Top Epoxy.
-
Once the patch has cured, sand the area flush and apply a final flood coat to blend the repair seamlessly.
This technique is especially helpful for river tables or projects with embedded objects.
Option #3: Full Surface Re-coating
If bubbles are widespread and numerous:
-
Sand the entire surface evenly with 220–400 grit sandpaper.
-
Clean thoroughly to remove any sanding residue.
-
Recoat the full top with UltraClear Bar & Table Top Epoxy, following standard pouring and leveling procedures.
While more labor-intensive, this method ensures that the final surface will be completely smooth and visually consistent.

Why Cheap Epoxies Are More Prone to Bubble Problems
Budget epoxies may seem tempting, but they often create more problems than they solve—bubbling included. Many low-cost options are made overseas with little quality oversight, and they frequently use inferior raw materials that don’t mix well or cure consistently.
These lower-tier formulas tend to:
-
Trap bubbles more easily due to poor self-leveling properties.
-
Yellow faster due to lack of UV inhibitors.
-
Fail to fully cure, leaving soft or tacky spots.
In addition, imported epoxies may not meet U.S. safety or emissions standards. Some contain unregulated solvents that emit noxious fumes or present long-term health risks to users.

UltraClear Epoxy: Premium Resin for Bubble-Free Results
In contrast, UltraClear Epoxy products are manufactured in the U.S.A. under stringent quality control. Their formulas are specifically engineered for superior clarity, reduced bubble formation, strong bonding, and long-term durability.
Whether you're using UltraClear Deep Pour Epoxy for artistic river tables or UltraClear Bar & Table Top Epoxy for protective coatings, the results are more consistent, safer, and longer-lasting.
Using a premium product doesn’t just ensure better outcomes—it also gives you peace of mind. You’ll spend less time fixing mistakes and more time enjoying the craftsmanship of your finished piece.

Epoxy Bubbles FAQs
Why do bubbles keep forming in my epoxy, even with a heat gun?
If bubbles persist, the most likely causes are deep outgassing from unsealed wood or an environment that’s too cold. Always seal porous materials and work in a climate-controlled space.
See our guide to applying an epoxy seal coat here!
Can I use a hair dryer instead of a heat gun or torch?
No. Hair dryers don't get hot enough and may blow dust onto the surface. Use a propane torch or professional-grade heat gun for best results.
How do I know when epoxy has cured enough to sand?
For most epoxy types, the surface can be sanded after 24–48 hours. If the surface gums up or sticks to the sandpaper, wait longer.
A full epoxy cure often takes 72 hours, especially for larger projects involving a more substantial amount of epoxy.
For a better understanding of the curing phase, check out this guide.
What if I see bubbles under the surface?
Sub-surface bubbles typically come from outgassing or deep mixing errors. Such bubbles usually start to rise but can't quite reach the surface of the epoxy finish.
Unfortunately, they can’t be popped after curing, but you can deal with them by sanding and applying a recoat, which will usually resolve the appearance.
Should I mix epoxy faster if I’m in a hurry?
Never mix quickly. Fast mixing traps air and creates microbubbles. Follow mixing instructions and allow yourself time to stir slowly and thoroughly.
Learn more about avoiding mixing mistakes here.
Is there an epoxy type that’s better for fewer bubbles?
Yes. UltraClear Epoxy products are each optimized for certain situations.
- UltraClear Deep Pour Epoxy is designed to reduce trapped air during thick pours. Use this when you need a thick finish or are performing a deep casting.
- UltraClear Bar & Table Top Epoxy works best for smooth, thin coatings. It's ideal for bar tops and tables with long, flat surfaces.
- UltraClear Art & Craft Epoxy is particularly useful for smaller projects involving manipulation of the epoxy to achieve a more intricate design.
All UltraClear Epoxy products are engineered to self-degas efficiently when used correctly.

Have Questions? Want Advice? We're Here to Help!
If you have any questions about bubbles in epoxy resin, or if you'd like assistance in planning an epoxy project, please reach out to us at UltraClear Epoxy—our epoxy experts are ready to assist!
You can contact us via phone or email here. During business hours, you can also text chat online with one of our resin specialists by clicking the Help button at the bottom of your screen.
In our online store, you'll find a variety of useful tools and supplies, ideal for resin projects, plus our award-winning UltraClear Bar & Table Top Epoxy and our UltraClear Deep Pour Epoxy.
UltraClear Epoxy—Trusted by over 1 Million+ Happy Customers


