Epoxy is well-known for its highly protective finish and customizable nature. Ordinarily, it functions as a clear, transparent coating, but it can also be colored in subtle or striking ways, allowing users to personalize the look of their finish to suit their aesthetic goals.
Epoxy customization typically involves using colorants for vibrant effect, such as tinting an epoxy vein within a river table or imbuing their resin art with vibrant hues. But another, more understated method is to imitate natural stone substrates like marble through the use of epoxy and suitable pigments. Instead of using a marble substrate, users end up with an epoxy finish that looks just like marble without the drawbacks.
In this guide, we'll explain the benefits and potential appeal of using epoxy to imitate marble surfaces, after which we'll provide a step-by-step guide to doing so.
Why use epoxy to imitate marble (and other natural stone) surfaces?
The appeal of using epoxy to imitate marble or other similar materials lies in its ability to mimic the luxurious, high-end appearance of natural stone while offering significant cost savings, durability, and customization options.
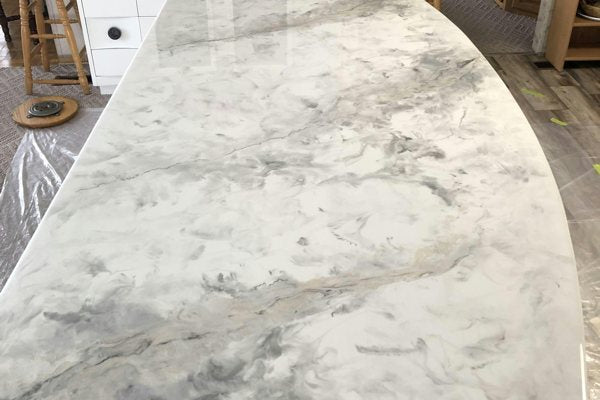
Through the use of resin colorants, epoxy can be made to look like marble, quartz, or granite, creating a beautiful and realistic stone finish for a fraction of the cost of real stone surfaces. It also offers versatility in terms of design, allowing for unique color combinations, veins, and patterns that might be difficult or expensive to attain with actual marble.
Furthermore, because epoxy stars off as a liquid before hardening, it can be comprehensively applied to existing surfaces, making it easy to create a seamless look without grout lines—a difficult feat to achieve with actual marble slabs. Epoxy is also much lighter than marble, making it easier to use in applications where weight is a concern, such as table tops or vertical surfaces.
Finally, it's considered more eco-friendly than marble. Using epoxy as a marble substitute can reduce the demand for natural stone extraction, which is energy-intensive and impacts the environment.

Which epoxies are best for imitating marble?
For realistic results, it's best to use a high-quality epoxy like UltraClear Bar & Table Top Epoxy as the base for your faux-marble creations. Not only is it cleanly transparent, allowing any colors you add to show through strikingly, but it's also highly receptive to the epoxy colorants that you'll need in order to create the marble effect.
For thicker finishes (greater than 1/4 inch), we recommend using UltraClear Deep Pour Epoxy, which is similarly clear and easy to manipulate with color.
How to make epoxy look like marble
To get your epoxy to look like genuine marble involves following a series of steps. It may seem like a lot, but it's worth doing it right. Here's how:
Step #1: Preparation
- Surface Cleaning: Clean the substrate surface thoroughly to remove dust, grease, and debris. Use a degreaser or isopropyl alcohol for optimal results.
- Surface Sanding: Sand the surface lightly with fine-grit sandpaper (e.g., 220 grit) to create a texture that helps the epoxy adhere. Wipe away the dust with a tack cloth.
- Masking: Use painter’s tape to cover the edges and any areas you want to protect from the epoxy. Plastic sheeting can protect floors and nearby surfaces.
- Priming: Apply a primer or base coat of paint in the primary color of the "marble." This ensures better adhesion and serves as a backdrop for the marble effect.

Step #2: The Base Coat
- Choosing the Color: Select a base color that matches the desired marble type (e.g., white for Carrara marble, black for Nero Marquina, etc.)
- Applying the Base Coat: Use a roller or brush to apply an even coat of epoxy to the surface. Let it cure completely (72 hours for UltraClear Bar & Table Top Epoxy) before moving to the next step.
Step #3: Preparing the Marbling Epoxy
- Measuring: Measure the epoxy resin and hardener carefully in the recommended ratio (e.g., 1:1 for UltraClear Bar & Table Top Epoxy). Use clean, disposable cups for mixing.
- Mixing: Stir the resin and hardener together slowly for at least 3–5 minutes to avoid introducing bubbles. Scrape the sides and bottom of the container for a thorough mix.
- Tinting: Divide the mixed epoxy into separate containers and add pigments or dyes to create the shades for the marble pattern. Start with a tiny amount of colorant and add more gradually to achieve the desired intensity.

Step #4: Marble Veining
- Pouring the Tinted Epoxy: Pour the tinted epoxy onto the surface in irregular patterns. Start with larger areas of one color and add smaller streams or streaks of contrasting colors.
- Creating Veins: Use a brush, stick, or feather to draw veins in natural, flowing patterns. Avoid straight lines; real marble veins are irregular and organic. If veins appear too harsh, soften them by dabbing with a sponge or blending with a gloved hand.
- Heat Manipulation: Use a heat gun (on low setting if it has one) to manipulate the epoxy, blending colors or softening veins for a more realistic look.
Step #5: Blending
- Layering: For added depth, create multiple layers of veins and colors. Allow each layer to cure partially (around 4–6 hours) before adding the next.
- Feathering: Blend the edges of veins and streaks into the base coat using a sponge, soft brush, or a gloved finger to mimic the natural gradation of marble.
- Removing Excess Epoxy: If you’ve poured too much epoxy, you can try carefully using a scraper or a sponge to remove or redistribute it before it sets.

Step #6: Additional Details and Considerations
- Metallic Highlights: Add a small amount of metallic pigment or glitter to the epoxy to enhance the veining and give a luxurious touch.
- Depth Effects: Use translucent tints in areas to create depth, making some veins appear to sit "below" others.
- Experimenting: Test effects on a scrap surface before applying them to the main project. This can help refine your technique.
Step #7: Top Coat
- Preparation: Allow the design layer to cure completely before applying the topcoat (typically 24–48 hours).
- Sanding: Lightly sand the surface with fine-grit sandpaper (e.g., 320–400 grit) to remove imperfections or level uneven areas.
- Clear Coat Application: Mix and apply a clear epoxy topcoat over the entire surface. This enhances the gloss and protects the design.
- Multiple Coats: If additional protection is needed, apply multiple coats, sanding lightly between each layer for optimal adhesion and smoothness.

Step #8: Curing
- Drying Time: Allow the epoxy to cure for the time recommended by the manufacturer (72 hours for UltraClear Bar & Table Top Epoxy).
- Temperature Control: Maintain a consistent temperature and humidity level during curing to prevent bubbles or imperfections.
- Final Touches: Remove the painter’s tape before the epoxy fully cures to avoid pulling up hardened resin. Sand and polish the edges if needed.

UltraClear Epoxy: Resin products of unmatched quality
As with any material, epoxy resin has both pros and cons. But no other sealant has so few weaknesses, and that's what puts epoxy above all other options when it comes to being a finish for high-traffic fixtures and furniture such as countertops, table tops, and bar tops. And among epoxy resin products, there are none that match the quality of UltraClear.
You can find our UltraClear Epoxy products on the following pages:
- UltraClear Bar & Table Top Epoxy: The classic choice for bar tops, countertops, and table tops. Rock-solid, waterproof, and crystal-clear.
- UltraClear Deep Pour Epoxy: Our deep pour casting resin. Ideal for thick layers, such as those needed for river tables.
- UltraClear Art & Craft Epoxy: Our arts and crafts resin, designed for smaller artistic endeavors which typically involve resin molds and require a bit more fluidity than bar top epoxy.
Epoxies that endure, with minimal upkeep
With high chemical and physical resistance, UltraClear resins can withstand and endure many forms of wear and tear without breaking a sweat or showcasing any cosmetic damage.
Plus, in addition to its ease of application, they also require little upkeep to maintain its pristine appearance. With a high-quality epoxy finish, you can expect a minimum lifespan of 7 years, with no need for reapplication. Beyond that, it's a breeze to renew that coating, requiring only a light sanding and a fresh layer of epoxy.
Expert support from our resin specialists
For more information about epoxy, or for assistance with your epoxy project, contact us at UltraClear Epoxy, where you can speak with one of our epoxy experts. During business hours, you can also text chat online with one of our resin specialists by clicking the Help button at the bottom of your screen.


