The Art of River Tables
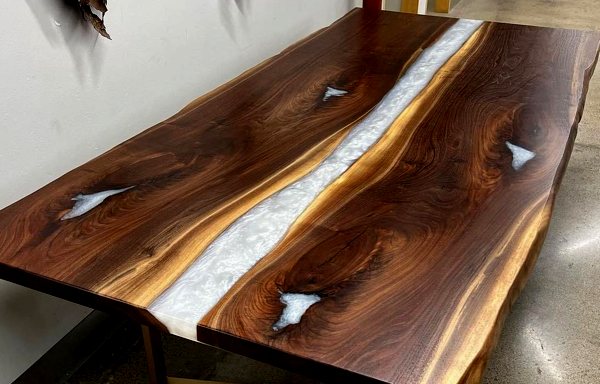
Epoxy river tables are a striking blend of natural wood and resin, often resembling a flowing river running through the center of the table top. The river, typically made with tinted or clear epoxy resin, contrasts beautifully with slabs of wood on either side, creating a visually captivating centerpiece.
This article covers everything you need to know about river tables—from understanding what they are and what makes them unique, to planning, constructing, and maintaining one for years to come. Whether you're a first-time DIYer or an experienced woodworker exploring a new medium, this guide is built to walk you through each step with clarity.
Contents |
|
Why River Tables Are So Appealing A DIY River Table: Ambitious but Also Achievable Planning Your Project: Supplies and Preparation Step-by-Step Guide to Making a River Table |

Why River Tables Are So Appealing
River tables are more than just furniture—they’re functional art. The visual effect of an epoxy “river” running between wood slabs creates a natural-meets-modern contrast that’s hard to match. You can make your river clear like water, glow with color, or even include embedded objects, stones, or lighting for added flair.
A river table typically consists of two slabs of live edge wood with a gap between them, filled with epoxy resin. However, the format is flexible: The "river" might be offset to one side, curved, or even set vertically through a coffee table or wall art piece. Some crafters incorporate multiple wood segments, geometric cuts, or contrasting materials like metal or glass.
Exploring Design Options
Before you begin your river table project, take time to think through your creative vision. Here are a few categories of decisions you’ll want to explore:
-
Wood Selection: Determine the type and look of wood that best suits your space. Epoxy pairs well with almost any type of wood, so your options are wide-ranging.
-
Do you prefer warm or cool tones?
-
Are you drawn to dramatic grain patterns or cleaner, subdued looks?
-
How much live-edge detail do you want to feature?
-
-
Epoxy Color and Finish: Decide whether your river should be clear, tinted, opaque, or patterned with swirls. (Learn more here.)
-
Do you want a high-gloss mirror finish or a more subdued matte appearance?
-
Should the color contrast the wood dramatically, or blend more naturally?
-
-
Shape and Layout: Think about whether the river should run down the center, along an edge, or even diagonally.
-
Would you like a straight river, or one that meanders like a natural waterway?
-
How thick should the tabletop be?
-
-
Inclusions and Effects: Epoxy is exceptionally receptive to embedments and many other additives; consider whether to incorporate them into your design.
-
Would you like to add objects or textures inside the resin—such as stones, shells, lights, or metallic flakes? Natural organic items such as flowers can be a striking addition but also require extra steps in preparation for the main part of the project.
-
Do you want the piece to glow in the dark or shift color under lighting?
-
Are you aiming for a minimalist effect or something bold and textured?
-
Each of these questions helps narrow your creative direction and ensures you're well-prepared before you purchase supplies or begin fabrication.

A DIY River Table: Ambitious but Also Achievable
Although river tables may seem complex, they’re definitely within reach for patient DIYers. The most important factor is preparation. Reading through this guide before you begin will help you avoid costly or time-consuming mistakes. If you’re new to epoxy, consider starting with a smaller table or practice pour to build confidence.
A Simple Overview of the River Table Process
Creating an epoxy river table typically involves:
-
Designing your table – Choosing your layout, wood, and epoxy color.
-
Building a mold – Containing your pour with melamine or HDPE forms.
-
Sealing & prepping the wood – To prevent bubbles and contamination.
-
Mixing & pouring epoxy – Often done in layers depending on the depth.
-
Curing – Allowing the epoxy to set fully.
-
Demolding and flattening – Releasing the table and making it level.
-
Sanding & finishing – Smoothing and sealing with a final topcoat.
-
Attaching legs or supports – Final assembly of your table.

Planning Your Project: Supplies and Preparation
Before starting your river table, it’s important to have the right materials and tools on hand. Here’s a breakdown of essential and optional items and what each one is used for:
Essential Supplies
-
Live-Edge Wood Slabs: These are the foundation of the river table, providing both structure and natural beauty. The live edge—showcasing the natural contour of the tree it's from—adds visual interest and organic flow to the final design. Choose wood that is fully dried and free of major cracks to ensure durability and reduce the risk of warping or splitting after construction.
-
UltraClear Deep Pour Epoxy: This is the epoxy resin used to create the river portion of the table. It’s specially formulated for deep, thick pours (up to 2 inches), which is essential for filling the gap between the wood slabs in a single pour. Its crystal-clear transparency and strong bonding make it the best choice for structural pours and embedding effects.
-
Mold or Form Walls: These barriers hold the epoxy and wood in place while the resin cures. They’re typically made of melamine or HDPE plastic panels treated with mold release or tape to prevent the epoxy from sticking. This is essential to contain the liquid resin and define the final dimensions of the table top.
- Silicone Caulk: This is used to seal the seams of your mold construction and prevent epoxy leakage.
-
Clamps and Supports: Clamps help stabilize the wood slabs during setup and ensure they don’t shift while the epoxy is curing. Additional supports or weights can help keep slabs from floating or bowing in the mold. Proper clamping is important for maintaining a symmetrical, level build.
-
Heat Gun or Torch: Used to eliminate surface bubbles that form during the epoxy curing process. Passing the heat source gently over the surface helps release trapped air for a glass-smooth finish. This is particularly important in deep pours to ensure clarity.
-
Mixing Containers and Stir Sticks: Epoxy must be mixed precisely by volume or weight, depending on the product instructions. Dedicated mixing containers with measurement marks and flat stir sticks ensure the components are fully blended without introducing unnecessary bubbles.
- Drill with Mixing Bit: You'll need a power drill and mixing bit to blend large batches of epoxy. A drill is often used for installing the table base (e.g., legs) near the end of the project.
-
Sandpaper and Orbital Sander: After curing, epoxy surfaces may require sanding to smooth out imperfections or prepare for a final finish. Sandpaper grits will vary depending on the stage—start coarse for leveling and finish with finer grits for polishing.
-
Safety Gear: Stay safe—Always wear gloves, goggles, and a respirator when working with epoxy. This protects your skin, eyes, and lungs from resin exposure and airborne particulates during sanding. This is especially important when working with low-grade epoxies.

Optional Supplies
-
Pigments or Dyes: These add color to the epoxy and allow for a wide variety of effects, from subtle tints to dramatic swirls. They come in powder, liquid, or paste forms. Pigmently brand products are a great choice for rich, stable color saturation. Learn more about them here.
-
Polishing Compound: If you want an ultra-smooth, mirror-like finish, a polishing compound can be used after sanding. This step restores shine and clarity to the epoxy, especially after high-grit sanding. Learn more here.
-
Table Base: Your table will need a sturdy, well-matched base. This can be custom-made or purchased separately. Choose a base that supports the weight and complements the aesthetic of the river table top.
- UltraClear Bar & Table Top Epoxy: For maximum durability and a perfectly smooth surface, some users opt to apply a clear topcoat of this epoxy to their otherwise finished river table. It can also be used to apply a seal coat, which makes bubble removal much easier.

Step-by-Step Guide to Making a River Table
#1: Prepare Your Workspace
- Start by organizing a clean, level, and dust-free work area. We recommend that you cover the floor and any nearby surfaces with plastic sheeting or drop cloths to protect from spills.
- Make sure the room is well-ventilated, and gather all your supplies before beginning to avoid disruptions during the process.
#2: Build and Seal the Mold
- Cut and assemble your mold using melamine or HDPE panels, ensuring that the inner dimensions match the size of your final table.
- Seal all seams with silicone caulk and let it cure fully to prevent leaks.
- Apply mold release or sheathing tape to all interior surfaces to allow for easy removal of the table once the epoxy has cured.
#3: Dry Fit and Stabilize the Wood Slabs
Place your wood slabs inside the mold to check their fit and orientation. Adjust placement until you're satisfied with how the grain and edges line up. Use clamps and supports to keep the wood slabs steady and prevent floating once the epoxy is poured.
#4: (Optional) Apply an Epoxy Seal Coat to the Wood
- Prepare a small batch of UltraClear Bar & Table Top Epoxy, then use a paint brush to apply a thin coating to the parts of the wood that will touch the river vein. This will push out air and seal the pores of the wood to prevent excessive air bubbles from forming later. Learn more here.
- Let it partially cure for 4 to 6 hours, then move to the next step.
#4: Mix and Pour Epoxy Resin
-
Carefully measure and mix your UltraClear Deep Pour Epoxy according to the instructions. Pour slowly and evenly between the slabs, filling the void to the desired depth.
-
Note: You can color the epoxy as desired while mixing it using your chosen dyes or pigments.
-
Note: You can color the epoxy as desired while mixing it using your chosen dyes or pigments.
- Use a heat gun or torch to remove surface bubbles every few minutes for the first hour of curing. To do this, hold the tool from a distance of several inches over the epoxy then activate it and move smoothly across the entire coating without lingering—no longer than 1 second over any spot to avoid heat damage.
#5: Allow Epoxy to Cure
- Let the epoxy sit undisturbed in a controlled environment for the full recommended cure time. For UltraClear Epoxy products, this is about 72 hours in appropriate conditions.
- Avoid moving the mold or disturbing the resin to maintain a smooth, even surface.
#6: Demold and Trim the Table Top
- Once fully cured, gently release the table from the mold using wedges or plastic tools.
- Trim any excess resin using a table saw or track saw if needed to achieve your desired final dimensions.
#7: Sand and Finish the Surface
- Begin sanding with a coarse grit to level and remove imperfections, then move to higher grits for a smooth finish.
- If desired, apply a topcoat of UltraClear Bar & Table Top Epoxy over the entire table top for a high-gloss appearance.
- Either way, you can also polish with compound for a high-gloss appearance. Finally, apply a protective top coat or sealant if using the piece in a high-use area. For outdoor tables, a UV-resistant urethane coating is recommended to prevent yellowing.
#8: Attach the Table Base
- Choose a base that suits the style and weight of your table top.
- Drill pilot holes and securely fasten the base using mounting hardware. Once attached, flip the table upright and inspect for any final adjustments.
#9: Final Touches and Maintenance Check
- Clean the surface with a soft cloth and inspect for any missed spots or areas that may need light buffing.
- You can apply rubber pads or furniture feet to protect floors and make future maintenance easier. Your river table is now ready for use!

The Risks of Low-Cost Epoxies
These days, low-cost "budget-brand" epoxies are extremely prevalent in online stores. Often imported from abroad, they sport a low upfront cost but come with significant downsides which can compromise your entire project.
Many imported resins lack the quality control standards upheld by U.S.-made products. Inconsistent ratios, contamination, and poor instructions often lead to curing issues—ranging from soft spots to yellowing and tackiness.
Low-cost epoxy brands frequently suffer from poor clarity, resulting in cloudy or milky finishes that reduce the visual impact of your river. These products may also emit stronger fumes due to a higher concentration of unregulated VOCs, presenting potential health risks.
Inferior bonding can cause peeling, bubbling, or cracking over time, especially in large pours. In short: using cheap resin may save money up front but could cost you your entire project—and your health—in the long run.

The Value in Choosing UltraClear Epoxy
UltraClear Deep Pour Epoxy and UltraClear Bar & Table Top Epoxy are engineered for clarity, durability, and easy use. Made in the U.S.A., our resins are batch-tested for consistency and quality assurance, so you can trust every pour to cure cleanly and smoothly.
An UltraClear finish creates a high-gloss, professional appearance that’s also easy to maintain. It’s designed to resist scratching, yellowing, and daily wear, giving your table a longer lifespan and a higher-quality appearance.
And finally, UltraClear Epoxy users get access to our superb customer support, where you can get assistance from resin experts with project planning or answers to your epoxy-related questions.

Longevity and Maintenance
With proper care, a river table can last for decades. The epoxy provides a durable protective barrier that resists wear, but it still benefits from gentle care.
Routine Maintenance and Cleaning
-
Wipe with a soft cloth and mild dish soap.
-
Avoid abrasive pads or cleaners that can dull the surface.
-
Use coasters and placemats to prevent scratching.
For stubborn marks or grime, use a damp microfiber cloth with diluted vinegar or a gentle plastic-safe cleaner.
Restoring the Finish
If your table becomes scratched or dull:
-
Lightly sand with high-grit sandpaper.
-
Clean thoroughly.
-
Apply a fresh coat of UltraClear Bar & Table Top Epoxy.
This process restores the glass-smooth finish and makes your table look good as new.
Additional Maintenance Considerations
-
Keep the table away from direct heat sources. Epoxy is heat-resistant, but not impervious to it.
-
Avoid dragging sharp or heavy items across the surface.
-
Do not use harsh chemicals or solvents. Avoid cleaning with acetone, bleach, and similarly harsh chemicals.

Frequently Asked Questions
#1: Can I use regular epoxy instead of deep pour epoxy?
No. Standard epoxies are not designed for thick layers and may overheat or fail to cure properly in deep pours. Always use UltraClear Deep Pour Epoxy for river tables.
An exception to this rule can be made if your river vein is very shallow. For instance, our Table Top Epoxy self-levels to 1/8 inch, and can be layered, so if your vein will be 1/4 inch or less, you can use Table Top Epoxy for the entire project.
#2: What type of wood works best?
Kiln-dried hardwoods like walnut, maple, and oak are excellent. Make sure the wood is moisture-free to avoid warping or bubble formation.
#3: How long does the whole process take?
From start to finish, a river table project usually takes 7–10 days, depending on curing times, sanding, and finishing.
#4: Can I tint the epoxy any color?
Yes, you can add compatible pigments, dyes, or metallic powders. Always test your color blend in a small batch first.
Learn more about epoxy colorants here.
#5: Is a vacuum chamber necessary?
Not at all. Though these can be helpful, a heat gun is usually more than sufficient for removing bubbles in most home setups.
#6: Can I use reclaimed wood?
Yes, but it must be fully dried and cleaned, and we strongly recommend an epoxy seal coat before pouring your full-sized batch. Old wood can offer beautiful character if properly prepped.

Have Questions? Want Advice? We're Here to Help!
If you have any questions about epoxy river tables, or if you'd like assistance in planning an epoxy project, please reach out to us at UltraClear Epoxy—our epoxy experts are ready to assist!
You can contact us via phone or email here. During business hours, you can also text chat online with one of our resin specialists by clicking the Help button at the bottom of your screen.
In our online store, you'll find a variety of useful tools and supplies, ideal for resin projects, plus our award-winning UltraClear Bar & Table Top Epoxy and our UltraClear Deep Pour Epoxy.
UltraClear Epoxy—Trusted by over 1 Million+ Happy Customers


