When working with epoxy resin projects, achieving precise edges and containing the resin within a specific area makes it much easier to get a good looking finish, and to achieve this, a temporary dam is often constructed.
A temporary dam serves as an essential tool to control the flow of epoxy, ensuring clean edges and preventing spills. Whether you're creating table tops, art pieces, or intricate designs, constructing a temporary dam can help achieve professional results.
Contents |
|
Common Situations Where a Temporary Dam is Beneficial |
Why Use a Temporary Dam?
A temporary dam is useful for several reasons:
- Prevents Overflows: Epoxy resin is a self-leveling material, but without proper containment—especially for low-viscosity resins like Deep Pour Epoxy—it can spill over edges, leading to wasted material and messy workspaces.
-
Creates Defined Edges: Ensures sharp and clean borders, which is especially important for projects like river tables, wall art, and bar tops.
- Allows for Layering: It also helps with containing layers of epoxy while building up the resin depth in pieces such as geode art or deep pour projects.
- Minimizes Cleanup Effort: Containing epoxy within a defined space simplifies cleanup and reduces the risk of resin getting onto unwanted surfaces.

Common Situations Where a Temporary Dam is Beneficial
Not every project needs a temporary dam, but for those that can benefit, it can often be a major convenience. Here are a few examples of projects you might construct a temporary dam for:
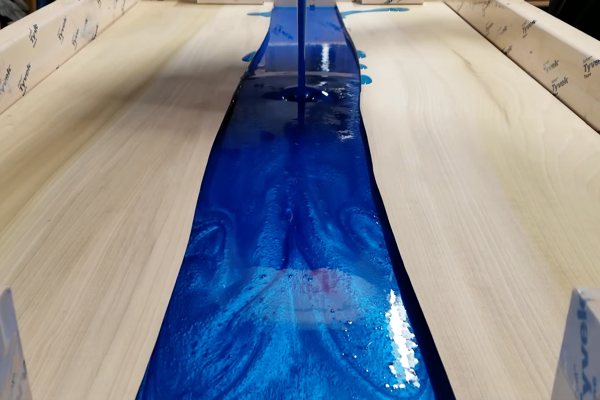
- Creating Epoxy River Tables: When using UltraClear Deep Pour Epoxy to produce a river vein, a temporary dam helps contain the deep pour in the routed section, preventing overflow.
- Pouring Table Top Epoxy: When applying UltraClear Bar & Table Top Epoxy, a dam ensures the liquid resin stays within the desired perimeter.
- Art & Craft Projects: For smaller artistic pieces using UltraClear Art & Craft Epoxy, a temporary dam allows for controlled resin application and layering.
- Filling Cracks and Voids: A dam helps when working on wooden slabs with natural voids that require epoxy filling.


A Step-by-Step Guide to Constructing a Temporary Dam
Materials Needed
To build a proper dam, you'll need the following materials:
-
Painter's tape or packing tape
-
Silicone caulk or hot glue
-
Plastic sheeting or acetate sheets
-
Wood strips or foam board
-
Clamps (if needed)
-
Level (to ensure even pours)
Once you have these things, you're good to go.
Step #1: Prepare the Work Surface
Before constructing your dam, it’s important to thoroughly prepare your workspace to ensure the best possible results. Start by cleaning the surface where the epoxy will be poured. Remove any dust, debris, or contaminants that could interfere with the epoxy’s adhesion or clarity. Use a lint-free cloth and isopropyl alcohol for thorough cleaning.
Next, ensure the surface is completely level. An uneven surface can cause the epoxy to pool in certain areas, leading to an inconsistent thickness and potential overflow. Use a bubble level to check multiple points across the work area and make any necessary adjustments by placing shims or adjusting the table height.
Finally, protect surrounding areas by covering them with plastic sheeting or drop cloths to catch any accidental drips or spills. Proper preparation helps to create a clean, efficient, and professional workspace.
Step #2: Choose Your Dam Material
Depending on your project, select the most suitable dam material. Each option offers unique benefits:
-
Tape (painter's or packing tape): This is ideal for flat surfaces such as table tops, providing an easy-to-remove barrier that adheres well to smooth surfaces.
-
Foam board or wood strips: These materials are more suited for deep pours and structural support in river tables. Foam board is lightweight and easy to cut, while wood strips offer a sturdy frame.
-
Plastic sheeting: A more flexible and adaptable option, typically used for intricate art projects, allowing for creative shapes and containment.
Consider factors such as project size, your desired edge sharpness, and how easy it is to remove the dam once finished when selecting your dam material.

Step #3: Apply the Dam
-
Tape Method: Apply painter's tape around the edges of your surface. Be sure to get a secure and even seal. You can overlap the tape slightly to reinforce the barrier and press firmly when adhering it to prevent leaks.
-
Foam or Wood Method: Cut foam boards or wood strips to fit the perimeter of your work area. Secure them with clamps for larger projects or attach them using hot glue or silicone caulk for smaller setups.
-
Plastic Sheeting: Cut the plastic sheeting to size and attach it around the edges with tape or clips. Smooth out any wrinkles to prevent resin seepage.
Regardless of the method chosen, ensure the dam is firmly secured and aligned properly to avoid irregularities in the cured epoxy.
Step #4: Seal the Edges
To prevent epoxy from seeping under or through gaps:
-
Apply a thin bead of silicone caulk along the bottom edge where the dam meets the surface.
-
If using tape, press it down firmly and overlap layers to reinforce the barrier.
Step #5: Test for Leaks
Before pouring epoxy, perform a quick test by pouring a small amount of water to check for leaks. If leaks are found, reseal the affected areas.

Step #6: Pour the Epoxy Resin
Once the dam is secured and tested, mix and pour the epoxy according to the manufacturer's instructions. For deep pours, such as with UltraClear Deep Pour Epoxy, pour in layers to prevent overheating. Carefully pour the resin to achieve an even distribution within the dammed area. Use a heat gun or torch to remove any bubbles that may appear on the surface.
Step #7: Remove the Dam
After the epoxy has fully cured, carefully remove the dam materials. If using tape, peel it off slowly to avoid damaging the cured surface. For silicone-sealed edges, gently cut along the seam to release the dam.
Additional Tips for Success
- Always use a release agent (such as mold release spray or a layer of wax) on dam materials to ensure easy removal.
- Keep an eye on the curing process and address any leaks or overflow issues promptly.
- Work in a dust-free environment to prevent debris from settling on your epoxy surface.
Following these steps will enable you to confidently construct a temporary dam for your epoxy projects, providing professional, clean results every time. Whether you're working on furniture, artwork, or DIY crafts, proper containment techniques make all the difference in achieving high-quality epoxy finishes.

Have questions? Want advice? Contact us!
If you have any questions about epoxy resin, or if you'd like assistance in planning an epoxy project, please reach out to us at UltraClear Epoxy—our epoxy experts are ready to assist!
You can contact us via phone or email here. During business hours, you can also text chat online with one of our resin specialists by clicking the Help button at the bottom of your screen.
In our online store, you'll find a variety of useful tools and supplies, ideal for resin projects, plus our award-winning UltraClear Bar & Table Top Epoxy and our UltraClear Deep Pour Epoxy.


