Embedding items within an epoxy coating is a tried-and-true method of customizing your epoxy bar top and make it your own. Common choices include photos, paper mementos, bottle caps, and coins. But did you know that epoxy's highly customizable nature is receptive even to natural items like shells, rocks, and dried flowers as embedments?
Sealing natural items within your epoxy allows you to blend organic beauty with the sleek durability of epoxy resin, but it must be done properly. Whether you're embedding pieces of wood, seashells, stones, or other materials, using the right techniques ensures a long-lasting finish that looks professional.
In this guide, we'll walk you through popular embedment choices, best application methods, and important considerations when working with embedments.

Popular Natural Elements for Epoxy Bar Tops
Among the many options for natural embedments within epoxy, several stand out for their ease of access and the aesthetic qualities they provide. These are:
Wood Accents
Wood is incredibly common as the primary material for any type of bar top, epoxy included, but in most cases the wood has been carefully smooth and refined.
However, live edge slabs, driftwood, or wooden inlays are less obvious choices that can add warmth and rustic charm to a bar top. Well-dried and sealed wood works best to prevent moisture-related issues.
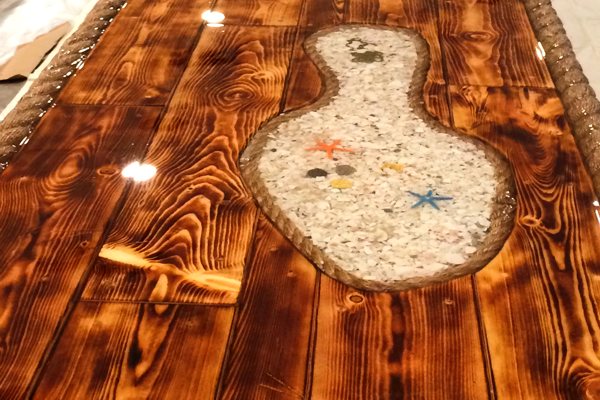
Seashells and Sand
In coastal-themed bar designs, shells and fine sand are often used to create a beachy aesthetic when layered into epoxy.
Rocks and Crystals
Smooth river stones, geodes, and semi-precious stones provide an earthy, high-end look. The variety of options makes it easy to color coordinate with other aspects of your bar room for a cohesive theme.
Dried Flowers and Leaves
Encapsulated flowers or foliage bring color and elegance but must be properly sealed to prevent decay or air bubbles.
See our guide on this topic for more info.
Metal and Natural Fibers
Copper flakes, gold leaf, or woven fibers can also be combined with wood or stone for a sense of timeless elegance.

Best Methods for Embedding Natural Elements
When incorporating natural elements like wood, shells, rocks, and dried foliage into your epoxy bar top, achieving a flawless, durable finish depends on employing proper methods of preparation, placement, and layering.
Below is a guide that breaks down each key method in detail.
Phase #1: Preparing the Materials
Before embedding any natural elements, proper preparation is crucial to ensure both adhesion and a clear finish:
Cleaning and Drying:
-
Wood: Ensure any wood pieces are completely dry and free from dust or oils. Sand the surface lightly and, if necessary, apply a thin seal coat (using UltraClear Bar & Table Top Epoxy) to prevent air bubbles.
-
Shells and Rocks: Wash these materials with mild detergent and water, then let them dry completely. For porous stones, a light sealant may be applied to prevent resin absorption.
-
Dried Flowers and Leaves: These must be fully dried and pressed. Any residual moisture can lead to cloudiness or cause the epoxy to not cure properly.
-
Sand: Make sure the sand is dry and free of organic matter to prevent discoloration or bubbles.
Sealing (When Necessary):
For materials that are naturally porous or may release moisture, apply a thin epoxy seal coat. This step not only prevents air bubbles from forming around the material but also locks in colors and textures.

Phase #2: Placement: Before or During the Curing Phase
The timing of when you place your natural elements in the epoxy can significantly affect the final outcome:
Before Pouring Epoxy:
-
Large and Heavy Items: Elements such as thick wood slabs or sizable rocks should be securely positioned on (or as part of) the substrate before the epoxy is poured. This ensures that they remain fixed and do not float or shift during the curing process.
-
Secure Positioning: Use adhesives or clamps as needed to fix these elements in place. This method is ideal when you want the embedded item to appear flush with the surface.
During the Curing Phase:
-
Lightweight or Small Objects: Delicate items like dried flowers, small shells, or tiny pebbles are best placed when the epoxy has begun to gel (approximately 1-2 hours into curing). At this stage, the resin is sticky enough to hold the objects in place but not so liquid that they will float to the surface.
-
Controlled Embedding: Gently press the items into the semi-cured resin using tweezers or a gloved hand. This method allows you to position objects more precisely and create a layered effect where the items are suspended within the resin.
For a detailed guide on epoxy embedment methods, click here.
Phase #3: Layering for Depth and Clarity
Creating a multi-dimensional bar top with natural elements involves careful layering techniques:
Initial Seal Layer:
-
Purpose: Apply a thin, clear seal coat over the entire substrate (using UltraClear Bar & Table Top Epoxy) to fill in surface pores and provide a smooth base. This minimizes the risk of air bubbles around the embedded elements.
-
Application: Allow this layer to cure to a tacky stage before proceeding.
Intermediate Embedding Layers:
-
Layering Technique: Pour a base layer of epoxy and, once it reaches a gel-like stage, embed your natural elements. This process may be repeated with multiple layers to gradually build up depth. Please see our beginner-friendly guide to layering for more in-depth guidance.
-
Ensuring Even Distribution: When pouring subsequent layers, work slowly and evenly to avoid disturbing the already embedded objects. Use a spatula or a spreader if necessary to maintain uniformity.
Final Flood Coat:
-
Finishing Touch: Once all elements are securely embedded and the intermediate layers have cured, apply a final flood coat of epoxy. This top layer should be smooth and self-leveling, providing a clear, protective finish that encapsulates the entire design.
-
De-bubbling: Immediately after pouring the flood coat, use a heat gun or torch to remove any trapped air bubbles and ensure a flawless, glass-like surface.

Natural Elements That Require Preparation
While many natural materials can be embedded into epoxy, some require special treatment before use:
-
Wood – Must be properly dried and sealed to prevent moisture from causing epoxy separation.
-
Flowers and Leaves – Should be dried and pressed beforehand. A thin clear coat of UltraClear Bar & Table Top Epoxy can prevent discoloration.
-
Porous Rocks or Sand – Needs to be cleaned and dried to avoid trapped moisture that can cause clouding or bubbles.
-
Shells with Organic Residue – Should be washed and completely dried before embedding to avoid decomposition within the epoxy.

The Benefits of Choosing UltraClear Epoxy for Your Bar Top Finish
When planning an epoxy project, your resin choice makes all the difference. Yet, these days, there are so many epoxy options, many of which are imported from overseas and exhibit subpar quality, that it can be difficult to sort through the noise and find the right resin for your goals—one that won't fail to cure or break down under ordinary use.
The good news is that you can skip that tedious search and achieve immediate professional-grade results by choosing UltraClear Epoxy.
UltraClear Epoxy: Premium Epoxy for Clear, Long-Lasting Results
At UltraClear, we take pride in our products. Throughout the production process, we hold ourselves to the highest standards of quality for all of our epoxy resins, ensuring unmatched durability and clarity in every batch.
Unlike lower-cost resins that yellow over time or fail to cure properly, UltraClear Epoxy products provide long-lasting performance with UV resistance and a glass-like finish.
Other features include:
-
100% Made in the USA—Give yourself peace of mind knowing that we meet not only our own standards but also those expected of American-made products.
-
Bubble-Free Formulation—Simply measure, mix, and pour—without the air bubbles. After application, bubbles are easily removed from our epoxy resin during the curing phase, in part due to precise viscosity levels that prevent air from becoming trapped. This makes it easy to achieve that iconic flawless finish.
-
Durable & Scratch Resistant—No epoxy holds up better under regular use. With UltraClear, you can expect top-tier protection from physical, chemical, and moisture damage—all three of the most common concerns for a bar top environment, whether at home, in your commercial establishment, or even in an outdoor setting.
Learn more about our epoxies, which have been optimized for bar tops, on the following pages:
- UltraClear Bar & Table Top Epoxy—Our strongest resin. Cures crystal-clear in a thin, impenetrable layer for top-tier protection.
- UltraClear Deep Pour Epoxy—A formulation designed for deep casting. Pour extra-thick layers (up to 2 inches!) without blemishes or curing problems using this versatile resin.

FAQs: Embedding Natural Items in Epoxy
Question #1: How do I prevent bubbles when embedding porous materials like wood or shells?
Apply a thin seal coat of UltraClear Bar & Table Top Epoxy to the materials before embedding them. This prevents air from escaping and forming bubbles during the final pour.
Learn more about preventing bubbles here.
Question #2: Can I use real plants or fresh flowers in epoxy?
Sadly, fresh flowers contain moisture and will rot over time. To use them, you must first dry and press the flowers; then you can embed them to maintain their appearance and prevent decay.
Question #3: Will embedded materials shift during the curing process?
If embedding lightweight objects, place them in epoxy when it reaches a gel-like state to prevent movement. Heavier objects should be adhered to the surface before pouring; for this you can use a basic glue (such as Elmer's).
Question #4: Can I use colored epoxy for embedding objects?
Yes, tinted or metallic epoxy can enhance the appearance of embedded materials. Just make sure that the colors complement rather than obscure the natural elements.
Question #5: How do I achieve a perfectly level epoxy finish over embedded materials?
Use a final flood coat of UltraClear Bar & Table Top Epoxy to cover any raised surfaces and create a smooth, glass-like finish.

Have Questions? Want Advice? We're Here to Help!
If you have any questions about epoxy resin, or if you'd like assistance in planning an epoxy project, please reach out to us at UltraClear Epoxy—our epoxy experts are ready to assist!
You can contact us via phone or email here. During business hours, you can also text chat online with one of our resin specialists by clicking the Help button at the bottom of your screen.
In our online store, you'll find a variety of useful tools and supplies, ideal for resin projects, plus our award-winning UltraClear Bar & Table Top Epoxy and our UltraClear Deep Pour Epoxy.


