In epoxy design, resin art is generally considered a welcoming place for users of any skill level to explore the field and develop their skills. With a wide range of projects and creative methods available, there's something there for everyone.
In this article, we'll examine a set of these techniques, ones which are focused on producing 3D effects in your resin art. We'll explain what we mean by them, then explain what level of skill they require, how to perform them, and we'll provide tips on getting started. Finally, we'll also explain why investing in high-quality products like UltraClear Epoxy is key to achieving clearer, longer-lasting creations.
Understanding 3D Effects in Epoxy Art
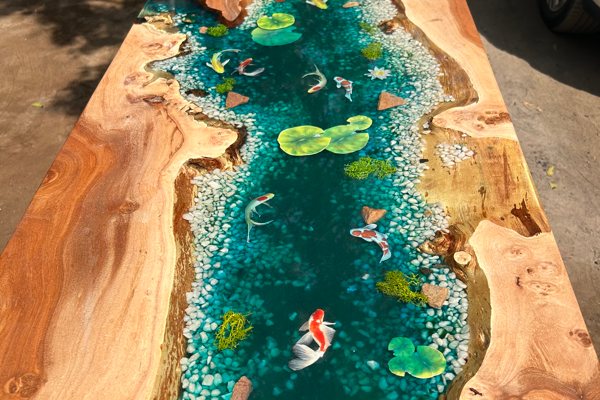
3D effects in epoxy art are created by building up layers that add depth and texture to a flat surface. These effects are achieved through techniques such as:
-
Layering: Pouring multiple thin layers with partial curing in between can create a sense of depth.
-
Deep Pours: Using products like UltraClear Deep Pour Epoxy allows you to create thick, sculptural layers that visually jump off the surface.
-
Embedding Objects: Incorporating items like powder pigments, natural elements, or decorative inlays can produce a tactile, multidimensional appearance.
- Casting Techniques: Carefully controlled casts allow for the creation of three-dimensional shapes within the resin.
Each of these techniques requires precision and attention to detail, which brings us to the question of skill level.
Skill Level: Intermediate (Relative to Other Epoxy Techniques)
Creating 3D effects in epoxy art generally requires a moderate level of skill compared to simpler epoxy projects. Here’s how it compares to other techniques:
-
Basic Epoxy Coating: Techniques like applying a flood coat over a table top using UltraClear Bar & Table Top Epoxy are relatively straightforward and ideal for beginners.
-
3D Layering and Deep Pours: These methods benefit from a good understanding of mixing, curing times, and the behavior of resin as it sets. However, with practice and proper instruction, beginners can successfully create 3D effects.
- Advanced Embedding: Incorporating multiple materials and object embedments and managing varying curing times adds complexity, but it can be mastered over time.
It's a good idea to start with simpler projects and gradually experiment with layering and deep pours as your confidence grows.
Tips for Beginners to Epoxy Art
If you're just starting out with epoxy art and want to incorporate 3D effects, consider these practical tips:
-
Begin with Small-Scale Projects: Start with projects like coasters or small art panels using UltraClear Art & Craft Epoxy to gain familiarity with the mixing and curing process.
-
Practice Layering: Experiment with thin layers first. Pour a base layer, allow it to become tacky, and then add additional layers to create depth.
-
Measure and Mix Precisely: Accurate measurements are crucial. Use graduated mixing cups and follow the manufacturer’s instructions to ensure proper curing.
-
Work in a Controlled Environment: Maintain a consistent temperature (ideally between 70°F and 75°F) and low humidity to promote even curing.
-
Take Your Time: Rushing can lead to air bubbles or uneven layers. Be patient and allow each layer to partially cure before applying the next.
- Document Your Process: Consider keeping notes on mixing times, layer thickness, and curing conditions. This record will help you adjust techniques to suit your working environment for future projects.
Step-by-Step Guide for Creating 3D Effects in Epoxy Art
Step #1: Prepare Your Workspace
- Clean and level your work area.
- Cover surfaces with plastic sheeting to protect against spills.
- Wear protective gear such as gloves, goggles, and a respirator mask.
Get more advice in our prep guide here.
Step #2: Mixing Your Epoxy:
-
Accurate Measurement: Follow the specific resin-to-hardener ratio indicated by the product. For small projects, UltraClear Art & Craft Epoxy is ideal; for thicker, deep pours, use UltraClear Deep Pour Epoxy.
-
Mixing Process: Stir slowly for 3-5 minutes, ensuring you scrape the container’s sides and bottom. For larger batches, a power drill fitted with a mixing bit can help achieve a uniform blend without over-agitating the mixture.
- Minimize Bubbles: Mix gently to reduce the amount of air pulled into the resin.
Step #3: Creating the Base Layer
-
Pour the first layer evenly onto your prepared surface. This base layer will set the foundation for your 3D effects.
- Allow the layer to become tacky before adding subsequent layers; this ensures proper adhesion between layers. Don't worry about seams; the epoxy layers will mesh together if done right.
Step #4: Building Up Layers
After establishing a solid base layer, you can start building additional layers to create a pronounced three-dimensional effect. This step is crucial for adding depth and texture to your epoxy art.
Follow these detailed guidelines to achieve a stable, multi-dimensional finish:
-
Layering for Depth
-
Pour additional thin layers gradually rather than as a single, thick pour. Before applying a new layer, ensure the previous layer has reached a tacky state but is not fully cured; this tackiness allows for better adhesion between layers. Typically, waiting 4-6 hours between layers is recommended, though this may vary based on ambient temperature and the specific epoxy product you're using.
-
-
Monitoring Curing Between Layers
-
You can perform a gentle touch test on the previous layer to get a sense of where it's at. It should feel slightly sticky (tacky) but not wet or fully hardened. If the layer is fully cured, the subsequent epoxy may not bond as effectively, leading to delamination. Adjust your waiting time accordingly to achieve optimal adhesion.
- Note: If you accidentally let your epoxy fully cure, you can sand it lightly, clean away the dust, then apply a new coating to continue the layering effect.
-
-
Deep Pours for Dramatic 3D Effects
-
For more dramatic, sculptural layers, use UltraClear Deep Pour Epoxy., which can be poured in deep, thick layers (up to 2 inches at a time) and which have a long working time.
-
Deep pours require careful handling but benefit from a generous working time: pour slowly to control the exothermic reaction, and consider pouring in stages if the desired layer thickness exceeds the product’s recommendations. Monitor the pour closely to ensure the resin cures evenly without overheating.
-
-
Embedding Objects and Creating Variations
-
To enhance the three-dimensional look, incorporate decorative elements into your layers. You might embed items such as dried leaves, small stones, or metal accents.
-
Plan the layout so that these elements appear naturally integrated within the resin. You can also vary pigment intensity in each layer to create subtle gradients or dynamic contrasts that add depth.
- Check out our Coloring Techniques guide for more ideas.
-
-
Managing Air Bubbles
-
Even with careful mixing, new layers might introduce air bubbles. Use a heat gun or torch immediately after each pour to release trapped air.
-
For optimal results, lightly sand the surface of a previous layer if bubbles persist, then reapply a thin coat to smooth out the texture.
-
-
Tools to Ensure Uniform Thickness
-
For larger projects, such as a resin table top or a sizable art panel, consider using a level or constructing a temporary dam to guide the resin and maintain consistent layer thickness. This practice helps in achieving a professional, even finish across the entire piece.
-
By carefully handling the layering process and adhering to these detailed steps, you can successfully create intricate 3D effects that add significant depth and visual interest to your epoxy art.
Step #5: Finishing Touches:
- Once the desired depth is achieved and all layers are fully cured, you can sand or polish the surface to refine the finish.
- If necessary, apply a final top coat with UltraClear Bar & Table Top Epoxy to protect the layered design and enhance clarity.

Why Choose UltraClear Epoxy?
When creating 3D effects in epoxy art, the quality of your resin is critical. Low-cost epoxy products often suffer from yellowing, uneven curing, and reduced durability. In contrast, UltraClear Epoxy products—manufactured in the USA—offer:
- Superior Clarity: Maintains a crystal-clear finish that won’t yellow over time.
- Consistent Curing: Engineered for reliable, even curing, ensuring your layered effects set properly.
- Enhanced Durability: Resists scratches, heat, and moisture, making it ideal for both artistic and functional projects.
To learn more about our award-winning craft resins, check out their product pages:
- UltraClear Bar & Table Top Epoxy: Thin, self-leveling layers with a crystal-clear appearance and the ultimate in durability.
- UltraClear Deep Pour Epoxy: Our deep casting resin that can be poured in layers up to 2 inches thick without concern for curing issues. Layer it multiple times for much greater combined depth.
- UltraClear Art & Craft Epoxy: The perfect choice for most art projects. Featuring a slightly longer working time than Table Top Epoxy without compromising heavily on strength, this versatile option can be used for a wide range of techniques.
Regardless of the resins you've chosen, using a premium product is what ensures that your creations can remain vibrant and long-lasting.
A Technique Worth the Effort
Creating 3D effects in epoxy art requires careful attention to technique, patience, and quality materials. By starting with simpler projects and gradually progressing to more complex layering and deep pours, even beginners can develop the skills needed to produce visually striking and durable art.
With detailed planning, precise mixing, and controlled pouring processes, you can achieve stunning 3D designs. Moreover, by choosing UltraClear Epoxy products, which are made in the USA, you ensure your work stands the test of time with superior clarity and performance.
Have Questions? Want Advice? We're Here to Help!
If you have any questions about epoxy resin, or if you'd like assistance in planning an epoxy project, please reach out to us at UltraClear Epoxy—our epoxy experts are ready to assist!
You can contact us via phone or email here. During business hours, you can also text chat online with one of our resin specialists by clicking the Help button at the bottom of your screen.
In our online store, you'll find a variety of useful tools and supplies, ideal for resin projects, plus our award-winning UltraClear Bar & Table Top Epoxy and our UltraClear Deep Pour Epoxy.


