Epoxy resin is a tremendously versatile medium, used often for creating artistic works and for protecting the surfaces of furniture and fixtures (such as table tops and bar tops) regardless of shape or size, and one of the most captivating trends in resin art is the integration of natural elements.
By embedding organic materials such as wood, leaves, flowers, and stones into epoxy, you can create stunning, one-of-a-kind pieces that bring the beauty of nature into your home. Whether you're designing furniture, jewelry, or decorative art, natural elements can add texture, color, and a sense of timelessness to your creations.
In this article, we’ll explore how to incorporate natural materials into your epoxy designs and provide practical tips to help you get started.
Why Use Natural Elements in Epoxy Projects?
Adding natural materials to your epoxy projects offers several benefits:
- Unique Aesthetic: No two natural elements are exactly alike, ensuring your project is truly one-of-a-kind.
- Organic Feel: Wood grain, flowers, and stones add warmth and a tactile quality to resin creations.
- Personal Connection: Incorporating keepsakes like seashells or dried wedding flowers can make your designs more meaningful.
- Eco-Friendly Appeal: Using repurposed wood or recycled materials can make your projects more sustainable.

Great Natural Materials to Use
- Wood: Create epoxy river tables, coasters, or jewelry using live-edge wood or driftwood.
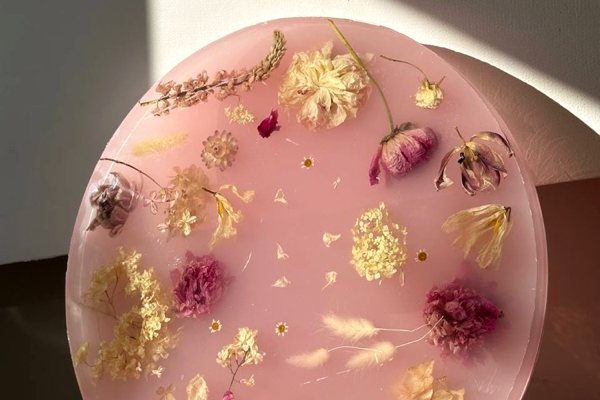
- Flowers and Leaves: Pressed flowers and leaves can be embedded for a delicate, colorful look.
- Stones and Crystals: Add texture and dimension with polished stones, quartz, or geodes.
- Seashells and Sand: Perfect for beach-themed designs.
- Feathers: Lightweight and intricate, feathers create a soft and elegant effect.
- Moss: Bring a rustic or forest-inspired aesthetic to your projects.

How to Prepare Natural Materials
Proper preparation is key to ensuring that your natural elements look great and bond well with the epoxy. It's also important for organic material like flowers to prevent decay or rot later on.
1. Dry Your Materials
Moisture can cause bubbles, discoloration, or improper curing of the epoxy. Make sure your materials are completely dry:
- Use a flower press or silica gel for flowers and leaves.
- Air-dry wood or use a kiln to remove moisture.
- Wash and dry stones, shells, and moss thoroughly.
2. Seal Porous Surfaces
Porous materials like wood and leaves can trap air, leading to bubbles in the resin. Use a clear sealer, such as a thin layer of epoxy (known as a seal coat) or a spray sealant, to coat these surfaces before embedding them.
3. Test Your Arrangement
Lay out your design before pouring the epoxy. This allows you to adjust placement and ensure the composition looks balanced.

Step-by-Step Guide to Embedding Natural Elements in Epoxy
1. Choose the Right Epoxy
- We recommend UltraClear Deep Pour Epoxy for thick applications like river tables or geode art—any project that will need a thick layer of epoxy.
- Opt for UltraClear Bar & Table Top Epoxy for thin layers on flat surfaces such as a table top or a bar top.
- Consider UltraClear Art & Craft Epoxy if you'll be making something small like jewelry, coasters, or coating canvas.
2. Prepare the Mold or Surface
- Clean your mold or surface to ensure proper adhesion.
- Use a mold release agent if working with silicone molds.
3. Mix and Pour the Base Layer
- Mix your epoxy according to the manufacturer’s instructions.
- Pour a thin base layer and use a heat gun to remove bubbles.
- Let this layer cure until tacky.

4. Place the Natural Elements
- Arrange your materials on the tacky surface to keep them in place.
- You can use tweezers for precise positioning.
- Secure lightweight items, like feathers, with a small amount of epoxy. This prevents them from being easily displaced.
Read our techniques guide for tips on this and other embedding methods.
5. Pour Additional Layers
- Mix a new batch of epoxy and pour it over the natural elements.
- Build up layers slowly to avoid trapping air bubbles.
- Use a heat gun or torch between layers to eliminate bubbles.
Learn how to prevent and remove air bubbles in this handy guide.
6. Final Layer and Finish
When you're ready to seal your project, it's time for a final clear-coat layer:
- Add a clear top layer for a smooth, glass-like finish.
- Sand and polish the edges if needed once the resin is fully cured.

Tips for Success
- Work in a Dust-Free Environment: Keep your workspace clean to avoid particles sticking to your resin. We recommend wearing gloves (e.g., disposable nitrile gloves) and a suitable mask while when working with uncured epoxy.
- Use Transparent Epoxy: Clear epoxy highlights the beauty of embedded elements. Tinting is fine, but too much colorant can turn the epoxy dark or opaque, making it difficult to see embedded items.
- Experiment with Pigments: Add subtle color to the resin to complement your materials. You can also aim for a themed approach, such as tinting the resin blue to simulate the look of water.
- Take Your Time: Building layers slowly ensures the best results.
- Test Materials First: Depending on what you'll be embedding, it can be a good idea to check how certain materials react to resin before using them in a major project.
Project Ideas for Natural Elements in Epoxy
- Epoxy River Tables: Combine live-edge wood with colorful resin for a stunning centerpiece. See our river table guide for more information.
- Geode-Inspired Art: Use stones and crystals to mimic natural geode formations. Learn more here.
- Jewelry: Encapsulate pressed flowers or small feathers in pendants or earrings. Our article on flower embedding can help you through that.
- Custom Coasters: Embed sand, seashells, or moss for unique table decor.
- Wall Art: Create nature-inspired scenes with layers of resin and organic materials.

Capture the Beauty of Nature in Resin
Instilling natural elements into your epoxy designs allows you to showcase the beauty of the world while creating your own distinct personalized pieces. By carefully selecting, preparing, and embedding these materials, you can elevate your resin projects to new levels of artistry. Through the use of high-clarity resins like our UltraClear Deep Pour Epoxy and UltraClear Bar & Table Top Epoxy. Allow yourself to explore and experiment, and see how nature inspires your next amazing work!
Have questions? Want advice? Contact us!
If you have any questions about epoxy resin, or if you'd like assistance in planning an epoxy project, please reach out to us at UltraClear Epoxy—our epoxy experts are ready to assist!
You can contact us via phone or email here. During business hours, you can also text chat online with one of our resin specialists by clicking the Help button at the bottom of your screen.
In our online store, you'll find a variety of useful tools and supplies, ideal for resin projects, plus our award-winning UltraClear Bar & Table Top Epoxy and our UltraClear Deep Pour Epoxy.


