Taking Your Epoxy Pours to the Next Level
Once you’ve learned the basics of working with epoxy resin, you may start craving more dynamic, visually striking results. Swirls, waves, ribbons, and color blending are just a few of the artistic techniques used by experienced epoxy crafters to transform a simple pour into a show-stopping masterpiece. Though they may look complex, these effects are well within reach for dedicated DIYers with the right tools, knowledge, and patience.
This guide is designed for beginner-to-intermediate users who are ready to expand their skills and learn advanced epoxy pouring techniques. We'll cover how to create layered effects, manipulate colors while pouring, and achieve special finishes like cells, lacing, and motion. We'll also discuss the tools, timing, and best practices that make it all possible—using high-quality UltraClear Epoxy products every step of the way.

Prerequisites: What You Should Know First
Before jumping into advanced epoxy techniques, it’s important to have a firm understanding of the fundamentals. You should already be comfortable with:
-
Measuring and mixing epoxy properly using UltraClear products
-
Eliminating bubbles with a heat gun or torch
-
Creating basic color blends with mica powder and resin dyes
-
Setting up a safe, level, and temperature-controlled workspace
-
Working with silicone or melamine molds and sealing wood with a seal coat
If you're unsure about any of these, refer to our 2026 Beginner’s Guide to Crafting with Epoxy Resin or Epoxy Tools & Supplies: A Complete Beginner's Guide. You can also contact UltraClear to speak to one of our resin experts during business hours.


Step-By-Step: Advanced Epoxy Pouring Techniques
Throughout this section, we'll be suggesting skills and fundamental epoxy techniques that we recommend having familiarity with. Don't let that dissuade you from trying any of these, though; even making mistakes can be an important part of the process, and attempting something is the best way to gain experience.

Technique #1: Epoxy Lacing
Lacing is a visual technique where two or more epoxy colors interact in ways that resemble seafoam, spiderwebs, or fractals. It’s commonly achieved by pouring a pigmented resin over a base color, then carefully applying heat or air to stretch the resin and create organic patterns.
To attempt this effect, you should have experience with:
-
Colorant handling (especially liquid dyes and alcohol inks)
-
Manipulating resin flow with a heat gun
-
Working quickly, as lacing must be performed while the epoxy is still fluid
Best used with UltraClear Art & Craft Epoxy due to its working time and surface tension characteristics.
Step-by-Step Guide:
-
Prepare your base pour and allow it to level.
-
Mix a second batch of resin and tint it with white pigment or mica powder.
-
Pour the tinted resin in lines or waves over the base.
-
Use a heat gun or air blower to stretch the lines gently.
-
Let the piece cure undisturbed for at least 24 hours.

Technique #2: Layered Depth Pours
This effect involves creating the illusion of 3D depth within a surface by pouring multiple thin layers of epoxy, each with its own design or embedded element (like pigments, inks, or inlays). As light passes through the cured epoxy layers, it reflects the depth in a way similar to looking through water.
Before trying this, you should be able to:
-
Time your pours correctly between curing stages
-
Use precise measurements to avoid pouring too much or too little in your layered work
This technique is popular in table tops and wall art that depict underwater scenes or abstract dimension.
For this technique, you can use any type of craft resin; just be mindful of your chosen epoxy's limitations, as supported layer depth varies by resin (e.g., 1/8 inch for Table Top Epoxy, yet 2 inches for Deep Pour Epoxy).
Step-by-Step Guide:
-
Pour a thin base layer and let it cure until tacky (typically 4 to 6 hours).
-
Add your design elements (e.g., ink swirls, glitter, or objects).
-
Pour the next layer, fully covering previous elements.
-
Repeat layering until desired depth is achieved.
-
Finish with a clear topcoat for protection and gloss.

Technique #3: Dirty Pours
A dirty pour involves combining multiple epoxy colors in a single cup without mixing them thoroughly before pouring them out in one fluid motion. As the colors interact naturally during the pour, they create marbling and abstract swirls with unpredictable beauty.
To perform this technique, we recommend experience with:
-
Choosing complementary or contrasting colors that won’t turn muddy
-
Using appropriate molds or surfaces for horizontal color dispersion
This method works well with UltraClear Bar & Table Top Epoxy and UltraClear Art & Craft Epoxy for their controlled flows and self-leveling features.
Step-by-Step Guide:
-
Mix separate batches of resin and tint each with your chosen colors.
-
Layer the colors into one pour cup without stirring.
-
Pour the cup over your surface in a circular or random motion.
-
Tilt the surface to spread the resin organically.
-
Use a heat gun to remove bubbles and enhance flow.

Technique #4: Resin Petri Dishes (Ink Dispersions)
Petri dish pours utilize alcohol inks dropped into freshly poured epoxy. Despite the label, this technique can be performed using small silicone molds instead of using an actual petri dish. As the ink sinks, it creates beautiful cloudy blooms that freeze in place. While small coasters are a common project choice for this technique, it also scales well into larger art pieces.
For best results, you should understand:
-
Timing for dropping inks (usually 5–10 minutes into the working time)
-
Compatibility of inks with UltraClear Art & Craft Epoxy, which holds color in suspension better than deeper-pour resins and has a more lenient working time than Table Top Epoxy.
Step-by-Step Guide:
-
Pour clear epoxy into a mold or dish.
-
Wait 5–10 minutes until the resin slightly thickens.
-
Drop alcohol inks in desired colors onto the resin surface.
-
Optional: Add a drop of white ink to help inks sink and bloom.
-
Let cure completely without disturbing for best definition.

Technique #5: Embedded Object Pouring
This involves encapsulating objects like flowers, stones, coins, or trinkets in epoxy for a preserved-in-resin look. The trick lies in object placement, pour staging, and ensuring no bubbles are trapped around the embedded items.
Helpful prerequisite skills include:
-
Sealing porous items before embedding
-
Layering epoxy without disrupting previously placed objects
-
Patience with pour timing and visual planning
UltraClear Deep Pour Epoxy is ideal here due to its clarity and longer working time. For thin, flat items, Table Top Epoxy or Art & Craft Epoxy work well, too.
Step-by-Step Guide:
-
Seal porous items with a thin layer of epoxy, Mod Podge, or acrylic spray.
-
Pour a base layer and allow partial curing.
-
Place your objects on the tacky surface to anchor them.
-
Pour additional layers slowly to cover the items.
-
Use a heat gun to eliminate trapped air and cure fully.
For more embedding techniques, see our other dedicated guide here.

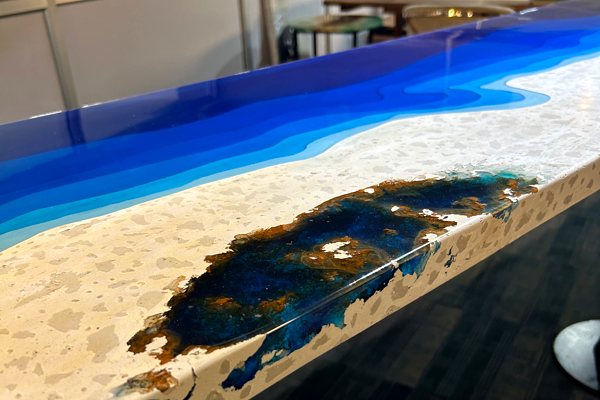
Technique #6: Wave and Ocean Effects
Often used in coastal decor and beach-themed table tops, wave effects use white-pigmented epoxy manipulated with heat and air to mimic crashing surf. A combination of color layering, heat flow control, and ripple styling gives this effect realism and motion.
You should be able to:
-
Use white epoxy lacing as described above
-
Create and blend blue-green gradient backgrounds (much easier than it sounds!)
-
Manage timing carefully to avoid overworking the white epoxy
Best performed using UltraClear Bar & Table Top Epoxy for its quick set and surface finesse.
Step-by-Step Guide:
-
Tint resin with blue, teal, or turquoise shades for ocean base.
-
Pour colors from dark to light in horizontal bands.
-
Mix white pigmented resin for waves.
-
Pour white resin in lines at transition points.
-
Use a heat gun or air blower to stretch the white resin into wave patterns.
-
Optional: Add sand or shells to depict a beach area.

Choosing the Right Epoxy Resin
Different epoxy effects require different working properties. Here’s what to look for:
-
UltraClear Deep Pour Epoxy: Ideal for layered or ocean effects due to its longer open time and clarity in thick pours.
-
UltraClear Bar & Table Top Epoxy: Effective for swirl and marble techniques applied in a thin flood coat.
-
UltraClear Art & Craft Epoxy: Great for fine detail pours, color blending, and pigment-driven designs.
When attempting more intricate pours, high-quality resin is crucial. Inferior products may cure too fast or introduce unwanted bubbles, especially when multiple layers or high pigment loads are used.

Tools & Materials for Artistic Epoxy Work
To successfully execute advanced epoxy techniques, the right tools are just as important as the epoxy itself.
Many of these tools can be considered optional, making a technique easier to perform but not necessary. Regardless, every item here plays a role in control, safety, precision, or creative flexibility.
-
Nitrile gloves
-
These keep your hands protected from skin contact with resin. Unlike latex, nitrile doesn’t degrade in contact with epoxy and the risk of permeation is much lower.
-
-
Silicone-tipped sculpting tools
-
Tools like this allow for fine control when manipulating resin swirls, ink flows, or pigment placement without damaging the surface. Silicone is an excellent material for manipulating and containing epoxy due to epoxy's inability to bond with it.
-
-
Precision droppers and pipettes
-
These are remarkably useful for placing small amounts of resin, pigment, or alcohol ink exactly where you want them. Great for layering or petri dish effects.
-
-
Heat gun (with variable speed and heat settings)
-
A good heat gun provides even, adjustable heat to remove bubbles and direct epoxy flow. Unlike torches, it won't scorch the resin surface or overheat delicate pigments.
-
-
Torch (butane or propane)
-
These are a solid alternative to a heat gun, used to pop surface bubbles quickly. However, they require a little more finesse when using due to their much stronger heat source.
-
-
Silicone measuring cups
-
Reusable and non-stick, they allow accurate pouring and easy cleaning. Especially handy for pigment mixing or small batch pours. Alternatively, for an easier time, you achieve the same with cheaper, single-use plastic mixing containers.
-
-
Pigment scoops and micro spoons
-
These are essentially tiny measuring spoons that help measure dry mica powders consistently to avoid over-saturation or muddy color mixes. You can also just use regular measuring spoons if you have a size that suits your needs.
-
-
Compressed air or mini air blowers
-
Perfect for creating organic resin movements, lacing, or dispersing alcohol inks with directional control. If you use these, be careful not to apply too much force to the resin.
-
-
Painter’s pyramids or risers
-
Use these if you need to elevate your piece off the working surface to prevent sticking and allow clean edge flow when epoxy drips.
-
For the pyramids, be sure to choose decent ones with a non-stick point.
-
-
Silicone mats and drop cloths
-
These types of items are used to protect your workspace and make cleanup easy. Cured epoxy peels right off silicone.
-
-
Respirator mask
-
Useful for safety, especially when fumes may build up in small or enclosed spaces. The quality of epoxy varies by brand, with some being less safe than others.
-
-
Level
-
Ensures your surface is perfectly flat before pouring. Even slight tilts can ruin layered effects or swirl designs.
-

Tips for Better Results
-
Control your environment: Keep your workspace at 70–75°F with low humidity.
-
Plan your color placements: Use a sketch or digital preview.
-
Use clean, dry tools: Moisture can ruin a pour.
-
Work in small sections first: Then scale up once confident.
-
Don’t rush layers: Let each one cure properly before adding more.

Final Thoughts: Artistry Meets Chemistry
Mastering advanced epoxy pouring means understanding both the artistic and chemical sides of the process. With high-quality UltraClear Epoxy products and a bit of practice, you can create effects that rival the best commercial resin art or furniture pieces. Don’t be discouraged by early mistakes—experimentation is part of the learning curve.
Whether you’re enhancing a table top with elegant marbling, designing a resin ocean wave, or layering pigments for a dreamy depth effect, the control you gain through technique will make each new project better than the last.

Have Questions? Want Advice? We're Here to Help!
If you have any questions about pouring epoxy resin, or if you'd like assistance in planning an epoxy project, please reach out to us at UltraClear Epoxy—our epoxy experts are ready to assist!
You can contact us via phone or email here. During business hours, you can also text chat online with one of our resin specialists by clicking the Help button at the bottom of your screen.
In our online store, you'll find a variety of useful tools and supplies, ideal for resin projects, plus our award-winning UltraClear Bar & Table Top Epoxy and our UltraClear Deep Pour Epoxy.
UltraClear Epoxy—Trusted by over 1 Million+ Happy Customers


