Finishing a table with an epoxy coating is one of the most effective and attractive methods you can use when crafting modern table tops. Quality epoxy delivers a crystal-clear finish, offers incredible durability, and seals materials against moisture and wear with a perfectly smooth surface.
For smaller table types like coffee tables, end tables, and console tables, epoxy is a particularly great fit. These surfaces benefit from the strength and visual depth epoxy provides, and they’re superb candidates for artistic enhancements like color swirls, wood inlays, or embedded objects, enabling intrepid DIY users to express their creativity in wide-ranging ways.
Throughout this guide, we'll walk you through how to build an epoxy coffee table, end table, or console table, starting with key differences between these styles and leading into a full list of tools and materials, a detailed build process, creative design ideas, and care tips to help your piece last.

Contents |
|
How to Make an Epoxy Coffee, End, or Console Table Why You Should Avoid Budget Epoxies |
Understanding the Table Types

Coffee Tables
Coffee tables are low, wide tables usually placed in front of a couch or sofa. They’re designed for convenience and casual use—perfect for drinks, snacks, magazines, and decor. Typically, they range between 16 to 18 inches in height.
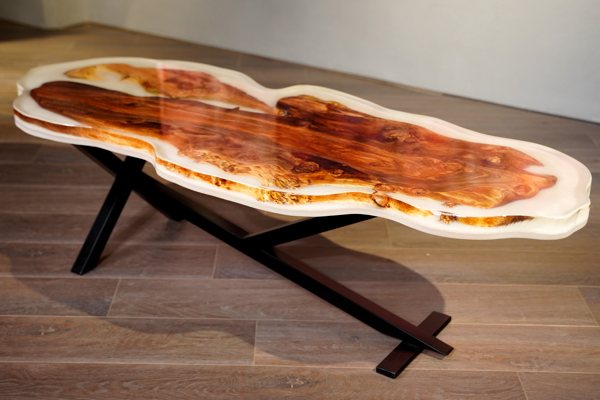
Because they’re often the centerpiece of a living room, epoxy coffee tables benefit from bold design features like wood slab rivers or embedded artistic patterns.

End Tables
End tables are smaller, usually square or round tables placed at the side of a couch, chair, or bed. They're taller than coffee tables—around 20 to 24 inches high—and are often used for holding lamps, remotes, books, or drinks.
For end tables, epoxy is excellent because it adds an attractive, durable finish that protects against scuffs and spills in high-use spaces.

Console Tables
Console tables are tall and narrow, commonly placed along hallways, entryways, or the backs of sofas. Their sleek form makes them great for showcasing decorative items. Most console tables are between 30 to 36 inches tall.
An epoxy surface can elevate the visual appeal while protecting against daily wear and accidental contact in tight spaces.
How These Tables Differ from Dining Tables
Unlike dining tables, these three table types are generally smaller and lighter. Because their purpose is often divided between function and aesthetic, it's easier to incorporate decorative or artistic elements at the expense of a fully smooth, flat surface, expanding your creative options.
Furthermore, they typically also experience different patterns of use—typically involving light to moderate impact rather than regular dining activity.

How to Make an Epoxy Coffee, End, or Console Table
Before you begin your project, take time to plan and prepare thoroughly.
Design Goals: Consider the style and dimensions of your table—whether it's a coffee table, end table, or console table—and determine what type of epoxy design you want to incorporate: a simple clear coat, a colorful pigment blend, or a river-style pour.
Being Informed: Be sure to review the materials you'll need based on your design goals, and make sure your workspace is clean, level, and temperature-controlled.
Proper planning not only prevents mistakes but also ensures a smoother, more enjoyable crafting experience.
Tools and Supplies You'll Need
-
A Suitable Epoxy, Such As:
-
UltraClear Bar & Table Top Epoxy: Perfect for seal coats and final flood coats due to its high-gloss, scratch-resistant finish. Use this as a topcoat for your table. For many types of tables, this is the only epoxy you'll need.
-

- UltraClear Deep Pour Epoxy: This is only needed for deep pour designs like river tables, layered objects, or molds exceeding 1/4 inch depth.
-
Table Top Base or Mold Base: You'll need a table top base to apply the epoxy to. Consider one that matches your desired style—for example, a live-edge wood slab can provide a rustic look. Alternatively, use a silicone or HDPE mold if you're casting the whole top.
- Clamps and Wood Filler (optional): You can use these to fix or secure your board prior to the epoxy applications.
-
Pigments or Dyes (optional): Use mica powder, liquid pigments, or alcohol inks to add color or design effects. In our store, we carry high-grade Pigmently colorants, found here:
-
Mixing Buckets & Stir Sticks: Graduated containers help you measure epoxy accurately. Use stir sticks to mix thoroughly.
-
Leveling Tools: A level ensures your work surface is flat, which is crucial to avoid pooling or uneven curing.
-
Heat Gun or Torch: Used after pouring to remove air bubbles from the epoxy.
-
Sandpaper & Polishing Supplies: For smoothing edges or achieving a desired finish. 120, 220, 400, 1000 is an example of a set of sandpaper grits that would work well.
-
Protective Gear: Gloves, safety glasses, and a respirator mask if working in an enclosed space.
-
Painter's Tape & Plastic Sheeting: To protect surrounding areas from drips and spills.
-
Table Legs or Base: Choose a base that matches your desired height and aesthetic—metal or wood bases are common.

Step-by-Step Instructions
Step #1: Prepare Your Workspace
- Choose a clean, dust-free, and well-ventilated area with stable temperature and humidity. Click here for more info about setting up a workspace.
- Lay down plastic sheeting or drop cloths to protect your floors and nearby surfaces.
- Use a level to ensure your work surface is perfectly flat—epoxy will self-level during curing and can spill over if the surface is tilted.
Step #2: Prepare the Wood Surface
- Sand the wood surface to a smooth finish using 120–220 grit sandpaper. Remove any dust or debris with a tack cloth.
- Apply a thin seal coat of UltraClear Bar & Table Top Epoxy to prevent outgassing bubbles during the flood pour. Learn about seal coats here.
- Allow the seal coat to cure until tack-free (typically 4–6 hours) before proceeding.
Step #3: Build a Form (If Doing a Deep Pour)
Only proceed with this step if you're using UltraClear Deep Pour Epoxy, which is specially formulated for thick layers up to 2 inches deep per pour.
- If you're creating a river-style or filled design with embedded materials that requires more than 1/4 inch of epoxy, build a mold or barrier around the table top to contain the pour.
- Use a non-stick form material (like melamine or HDPE), and apply a mold release agent if necessary.
Step #4: Mix the Epoxy
-
Measure resin and hardener precisely by volume, following the instructions for your chosen product.
- For UltraClear Bar & Table Top Epoxy, use a 1:1 ratio.
- For UltraClear Deep Pour Epoxy, use a 2:1 ratio.
- Mix slowly and thoroughly for 3 to 5 minutes, scraping the sides and bottom of the container to ensure a complete blend. Improper mixing is a common cause of curing issues.
Step #5: Pour the Epoxy
-
For basic table top coatings: Use UltraClear Bar & Table Top Epoxy and pour a flood coat across the sealed surface. Use a spreader to distribute it evenly.
-
For deep-pour projects: Slowly pour UltraClear Deep Pour Epoxy into the mold or recessed area. Do not exceed the max depth per pour (2 inches). If your design requires more depth, wait 12 hours between layers.
Step #6: Remove Air Bubbles
- Use a heat gun or propane torch to remove surface bubbles by passing the heat source quickly over the surface.
- Maintain a distance of several inches while doing this and never linger over any spot for more than a second to avoid causing heat damage to the epoxy.
- After each pass, take a closer look at the surface from different angles to see if there are any bubbles left. If there are, you can do an additional pass to remove them.
Step #7: Let It Cure
- Allow the epoxy to cure in a stable, dust-free environment for at least 72 hours.
- Do not touch or disturb the surface while it cures. Keep pets, dust, and debris away.
- It's important to maintain a 75°F environment for optimal curing. Keep the humidity level below 60% to avoid any issues with moisture.
Step #8: Sand and Polish (Optional)
- If the surface has imperfections or if it has cured but you need to layer another coat, sand lightly with 220–320 grit sandpaper. Wipe clean before reapplying epoxy or finishing.
- To achieve a matte or satin finish, continue sanding with finer grits (up to 1000) and apply a polishing compound if desired.
Step #9: Attach Legs and Final Assembly
- Once fully cured, attach your chosen table legs using a drill and appropriate screws or bolts. Be careful not to overtighten, which can crack the surface.
- Test for stability and levelness.
- Optionally, apply rubber feet or felt pads underneath to protect floors.

Creative Table Design Ideas
Epoxy gives you the flexibility to express your creativity in countless ways, especially when working with small to mid-sized tables like coffee tables, end tables, and console tables.
Because these table tops don’t require large uninterrupted surfaces, you can focus on bold, decorative features—like embedded materials, tinted pours, and artistic wood pairings—that transform a functional piece into a unique work of art. This is especially nice for console tables where a common approach is to use it solely for display purposes in a hallway or near the entrance of a home.

Here are some popular ideas to start with:
-
River Tables: A river table is one which features a thick epoxy vein—often colored—that has been poured between multiple pieces of wood or other material, resulting in the "river" look. It usually consists of a live-edge slab split down the center with pigmented epoxy filling the space but is not limited to one vein or even a conventional lengthwise "river".
-
Marble Look: Epoxy can be pigmented with different tones to simulate the appearance of attractive minerals like such as marble. The most common method is achieved by drizzling gray-pigmented epoxy over a white-colored flood coat to produce streaks that provide a faux marble appearance.
-
Geode-Inspired Designs: Create crystal-like patterns using metallic pigments and embedded stones, crystals, or crushed glass. Check out our guide to this here!
-
Embedded Nature: Press dried flowers, leaves, or pebbles into a clear layer for a naturalistic effect. Learn how to handle items like flowers here.
-
Themed Art Tables: Embed coins, bottle caps, or photos beneath a flood coat for a personalized touch. For embedding techniques, see this guide.

Why You Should Avoid Budget Epoxies
Cheap imported epoxy resins often promise a low upfront cost but come with significant downsides. Many budget-brand epoxies are produced overseas with limited or inconsistent quality control. The result is unpredictable curing behavior, yellowing, and poor bonding, which can jeopardize your entire project.
Low-cost epoxies may also contain impurities or harmful chemicals that don’t meet U.S. safety standards. This poses potential health risks, especially in projects intended for home use. Bubbles, cloudiness, and surface tackiness are all common issues linked to inferior resin formulas.
Learn more about the importance of your epoxy choice here.

UltraClear Epoxy: Long-Lasting Quality and Peace of Mind
In contrast, UltraClear Epoxy products are manufactured in the U.S.A. with strict quality assurance at every step. Whether you choose UltraClear Deep Pour Epoxy or UltraClear Bar & Table Top Epoxy, you’re investing in a formula that delivers a clear, strong, and long-lasting finish with fewer defects and lower maintenance needs. With UltraClear, your table will look better and last longer—and you can trust what’s in the mix.

FAQs: Common Questions About Epoxy Tables
How thick should my epoxy table top be?
For coffee and end tables, a 1" to 1.5" thick top is usually sufficient for strength and appearance. Console tables can be thinner due to lighter use. If casting a full epoxy slab, use UltraClear Deep Pour Epoxy to avoid overheating or improper curing.
Can I use epoxy on a painted surface?
Yes, but only if the paint is fully cured and compatible. Sand lightly to help the epoxy bond, and avoid latex or chalk paints which may not adhere well. Always test a small area first.
How do I prevent bubbles in my pour?
Seal porous materials with a thin seal coat of UltraClear Bar & Table Top Epoxy first. Then, pour your deep layer slowly and use a heat gun or torch to release bubbles. Work in a warm room to reduce viscosity.
Can I place hot items on an epoxy table?
Epoxy can resist some heat, but it is not heatproof. Avoid placing hot pans, mugs, or appliances directly on the surface. Use coasters or trivets to prevent heat damage.
How do I clean and maintain an epoxy table?
Use a soft cloth with mild soap and warm water. Avoid abrasives, alcohol-based cleaners, or acidic products. For a glossy shine, apply a plastic polish or a furniture-safe wax periodically.
For more guidance, check out our epoxy surface cleaning guide.
Is UltraClear Epoxy UV resistant?
Yes—UltraClear Epoxy includes UV stabilizers to reduce yellowing over time. However, no epoxy is 100% UV-proof, so limit direct sun exposure when possible for best longevity.

Have Questions? Want Advice? We're Here to Help!
If you have any questions about epoxy table projects, or if you'd like assistance in planning an epoxy project, please reach out to us at UltraClear Epoxy—our epoxy experts are ready to assist!
You can contact us via phone or email here. During business hours, you can also text chat online with one of our resin specialists by clicking the Help button at the bottom of your screen.
In our online store, you'll find a variety of useful tools and supplies, ideal for resin projects, plus our award-winning UltraClear Bar & Table Top Epoxy and our UltraClear Deep Pour Epoxy.
UltraClear Epoxy—Trusted by over 1 Million+ Happy Customers


