Crafting your own resin bookmarks is a fun way to showcase your epoxy resin skills—or to develop them if you're new to resin art. This DIY project is not only relatively simple, but also small, so you can do iterations of various ideas to try out different designs and colors.
In this step-by-step guide to DIY resin bookmarks, we'll explain what resin bookmarks are, the best epoxy to use in crafting them, and how to make and personalize them to give them your unique sense of creative expression.
What are resin bookmarks?
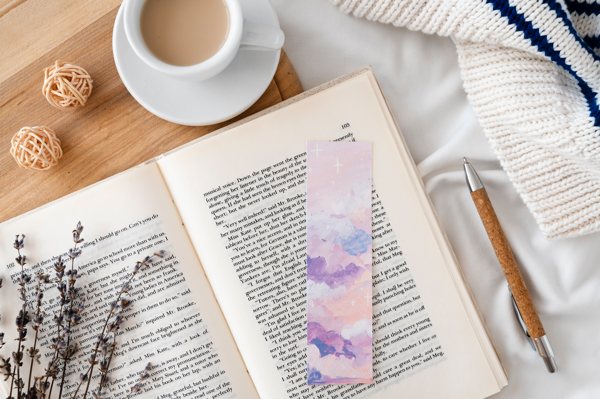
Resin bookmarks are long, thin decorated strips of resin. Ostensibly, they can be used for saving your place in whatever book you might be reading, but in practice they're also often a decoration displayed for their aesthetic appeal.
These bookmarks are made using craft epoxy resin as a core ingredient, which is poured carefully into a bookmark mold. Various additional ingredients can be added to the recipe to give the resin bookmark a distinct appearance—things like colorful powder pigments, glitter, sequins, tiny photos, and much more.
After pouring the resin and applying any decorative objects, the epoxy is given time to cure, at which point it will harden into a beautiful piece of art.
Resin bookmark designs can vary greatly. Because of their simple shape and epoxy's versatility when it comes to embedments and coloring, there's a lot of room for you to be creative.
Many newcomers elect to start with simple creations, such as tinted epoxy using resin dyes, or using glitter to write a word or name. But if you're already familiar with epoxy, or you're just feeling bold, it's worth experimenting with different ideas to discover intricate designs of your own.

What is UltraClear Art and Craft Epoxy?
UltraClear Art and Craft Epoxy is our high-quality, two-part epoxy resin designed specifically for resin art projects. It's the ideal choice for artists and other creators who want something that is easy to work with but will hold up beautifully long-term.
UltraClear Art and Craft Epoxy is:
- A crystal-clear resin: Get absolute clarity in your art.
- Highly receptive to colorants: Achieve that perfect hue in every batch.
- Strong and resilient: It doesn't wear thin over time; this resin is durable.
- 100% Made in the USA: Our Art and Craft Epoxy is made right here at home—never imported.
Our craft epoxy has been carefully formulated to prevent yellowing and ward off bubbling—without cracking or fading. With UltraClear Art and Craft Epoxy, you get a top-tier craft resin without the excessive cost.
The value of using a premium craft epoxy for your resin bookmarks
The quality of the epoxy you choose to craft your resin bookmarks has a significant impact on your final results. By using high-quality epoxy like our UltraClear Art and Craft Epoxy, you can ensure your bookmarks are clear, durable, and long-lasting.
A good quality epoxy will provide a high-gloss finish that enhances the look of your designs, rather than impede them. It's also more resistant to scratches and wear, meaning your bookmarks will look new for much longer. Additionally, high-quality epoxy has better bubble release properties, reducing the chances of getting unwanted air bubbles in your bookmarks.
Essential Materials for Making Resin Bookmarks
Crafting your own resin bookmarks isn't complicated, but it does require several different supplies.
Here are the different tools and materials you'll need for your project:
- UltraClear Art and Craft Epoxy - Our top-tier craft epoxy designed for resin art.
- Silicone bookmark molds - These are what you can pour your epoxy into to make picture-perfect bookmarks.
- Mixing cups and stir sticks - You'll use these to mix up your epoxy resin batch before pouring.
- Heat gun or torch - Either of these will enable you to quickly remove any bubbles that appear in the resin as it begins curing.
- Decorative elements (glitter, dried flowers, etc.) - This can be almost anything. Just make sure it will fit on or within your bookmarks, which are usually quite thin.
- Gloves and protective gear - We recommend wearing these to stay safe anytime you're working with epoxy resin. Nitrile gloves are affordable and effective here. You can also wear an N95 mask to filter out any light fumes from your chosen epoxy.
Just remember—safety comes first. Do you work in a well-ventilated area and use gloves and protective gear to prevent direct contact with the skin.
Preparing Your Workspace for Resin Bookmark Creation
Once you have all your materials ready, the next step is to prepare your workspace. This involves ensuring that your work surface is level, clean, and covered with a protective sheet to prevent accidental spills.
We also recommend placing your materials and tools within reach for convenience.

Step-by-Step Guide: How to Make Resin Bookmarks
Now that everything is set, let's dive into the process of how to make resin bookmarks.
-
Prepare the epoxy: Start by mixing your chosen epoxy resin according to the manufacturer's instructions. Make sure to stir slowly to minimize air bubbles. If you're using mica powder pigments, be sure to add those during mixing. A very small amount will probably be plenty, and you can add more as needed.
-
Add decorative elements: Once your resin is ready, you can add your decorative elements into the mixture.
-
Pour the resin: Carefully pour the resin into your bookmark mold. Use a torch or heat gun to pop any visible bubbles.
-
Let it cure: Allow the resin to cure fully. This might take anywhere from 12 to 72 hours depending on the brand of epoxy you're using.
-
Demold: Once fully cured, gently remove the bookmark from the mold. If you used our craft epoxy, it should come out fairly easily and be ready for use.
Once you've finished step 5, your bookmark will be complete! You can keep them for your own use, gift them to friends, or sell them online.
Creative Ideas for Personalizing Your Resin Bookmarks
One of the best parts about making resin bookmarks is personalizing them. From incorporating your favorite colors and glitter to adding meaningful trinkets or dried flowers, there's a lot of opportunity for customization.
For an extra touch, you can even add small photographs or create a theme around your favorite book or character. Experiment with different ideas and see what you can come up with!

Have questions? Want advice? Contact us!
At UltraClear Epoxy, your satisfaction is our number one priority. We're committed to providing the best in support.
If you have any questions about crafting resin bookmarks, or if you'd like advice planning any type of epoxy project, please reach out to us. Our resin experts are ready to assist!
You can contact us via phone or email here. During business hours, you can also text chat online with one of our resin specialists by clicking the Help button at the bottom right of your screen.


