Artwork You Can Serve With
Use of epoxy resin in the 21st century for functional art has gradually spread among creators in DIY and professional craftsmanship alike. One of the most approachable projects in this vein is crafting a custom epoxy serving tray.
These trays are more than just decorative—they're durable enough to handle daily use while offering you a chance to express your personal style. Whether you're hosting a gathering or simply serving coffee on a lazy morning, a resin tray can turn an everyday task into a small delight.
Below, we'll cover three popular styles of epoxy serving trays, each with its own creative appeal. We’ll walk you through what they are, how to make them, and share helpful tips along the way to ensure your project is both successful and enjoyable.
Contents |
|
Three Common Types of Epoxy Serving Trays Tools and Supplies for Epoxy Serving Trays How to Make Resin Trays: Step-by-Step Guides |

Three Common Types of Epoxy Serving Trays
While there are many ways to make an epoxy serving tray, three types remain the most prevalent due either to their beginner-friendly design or beautiful aesthetic appeal.
#1: Simple Molded Resin Tray
This tray type is the easiest to get started with, especially for DIY beginners. It primarily involves pouring UltraClear Art & Craft Epoxy into a silicone tray mold. You can customize the epoxy with pigments, dyes, or glitter, as well as small embedded objects. It’s great for learning the basics and experimenting with artistic effects.
Skill Level: Beginner
Special Considerations: Learn how to eliminate bubbles using a heat gun or torch after pouring.
#2: Wood & Resin Tray
This tray type combines a wooden base or panel with a resin coating or fill. The resin may be poured over the wood to act as a glossy protective surface, or used in carved or recessed areas for artistic accents. It’s ideal for those who want a rustic-meets-modern look.
Skill Level: Beginner to Intermediate
Special Considerations: Ensure the wood is sealed and dry before pouring. A seal coat is often needed to prevent bubbles.
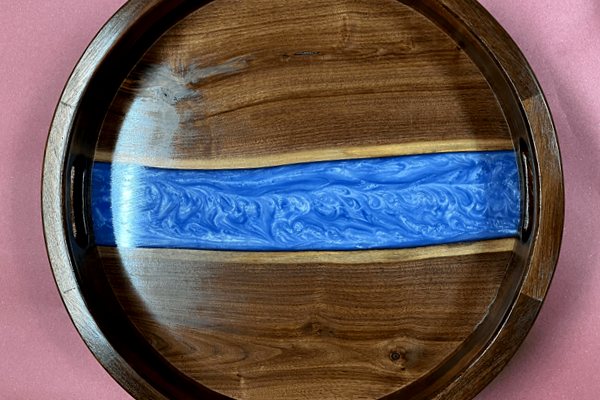
#3: Epoxy River Tray
Inspired by river tables, this tray features a central resin channel (the "river") running between two wooden slabs. It's a scaled-down version of a popular furniture style and offers dramatic aesthetic potential.
Skill Level: Intermediate
Special Considerations: Use UltraClear Deep Pour Epoxy for deeper pours and make sure your mold is tightly sealed to avoid leaks.

Tools and Supplies for Epoxy Serving Trays
When planning any epoxy tray project, it’s important to have all the necessary tools and materials on hand. The supplies listed below include everything you’ll need for most resin tray projects. Each item plays an important role in ensuring a successful and safe epoxy pour.
Essential Supplies
-
UltraClear Art & Craft Epoxy—This is the recommended epoxy for small- to medium-scale artistic projects like trays. It’s designed for thin pours, has excellent self-leveling properties, and cures to a crystal-clear, durable finish. Its low-viscosity formula makes it ideal for detail work, pigments, and small embedding.
-
Mixing cups and stir sticks—Accurate measuring and thorough mixing are crucial to epoxy’s performance. Graduated mixing cups help ensure the proper 1:1 ratio, while stir sticks allow you to fully blend the resin and hardener to avoid soft spots or improper curing. You can find some in our store on the following pages:
- Stir Sticks for Mixing Epoxy (for manual stirring)
- 5-Quart Mixing Container (for preparing large batches)
- 1-Quart Mixing Container (for preparing small batches)
-
Level work surface—A flat, level surface prevents epoxy from pooling or running unevenly to one side of the tray. Even slight angles can cause distorted finishes or overflow, especially with shallow molds or frame-style trays.
-
Protective gear—Epoxy resin should be handled with care. Nitrile gloves protect your skin from irritation, and safety glasses prevent accidental splashes. Always work in a well-ventilated space, and consider a respirator mask if ventilation is limited.
-
Tray mold or frame—The mold or frame shapes the tray. Silicone molds are perfect for resin-only trays due to their flexibility and non-stick properties. Wooden frames are better for hybrid or river-style trays and allow more control over design features.
-
Painter’s tape—Painter’s tape is used to mask off areas you want to keep clean and is especially useful for sealing gaps in wooden tray molds or frames. It also helps keep epoxy from seeping through seams or dripping onto unwanted surfaces.
-
Heat gun or torch—After pouring, bubbles may rise to the surface of the epoxy. A heat gun or torch is used to gently eliminate these bubbles, resulting in a smoother, glass-like finish that’s essential for aesthetic quality.
Optional Supplies
-
Pigments or dyes—These include mica powders for shimmering metallic tones and translucent resin tints for subtle hue variations. Either type offers unique visual results, allowing you to create custom looks for your tray. The Pigmently lineup in our store features potent, high-quality colorants with many shades to choose from:
-
Embedding materials—From dried flowers and glitter to stones and seashells, embedded items can give your tray a one-of-a-kind appearance. They must be clean and completely dry to avoid cloudiness or moisture interference during curing.
-
Handles (for serving trays)—Handles can be added to either side of a tray for practical carrying use. They also enhance the final look—metal, wood, or resin handles can complement the overall style. Be sure to pre-drill if you're installing them into wood.
-
Sanding tools—After demolding or curing, sanding tools help remove any sharp edges or uneven surfaces. Sandpaper, sanding blocks, or electric sanders can also prepare a surface for an additional topcoat or polish.
-
Rubber feet or felt pads—These are applied to the underside of trays to prevent scratches on table tops or counters. They also add grip and prevent trays from sliding, especially on slick surfaces like glass or tile.

How to Make Resin Trays: Step-by-Step Guides
Below, we've placed step-by-step guides for each of the three epoxy tray types mentioned earlier. While the process is similar for all of them, they each vary slightly in how they are crafted.

How-To #1: Simple Molded Resin Tray
-
Prepare your mold: Clean the silicone mold and ensure it's dry and free of debris. Place it on a perfectly level surface to avoid uneven results.
-
Mix the epoxy: Measure equal parts of UltraClear Art & Craft Epoxy resin and hardener, then stir slowly for several minutes to fully blend. Avoid whipping the mixture, as this introduces excess air bubbles.
-
Add color or embedding materials: If desired, mix in resin dye or mica powder, or add items like glitter and small objects. Stir gently to keep the blend smooth.
-
Pour the epoxy: Slowly pour the mixed epoxy into the mold. Pour in a spiral or zig-zag motion to distribute evenly and reduce trapped bubbles.
-
Remove bubbles: After pouring, lightly pass a heat gun or torch over the surface to eliminate bubbles. Repeat as needed within the working time.
-
Allow to cure: Let the tray cure undisturbed in a clean, dust-free environment. Cover it loosely if needed to protect from dust. Curing may take 24–72 hours.
-
Demold and finish: Once fully cured, gently remove the tray from the mold. Sand the edges if needed and attach rubber feet to the bottom.

How-To #2: Wood & Resin Tray
-
Prep your wood base: Sand the surface thoroughly and wipe it clean. Apply a thin seal coat of epoxy to prevent air bubbles from escaping during the flood coat.
-
Prepare a mold or frame: Use painter’s tape and caulk if needed to seal any gaps. This prevents leaks during the pour.
-
Mix the epoxy: Follow the same careful mixing method with UltraClear Art & Craft Epoxy. Mix enough to cover the base and fill your intended depth.
-
Add pigment or embed items: Incorporate colorants into your epoxy or place embedding materials on the sealed wood base before pouring.
-
Pour over the wood: Slowly pour epoxy over the center and let it spread out. Use a stir stick to guide it into corners if necessary.
-
Eliminate bubbles: Use a torch or heat gun to gently remove bubbles from the surface. Keep the tool moving to avoid scorching.
-
Let it cure fully: Allow the tray to cure on a level surface. Full curing may take up to 72 hours depending on conditions.
-
Add finishing touches: Sand the edges if desired, install handles, and attach rubber feet to complete the tray.

How-To #3: Epoxy River Tray
-
Select and prep wood slabs: Obtain two pieces of live-edge or milled wood. Dry them thoroughly, sand, and seal the edges to prevent bubble release.
-
Build the tray mold: Create a mold using melamine or sealed plywood and silicone. Clamp the wood pieces in place with space between them to form the river channel.
-
Seal gaps: Apply painter’s tape and caulk along the base to stop leaks. Make sure the mold is completely watertight before continuing.
-
Mix Deep Pour Epoxy: Use UltraClear Deep Pour Epoxy for deeper pours between wood slabs. Mix carefully in large batches following the product’s ratio.
-
Add color or effects: If desired, tint your epoxy or add metallic swirls using mica powders. Pour slowly into the channel to minimize bubbles.
-
Use a heat gun or torch: Gently remove surface bubbles after pouring. This involves activating your heat gun or torch and passing over the epoxy from a distance of several inches, without lingering for more than a second over any one spot.
-
Once a complete pass has been performed, take a close look at the resin surface from different angles to see if any bubbles remain. You may need to return periodically during the first hour of curing.
-
-
Cure undisturbed: Deep pours require longer cure times—up to several days—but 72 hours within good curing conditions is adequate for light use. Cover to prevent dust contamination.
-
Unmold and finish: Disassemble the mold, sand edges, and polish the surface if needed. Add handles or feet as the final touch.

Why Budget Epoxies Fall Short
At first glance, budget-brand epoxies can seem like a cost-saving solution, but they often come with major drawbacks that undermine your project. Cheap epoxies are frequently made overseas with inconsistent quality standards. This can lead to issues such as improper curing, yellowing, or brittleness.
In many cases, these epoxies aren’t formulated for the demands of crafting. They may contain contaminants or improper ratios of resin to hardener, resulting in sticky surfaces, trapped bubbles, or incomplete curing. Worse still, they can release unpleasant or unsafe fumes during application.
Budget products rarely offer reliable customer support. If something goes wrong, you're often left troubleshooting alone, risking wasted time, money, and materials. That's why your epoxy choice matters so much.

Why Choose UltraClear Epoxy?
In contrast to subpar budget-brand epoxy, all UltraClear Epoxy resins are carefully produced with high-grade ingredients to ensure consistent quality and safety, and each UltraClear Epoxy product is manufactured in the USA to strict quality standards. They're easy to use, exceptionally clear, and highly durable.
At UltraClear, we recommend two of our resins for epoxy tray projects:
-
UltraClear Art & Craft Epoxy for any type of tray that doesn't require an extra-thick (greater than 1/4 inch) epoxy finish.
-
UltraClear Deep Pour Epoxy for river-style trays or thick finishes.
With UltraClear, you get premium performance and peace of mind knowing your surface will stay beautiful and functional.

FAQs: Crafting & Caring for Epoxy Trays
Can I serve food directly on my epoxy tray?
Once fully cured, UltraClear Epoxy is non-toxic and safe for incidental food contact. Avoid cutting directly on the surface, though, as it's not meant to serve as a food prep surface.
How do I prevent bubbles in my resin tray?
Always use a heat gun or torch right after pouring to release air bubbles. For trays with a wooden substrate, a seal coat can help prevent air from escaping into the resin.
What’s the cure time for UltraClear Epoxy?
Cure time depends on the product and the pour thickness, as well as the environmental conditions of the space in which it cures. Most trays cure within 24 to 72 hours, while deeper pours may take 3 to 5 days.
We recommend allowing for a full 72 hour curing period before using the tray to ensure adequate hardening of the epoxy.
How can I clean my epoxy tray?
Use a soft cloth and mild soap to wipe away any residue or debris. Avoid abrasive cleaners (e.g., bleach solutions or vinegar) or scrubbing pads that could scratch the surface.
Learn more about what works for cleaning epoxy here.
Can I add handles to my tray?
Yes, handles can be added to most epoxy serving trays, especially hybrid or river trays with wooden frames.
- After the epoxy has fully cured, use a drill to carefully make holes for the handle hardware.
- Be sure to measure and mark the location beforehand to ensure symmetry.
Handles not only make it a lot easier to move around but also add a stylish, finished look to your tray.
What’s the best epoxy for resin trays?
While all UltraClear resins work for crafting resin trays, UltraClear Art & Craft Epoxy is the top choice for most resin tray projects. It can be poured like our Bar & Table Top Epoxy but is also designed for intricate resin art, with slightly lower viscosity which allows users to manipulate it more easily to create interesting patterns and designs.
For tray designs requiring thick pours or deep embedded river channels, use our UltraClear Deep Pour Epoxy is ideal, as it can be poured in layers up to 2 inches thick without developing blemishes or imperfections.

Have Questions? Want Advice? We're Here to Help!
If you have any questions about epoxy serving trays, or if you'd like assistance in planning an epoxy project, please reach out to us at UltraClear Epoxy—our epoxy experts are ready to assist!
You can contact us via phone or email here. During business hours, you can also text chat online with one of our resin specialists by clicking the Help button at the bottom of your screen.
In our online store, you'll find a variety of useful tools and supplies, ideal for resin projects, plus our award-winning UltraClear Bar & Table Top Epoxy and our UltraClear Deep Pour Epoxy.
UltraClear Epoxy—Trusted by over 1 Million+ Happy Customers


