Artistic Function Meets DIY Simplicity
Epoxy resin art continues to be a favorite gateway into the world of crafting with resin, offering an ideal mix of creativity and accessibility. Resin trays, in particular, have proven to be one of the most rewarding projects for both beginners and experienced crafters. Not only are they visually captivating, but they also serve a practical purpose in any home or workspace.
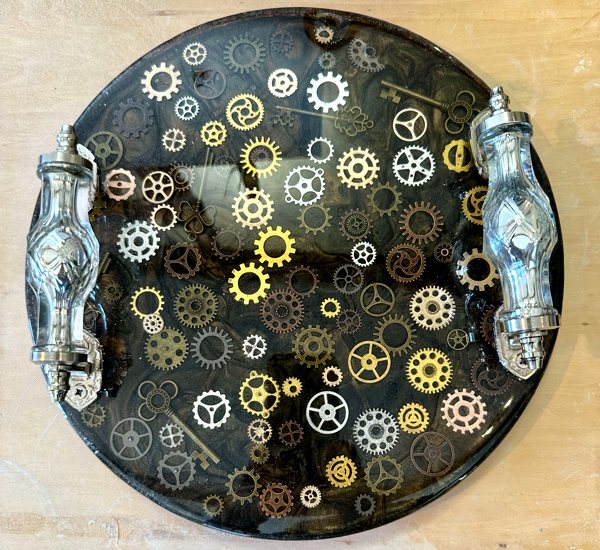
In this article, we highlight epoxy resin tray projects created using UltraClear Epoxy, examining what makes these trays stand out and how you can craft one yourself. We'll explore the different types of trays, discuss which UltraClear Epoxy to use, and provide helpful guidance to get started on your own resin tray creation.

What Are Resin Trays?
Resin trays are functional pieces of resin art designed to hold, transport, or display small items. The most popular type is the serving tray, a flat surface with handles, often used to carry drinks, food, or decor items between rooms. These trays combine beauty and functionality, offering a personalized surface that can be both practical and decorative.
Smaller, decorative resin trays are often used as jewelry holders, coin catchers, or vanity organizers. They’re compact, elegant, and perfect for showcasing embedded flowers, stones, or color effects. Other types include rolling trays, makeup trays, desk trays, or accent pieces used as artistic centerpieces. While each type differs in size or purpose, they all follow the same basic crafting principles and can be tailored to match any aesthetic.

Design Considerations for Epoxy Resin Trays
The design process for an epoxy tray is often the most enjoyable part. Your tray can reflect your style with different colors, textures, embedded elements, and even the tray’s shape or frame.
Some key considerations include:
-
Tray Shape and Depth: Do you want a deep-sided tray for carrying beverages, or a shallow one for holding jewelry? You can use pre-made silicone molds, wooden tray blanks, or build your own.
-
Color Palette: Choose resin-safe pigments from Pigmently such as powder pigments or resin dyes to create the look you want—whether that’s ocean blues, gemstone tones, metallic swirls, or opaque pastels. Think about whether you want uniform color, gradients, or abstract color blending.
-
Inclusions and Effects: Consider embedding small objects like shells, dried flowers, glitter, stones, or even gold flakes. These details can add visual depth and texture.
-
Use of Wood or Other Substrates: Many trays incorporate a wood base or sides for added structure. Live edge wood adds a rustic touch, while flat panel wood can provide a neutral canvas. You might also use ceramic tiles, acrylic sheets, or MDF for different appearances.
The final product should balance your artistic goals with practical needs, like weight, ease of use, and durability.

Beginner Tips: How to Get Started with Resin Trays
If you’re new to resin art, trays are a great place to begin. Here are a few beginner-friendly tips:
-
Start with a Silicone Mold: These are readily available online and in craft stores. Choose one with built-in handles if you want to create a serving tray. You can also add handles of your own, which is a slightly trickier task.
-
Choose the Right Epoxy: For trays, we recommend UltraClear Art & Craft Epoxy for detailed, pigment-rich pours. You can also use UltraClear Bar & Table Top Epoxy for a stronger, more protective finish.
-
Use Quality Colorants: Stick with high-quality brands like Pigmently to ensure stable coloration and avoid clumping or uneven curing. You'll find the Pigmently collections on the following pages:
-
Mix Carefully: Always follow the manufacturer's instructions for mixing epoxy to avoid sticky or soft spots in your final product. Use graduated cups and mix slowly to reduce bubbles.
-
Protect Your Workspace: Lay down plastic sheeting or parchment paper and work in a well-ventilated area. Keep dust, hair, and other particles away from curing resin.

Basic Step-by-Step Guide for an Epoxy Serving Tray
Creating a resin serving tray is a beginner-friendly project that offers lots of room for creativity. Below is a simple guide you can follow:
-
Prepare Your Workspace: Choose a work surface and cover it with over your work surface with a drop cloth or disposable plastic. Make sure your tray mold or base is clean, level, and ready.
-
Mix Your Epoxy: Using UltraClear Art & Craft Epoxy, carefully mix your resin and hardener according to the manufacturer’s instructions. Stir slowly with stir sticks to minimize bubbles.
-
Add Color (Optional): If you’d like to tint your resin, stir in Pigmently mica powder or resin dye. Mix thoroughly for even distribution.
-
Pour the Resin: Slowly pour the mixed resin into your mold or onto your tray base. Spread evenly using a stir stick or resin spreader.
-
Add Embedded Items (Optional): Place dried flowers, glitter, shells, or other inclusions into the wet resin. Press them gently so they are submerged but visible. (See our embedments guide for more details).
-
Remove Bubbles: Use a heat gun or torch briefly over the surface to remove any air bubbles. Be cautious not to overheat.
-
Let It Cure: Allow the epoxy to cure undisturbed. Initial curing may take 12–24 hours—making it safe to touch but not use—with full-use curing happening after about 72 hours.
-
Demold or Finish Edges: If using a silicone mold, demold once cured. For wood trays, check for resin overflow and sand edges if needed.
-
Add Handles (Optional): Drill and install handles if your tray is designed to be carried.
-
Final Clean and Polish: Wipe the surface with a microfiber cloth. If needed, apply a polish safe for epoxy to enhance the shine.
Your tray is now ready to use or gift!

Why Budget Epoxies Fall Short
Although it's tempting to save money on epoxy, using one of the many low-cost imported resins available these days can lead to numerous issues. Many budget-brand epoxies have poor curing consistency, resulting in tacky or cloudy finishes. They’re often more susceptible to yellowing, scratching, or developing surface imperfections after curing.
Quality control is another major concern. Inconsistent formulas can result in unpredictable reactions, leaving projects with air bubbles, poor clarity, or weak bonding. Some cheap epoxy brands may even include harmful additives or lack the testing needed for safe indoor use.
New users to epoxy often do not realize how important their choice of epoxy actually is.

The UltraClear Advantage
Choosing UltraClear Epoxy ensures your resin tray projects benefit from:
-
A strong, crystal-clear finish
-
Smooth self-leveling properties for even coverage
-
Low-maintenance, easy-to-clean surfaces
-
Long-term durability that resists wear and tear
-
Safe, consistent curing with every batch
Plus, UltraClear Epoxy products are proudly made in the U.S.A., meeting U.S. regulatory requirements along with our own high standards. With this, you can have the peace of mind that you're working with premium, reliable materials that have undergone rigorous quality testing.
Recommended epoxy products for resin tray projects:
-
UltraClear Art & Craft Epoxy—Great for colorful designs, detailed pours, and artistic layers. We recommend this for projects involving intricate customization.
-
UltraClear Bar & Table Top Epoxy—Similar to our art epoxy, this resin type features higher viscosity and is less easy to manipulate but cures to a stronger finish. Ideal as a final coating for added durability and a glossy finish.

FAQs: Common Questions About Resin Trays
Can I use any epoxy to make a resin tray?
Not all epoxies are formulated the same. For artistic trays with embedded objects or pigments, UltraClear Art & Craft Epoxy is best. For topcoats, use UltraClear Bar & Table Top Epoxy for strength and shine.
UltraClear Deep Pour Epoxy can be used for trays involving thick layers, such as a river vein. This could be considered a more advanced technique, though newcomers often find it easier than it seems as long as they are careful to follow provided instructions.
How long does it take for a tray to cure?
- Initial curing takes about 24 hours; this makes it safe to touch be we don't recommend using it just yet.
- Full hardness typically requires 72 hours. Wait at least that long before using your tray.
- This is true for all UltraClear Epoxy products and attempts to account for environmental conditions that may stall the curing process. In some situations, curing may take even longer even with well-mixed epoxy. Such cases are often due to low temperatures.

Can I serve food on a resin tray?
- This answer depends on the epoxy used. UltraClear Epoxy resins (e.g., UltraClear Art & Craft Epoxy) are all food safe after fully curing. That said, we recommend placing food on surfaces intended for it, such as a plate or parchment paper.
- Don't use the epoxy surface to prepare food; sharp knives can cause damage and extreme heat can soften or warp the epoxy surface.
Why is my tray sticky after curing?
This usually indicates an improper resin-to-hardener ratio or inadequate mixing. Always follow the instructions precisely.
Learn what you can do to resolve this issue here.

Is it safe to make resin trays indoors?
Yes, if your workspace is well-ventilated. Always wear gloves and a respirator when working with epoxy.
What happens if my tray gets scratched?
Light scratches can be buffed out with resin polish. For deeper flaws, you can recoat the surface with UltraClear Art & Craft Epoxy or UltraClear Bar & Table Top Epoxy.

How do I clean my resin tray?
Use a soft cloth with warm water and mild soap. Avoid abrasive sponges or harsh cleaners. Epoxy is very easy to keep clean and maintained with gentle household cleaning supplies.
Can I embed flowers or small objects in a tray?
Yes—in fact, this is a popular design choice due to the pleasing aesthetic and variety it lends to creators. Be sure to fully dry any organic material before embedding to avoid moisture issues.
Learn how to prepare flowers for embedment within epoxy here.

Have Questions? Want Advice? We're Here to Help!
If you have any questions about epoxy resin trays or resin art in general, or if you'd like assistance in planning an epoxy project, please reach out to us at UltraClear Epoxy—our epoxy experts are ready to assist!
You can contact us via phone or email here. During business hours, you can also text chat online with one of our resin specialists by clicking the Help button at the bottom of your screen.
In our online store, you'll find a variety of useful tools and supplies, ideal for resin projects, plus our award-winning UltraClear Bar & Table Top Epoxy and our UltraClear Deep Pour Epoxy.
UltraClear Epoxy—Trusted by over 1 Million+ Happy Customers


