Where Art and Utility Meet
Most epoxy table tops stick with familiar designs—wood slabs, flat molds, symmetrical builds—but there’s a world of opportunity beyond the basics. From stylized ocean wave coffee tables to river tables celebrating cultural patterns, epoxy allows for detailed, layered expressions that blend form and function. These projects don't just protect your surface; they tell a story, evoke a mood, or celebrate a concept.
In this article, we'll explore these one-of-a-kind resin table tops—what they are, advice on how to make them, and why the right epoxy matters. Along the way, we’ll showcase striking examples of artistic resin tables and offer practical advice for those eager to begin their own.

Artistic Table Types—Styles That Make a Statement
While traditional tables aim for a classic finish, artistic resin tables embrace bold, unconventional elements.
Here are a few examples:
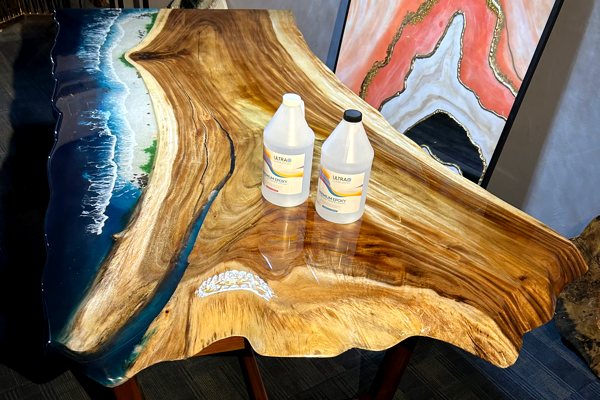
Ocean-Themed Table Tops
With carefully tinted epoxy using one of our UltraClear Epoxy products, along with white pigment accents, these capture the essence of crashing waves or tranquil lagoons.
Artists often use layered pours, airbrush techniques, and embedments like shells or sand.
Themed River Tables
River-style tables can feature more than just translucent blue channels. With careful planning, creators can use embedded stones, coins, beads, and even miniature landscapes to tell a cultural or personal story.
Barrel Tables and Reclaimed Builds
Old barrels, salvaged wood, or industrial objects form the base for complex epoxy designs.
Despite their atypical design, these table types often benefit most from a standard UltraClear Bar & Table Top Epoxy finish, which provides a strong, high-gloss surface while preserving the rustic character beneath.
Embedment Designs
Coins, keepsakes, or memorabilia can be set into layers of UltraClear Bar & Table Top Epoxy or UltraClear Deep Pour Epoxy. These tabletops serve as functional memory pieces—perfect for family heirlooms, restaurants, or gifts.
Even sticking with one type of object, such as pennies, can allow you to convey different patterns and imagery by carefully arranging each item based on the color of its tarnish—there's often quite a distinction between old and new pennies!
Planning a Themed Epoxy Table Top
Before you dive into your project, spend some time developing a cohesive theme. A well-thought-out concept will guide your material choices, color scheme, layout, and layering techniques, ensuring the final table is both visually striking and structurally sound.
Taking the time to plan your themed epoxy table top in detail minimizes costly mistakes and gives you a clear creative direction, especially when layering and embedments are involved.
Choose a Strong Concept
Your table should tell a story or evoke a distinct mood. Common themes include nature (beach scenes, forest floors), nostalgia (vintage coins, memorabilia), fantasy (mythical landscapes, cosmic patterns), and cultural elements (tribal designs, symbolic embedments).
You probably already have an inkling of what you want before you ever start planning, but if not, take time to determine what might resonate with you or those around you.
Sketch Your Design
Draw out your layout ahead of time. Indicate where key elements like embedded items, colored pours, or texture changes will go. This helps you plan your pour sequence, pigment choices, and mold or base preparation.
Curate Embedments Carefully
Use items that reflect your theme while being compatible with epoxy. Avoid anything perishable or prone to trapping air.
Good embedment examples are sand, pebbles, coins, metal charms, glass pieces, or artificial plants. If you're not sure about something, test it first for durability and sealability.
You can also contact us to speak with a resin expert for guidance.
Layer With Intention
Epoxies come in different types, each with its own limitations on how thickly they can be poured.
- For builds that need a lot of depth (i.e., an extra thick resin layer), use UltraClear Deep Pour Epoxy.
- Additionally, try to break your design into multiple pour stages.
- For instance, a beach scene might begin with a sand layer, followed by embedded shells, then tinted blue resin for the “water,” topped off with a white pigment wave effect using UltraClear Bar & Table Top Epoxy.
Balance Function and Form
While artistic tables are decorative, they still usually—but not always—need to function as furniture. If yours is such a case, be sure to keep the top surface smooth and level, especially in areas meant to hold drinks or objects. Position raised or textured elements below the final epoxy coat so the table remains usable.
Test Samples When Possible
If your project involves unusual combinations of pigments or materials, run a small test pour first. This will help you get a sense of compatibility, transparency, and curing behavior before committing to your full design.

Beginner Tips for Making Your First Artistic Table
Interested in making your own artistic resin table? Here are a few foundational tips to get started:
Choose a Simple Theme First
Start with a manageable concept like an ocean table, where you can use natural embedments and practice layering techniques. This gives you hands-on experience with depth pouring and pigment dispersion.
Start with a Pre-Built Table or Base
Rather than building a base from scratch, use a ready-made table or sturdy slab. Local thrift stores, flea markets, or salvage yards are great places to find furniture bases with potential.
Tools & Supplies You'll Need:
-
UltraClear Deep Pour Epoxy or UltraClear Bar & Table Top Epoxy (depending on your design)
-
Silicone mold (for rivers or shaped sections)
-
Pigments and resin dyes (mica powders, alcohol inks, etc.)
-
Natural embedments or custom objects
-
Torch or heat gun (for bubble removal)
-
Safety gear (gloves, eye protection, mask)
Many of these materials can be found at specialty art suppliers, online resin retailers, or through UltraClear's online store.
Test Small First
Use a smaller test pour to practice your color layering, curing times, and embedding strategy. This reduces waste and gives you room to experiment before committing to a full table project.

Troubleshooting Common Artistic Resin Table Issues
Even with good planning, artistic tables can be unpredictable. Here are some common issues and how to resolve them:
-
Pigment Clumping or Separation: Stir thoroughly but avoid whipping air into the mixture. Use a dispersion agent or test compatibility with your chosen epoxy before committing to the full pour.
-
Bubbles Under Embedments: Always seal porous embedments (like wood or leaves) with a thin coat of epoxy first. Unsealed items trap air that escapes during curing. In some cases, you can use something like Mod Podge to seal the object. Make sure it dries before applying epoxy over it.
-
Objects Floating or Shifting: Wait until your pour thickens slightly before embedding, or secure heavier items with temporary supports like skewers or weights. For object placed on the substrate itself, you can adhere them with ordinary craft glue.
-
Color Bleeding Between Layers: Let each layer partially cure before adding the next. Some users employ dividers or dams to keep pigments isolated until set.
Addressing these issues early prevents frustration later and keeps your design looking polished and intentional.

Why Budget Epoxies Fall Short for Artistic Projects
When it comes to decorative epoxy tables, the quality of your epoxy resin directly influences both the clarity and durability of the final product. Unfortunately, low-cost epoxies—especially those imported from overseas with little regulatory oversight—are often filled with substandard materials.
These epoxies have a tendency to:
-
Yellow prematurely under UV exposure
-
Contain excessive bubbles or cloudiness
-
Shrink or crack as they cure
-
Emit higher levels of VOCs or irritating fumes
-
Create soft surfaces that scratch or dent easily
Since many artistic resin tables include delicate visual details and often rely on transparency for their full effect, using poor-quality epoxy can ruin weeks of work.

The UltraClear Advantage
Unlike most budget-brand resins, our UltraClear Epoxy products are manufactured in the U.S.A. under strict quality standards. They offer superior UV resistance, exceptional clarity, and long-lasting durability.
- UltraClear Bar & Table Top Epoxy creates a hard, glossy finish that resists scratches and cleans easily. This is the usually the best option unless a deep layer or intricate manipulation of the resin is needed.
- UltraClear Deep Pour Epoxy allows for thick, bubble-free layers perfect for embedding objects or creating wave-like scenes.
- UltraClear Art & Craft Epoxy is designed for intricate projects where precision and clarity matter most.
Choosing UltraClear means fewer headaches during curing, a stronger finished surface, and peace of mind knowing you're using a trusted, safety-tested product.

FAQs: Artistic Resin Table Projects
What type of epoxy is best for creating depth or layering effects?
UltraClear Deep Pour Epoxy is the best choice for achieving deep pours up to 2 inches in one layer. It's ideal for deep ocean effects, embedded items, and multi-layered table tops.
Can I use live-edge wood for artistic epoxy tables?
Yes. Live-edge slabs are an excellent way to provide a natural, organic shape that pairs beautifully with river pours and other flowing designs. Just make sure to sand and seal the wood properly beforehand.
How do I prevent bubbles from forming under embedded objects?
Seal porous items with a thin coat of UltraClear Art & Craft Epoxy first. Then embed them in your main pour. This reduces trapped air that might otherwise rise as bubbles.
What pigments work best for ocean tables or abstract designs?
Mica powders, resin dyes, and alcohol inks are popular for creating vibrant color effects. For ocean waves, you can also use white-tinted epoxy or lacing additives to create surf-like motion.
Is it safe to embed real sand, shells, or rocks?
Yes, but wash and dry them thoroughly before use. Moisture or organic residue can cause cloudiness or inhibit curing. This applies especially to organic objects such as flowers, as well as any item that has a tendency to retain moisture inside pores or grooves.
Can I pour epoxy over a painted surface?
Absolutely, but make sure the paint is fully cured and free from oils. Many artists use acrylics or spray paints to set a scene before pouring a clear epoxy layer over it.
How do I clean and maintain an artistic epoxy table top?
Use a soft cloth and mild soap. Avoid harsh abrasives or cleaners. UltraClear Bar & Table Top Epoxy is especially resistant to stains and scratches, making upkeep easy.
What are some warning signs of low-quality epoxy?
Look out for strong chemical odors, long shipping delays, lack of technical support, unclear safety labeling, and reviews citing yellowing or bubbling. Reputable brands will offer full specs, safety data, and consistent performance.

Have Questions? Want Advice? We're Here to Help!
If you have any questions about decorative or artistic resin tables, or if you'd like assistance in planning an epoxy project, please reach out to us at UltraClear Epoxy—our epoxy experts are ready to assist!
You can contact us via phone or email here. During business hours, you can also text chat online with one of our resin specialists by clicking the Help button at the bottom of your screen.
In our online store, you'll find a variety of useful tools and supplies, ideal for resin projects, plus our award-winning UltraClear Bar & Table Top Epoxy and our UltraClear Deep Pour Epoxy.
UltraClear Epoxy—Trusted by over 1 Million+ Happy Customers


