Epoxy river tables are a striking blend of natural wood beauty and modern resin design. For many DIY enthusiasts, building a river table is a rewarding project that enhances home décor with a unique, functional piece.
This guide will walk you through all the basics for crafting a river table, including the types of epoxy used, detailed steps for assembly, and why high-quality products like UltraClear Epoxy—which are 100% manufactured in the USA—are a smart choice for achieving a durable, clear, and long-lasting finish.
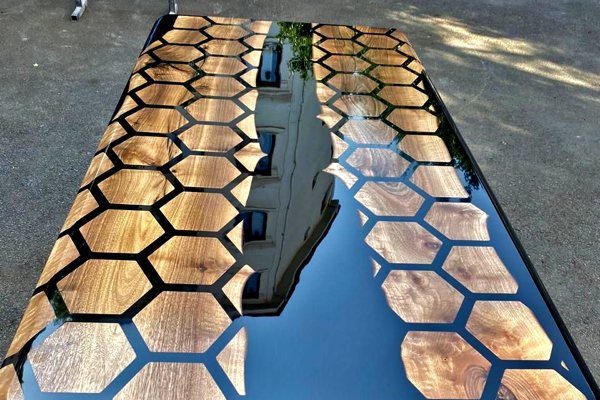
What Are Epoxy River Tables?
An epoxy river table is a table that features at least one gap or “river” filled with epoxy resin between/around slabs of wood. A conventional river table design consists of two slabs of wood with a singular epoxy vein lengthwise running between them, but many users opt for more complex creations, such as having multiple separate river veins or a an additional tinted epoxy layer at the border of their table top.
The resin itself can be tinted or left clear to suit your creative preferences. In either case, its presence provides a visual contrast with the natural wood grain, resulting in a dramatic, high-gloss aesthetic. The project combines woodworking and resin art techniques, making it an engaging endeavor for both beginners and experienced crafters.

Types of Epoxy for River Tables
When creating a river table, different epoxy formulations are used to achieve specific results:
-
UltraClear Deep Pour Epoxy: Designed for thick pours, this epoxy is perfect for filling the river channel between wood slabs. Its formulation handles deep layers without overheating, ensuring a robust, clear fill that maintains its integrity.
-
UltraClear Bar & Table Top Epoxy: Best suited for thin, self-leveling coatings, this epoxy is ideal for applying a final finish on the table top. It enhances the wood’s natural beauty and provides a hard, scratch-resistant surface.
-
UltraClear Art & Craft Epoxy: Although primarily used for detailed craft projects, this epoxy can be employed for smaller decorative elements or accents within the river design, offering excellent clarity and fine detail.
In some projects, creators may use a combination of these products. For example, using UltraClear Deep Pour Epoxy for the river fill and topping it off with UltraClear Bar & Table Top Epoxy for a smooth, protective finish.
Choose Quality Epoxy to Avoid Problems Later
For a project as demanding as a river table, the quality of your epoxy is extra important. Low-cost resin products often fall short in terms of clarity, consistent curing, and long-term durability. Budget brand resins such as these are generally imported from regions with lax regulation, allowing the manufacturers to cut corners on quality and safety. These resins are then brought to the U.S. to be sold to unsuspecting users, who then have to deal with the downsides.
To avoid this issue, always choose a high-quality epoxy from a reputable brand.

UltraClear Epoxy: Premium Epoxy Made in the USA
At UltraClear, we take pride in our work. That's why all of our resin creations are 100% made in the USA. Every batch of UltraClear Epoxy has to meet our extra-high standards for quality and safety before shipping, which ensures that the epoxy you receive from us can be trusted to do what it's meant to without compromise.
Here are some of the benefits of choosing UltraClear Epoxy:
- Clarity: UltraClear formulations remain crystal clear and resist yellowing over time.
- Consistent Curing: They are engineered for even curing, ensuring a uniform and robust finish.
- Durability: These products withstand scratches, heat, and moisture better than many low-cost alternatives.
- Quality Assurance: Strict manufacturing standards guarantee that UltraClear Epoxy delivers reliable performance on every project, lasting for a minimum of 7 years with proper care.
Investing in UltraClear Epoxy ensures that your river table's resin veins stay vibrant and intact, providing a lasting, professional-quality finish.

The Added Appeal of Epoxy as a Finish Over Traditional Options
Epoxy resin isn't just used for river veins; it also functions perfectly as a topcoat when applied after the river vein has cured. As a sealant, it stands out particularly as a powerful finish for wood and other materials when compared to traditional options like lacquer, hardwax, or polyurethane:
- High-Gloss, Uniform Appearance: Epoxy produces a seamless, glass-like finish that accentuates the natural grain and color of wood without the visible brush strokes common in other finishes.
- Enhanced Protection: Once cured, epoxy forms a hard, non-porous barrier that protects against moisture, scratches, and heat. This makes it particularly suited for surfaces that endure daily use, such as a table top.
- Customizable Aesthetics: With epoxy, you can add pigments, embed decorative elements, or layer different colors to achieve a tailored design that enhances the overall visual appeal.
- Ease of Maintenance: Epoxy finishes are durable and easy to clean, making them a practical choice for furniture that is both functional and stylish.

Step-by-Step Guide to Making a DIY Epoxy River Table
Step #1: Design and Material Preparation
- Design Your Layout: Sketch your design to decide where the “river” will run and how you want to display the wood grain.
- Select Wood Slabs: Choose high-quality, live edge wood with an appealing natural shape and grain.
- Gather Epoxy and Tools: What you need for this depends on your design. Most river tables use UltraClear Deep Pour Epoxy for the river fill and UltraClear Bar & Table Top Epoxy for the finish. Be sure to acquire any other tools and supplies you need.
Step #2: Surface Preparation
- Prepare the Wood: Sand the wood slabs to remove any rough spots and ensure proper adhesion.
- Clean Thoroughly: Wipe the wood with a tack cloth and isopropyl alcohol to remove dust and grease and prepare it for the epoxy bond.
- Build a Dam: Construct a temporary mold or dam using painter’s tape or wood strips to contain the epoxy within the designated river channel.
Step #3: Mixing the Epoxy
- Measure Accurately: Follow the manufacturer’s instructions for the resin-to-hardener ratio. Use graduated cups for precision.
- Mix Thoroughly: Stir the components slowly for 3-5 minutes, ensuring you scrape the sides and bottom of the container. For larger batches, a power drill with a mixing bit can be used to achieve a uniform blend without introducing excessive air.
- Add Pigments (Optional): If tinting the resin, add your chosen dyes or powder pigments at this stage and mix until completely incorporated.
Step #4: Pouring the Epoxy
- Pour the River Fill: Slowly pour the mixed UltraClear Deep Pour Epoxy into the channel between the wood slabs. Work carefully to ensure even distribution.
- Remove Air Bubbles: Immediately use a heat gun or torch to remove any trapped air bubbles. For thicker pours, perform multiple passes as needed.
- Final Top Coat: Once the deep pour has cured, apply a thin layer of UltraClear Bar & Table Top Epoxy over the entire surface to create a smooth, protective finish that also enhances clarity.
Step #5: Curing and Finishing
- Allow Sufficient Curing Time: Let the epoxy cure completely as per the product’s instructions (typically 72 hours for a thin coat).
- Remove the Dam: Carefully remove any molds or tape used to contain the resin.
- Final Touches: Sand lightly if necessary and polish the surface to achieve a flawless finish.

Frequently Asked Questions (FAQs)
Question #1: What is the ideal epoxy for filling the river channel in a river table?
For thick pours like river fills, UltraClear Deep Pour Epoxy is ideal due to its ability to cure evenly in deep layers without overheating.
Alternatively, some users opt to use UltraClear Bar & Table Top Epoxy for their river veins by applying it as multiple layers until it's thick enough. It's possible but takes more time and care.
Question #2: Can I tint epoxy resin for my river table?
Yes, you can add dyes or powder pigments to achieve your desired color. Careful mixing is required to maintain clarity and ensure proper curing.
Read here for more information on epoxy pigments and dyes.
Question #3: How long does it take for a river table to fully cure?
Curing times vary by project thickness. A thin top coat of UltraClear Bar & Table Top Epoxy typically cures in 72 hours, while thicker deep pours with UltraClear Deep Pour Epoxy may require as little as 72 hours but potentially up to a week, depending on conditions.
Question #4: What tools do I need for mixing and pouring epoxy?
Essential tools include graduated mixing cups, stir sticks (or a power drill with a mixing bit for larger batches), a heat gun or torch for de-bubbling, and materials to construct a temporary dam.
Learn more about the essential tools and supplies of an epoxy project here.
Question #5: How do I ensure a smooth, professional finish on my river table?
Proper surface preparation, accurate mixing, controlled pouring, and removing air bubbles are key steps. Additionally, using a final top coat of UltraClear Bar & Table Top Epoxy will enhance both clarity and durability.
Question #6: Why is UltraClear Epoxy recommended over low-cost alternatives?
UltraClear Epoxy products are manufactured in the USA and provide superior clarity, consistent curing, and enhanced durability. They outperform low-cost resins, which often yellow and cure unevenly.
Question #7: Can epoxy river tables be used outdoors?
While epoxy resin is durable, outdoor use is best reserved for pieces that receive minimal direct sunlight or have a UV-protective top coat applied to prevent discoloration.
Question #8: What maintenance does a river table require?
River tables typically require very little upkeep. Just regular cleaning with a damp cloth and mild detergent is recommended. Avoid abrasive cleaners to prevent scratching the epoxy surface.

Even For Beginners, River Tables Are Possible
A DIY epoxy river table is an impressive project that combines natural wood beauty with the modern elegance of resin. With careful planning, precise mixing, and proper application techniques, even beginners can create a durable and visually striking piece.
Understanding the different types of epoxy—using UltraClear Deep Pour Epoxy for thick river fills and UltraClear Bar & Table Top Epoxy for a flawless finish—will further ensure that your project is not only functional but also attractive.
And by choosing high-quality, American-made UltraClear Epoxy products, you’re investing in a material that not only enhances your design with superior clarity and durability but also outperforms low-cost alternatives. With detailed guidance and proper techniques, your DIY river table will become a standout piece that elevates your home décor for many years to come.

Have Questions? Want Advice? We're Here to Help!
If you have any questions about epoxy resin, or if you'd like assistance in planning an epoxy project, please reach out to us at UltraClear Epoxy—our epoxy experts are ready to assist!
You can contact us via phone or email here. During business hours, you can also text chat online with one of our resin specialists by clicking the Help button at the bottom of your screen.
In our online store, you'll find a variety of useful tools and supplies, ideal for resin projects, plus our award-winning UltraClear Bar & Table Top Epoxy and our UltraClear Deep Pour Epoxy.


