Creating a custom epoxy bar top is a practical solution for updating your space with a durable, long-lasting finish. Not only is UltraClear Epoxy user friendly, even for beginners, but it's also quite economical in the long term, due to its very low maintenance requirements without need for regular reapplication.
In this guide, we detail every step—from material selection and surface preparation to mixing, pouring, and finishing—so you can achieve a professional result tailored to your needs.

Choosing the Right Materials and Supplies
Substrate Options
Epoxy's ability to bond with nearly any material makes it an exceptional choice for any bar top substrate. Here are a few common materials that pair well with epoxy:
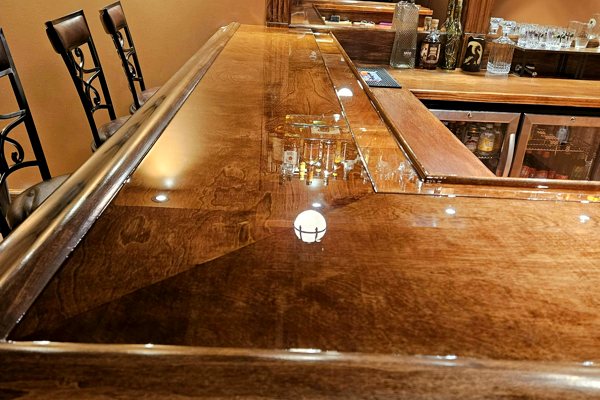
- Wood: Reclaimed wood, plywood, MDF, or live edge slabs are popular choices. Wood offers a warm, natural look and pairs beautifully with a clear epoxy finish.
- Concrete: This is a good choice when you want a modern, industrial aesthetic. Keep in mind that concrete is incredibly porous, so be sure to give it a seal coat or two first to prevent air bubbles.
- Metal and Stone: While less common, these materials tend to produce very distinct, contrasting surfaces with an epoxy coating.
Essential Supplies
Aside from a viable substrate, you'll also need some basic supplies before you can perform a DIY epoxy bar top project. This includes choosing the right epoxy for your goals:
-
Epoxy Resin:
- UltraClear Bar & Table Top Epoxy – Ideal for thin, high-gloss coatings on flat surfaces. This is almost certainly the best choice for any bar top project.
- UltraClear Deep Pour Epoxy – Best for thick, volumetric pours like river fills. For bar tops that need extra-thick (often decorative) layers.
- UltraClear Art & Craft Epoxy – Suited for detailed projects and decorative accents. This isn't typically used for bar top surfaces.
- Mixing Tools: Graduated measuring cups, stir sticks, and likely a power drill with a mixing bit (for larger batches).
- Protective Gear: Nitrile gloves, safety goggles, and a respirator mask to protect against fumes.
- Surface Preparation Materials: Sandpaper, tack cloths, isopropyl alcohol, and painter’s tape.
- Work Surface Protection: Plastic sheeting or drop cloths to catch spills.
- Heat Gun or Torch: For removing air bubbles from the poured epoxy.
- Optional Pigments/Additives: Dyes, powder pigments, or metallic flakes if you wish to tint or add decorative effects. Learn more here.
You can get most of these supplies conveniently bundled together in our Epoxy Tool Kit.


Step-by-Step Guide to Making an Epoxy Bar Top
Step #1: Design and Material Preparation
- Plan Your Layout: Consider sketching the design for your bar top. Determine whether you’ll be doing a traditional clear coating for your bar top or if you want to incorporate patterns, river fills, or embedded decorative elements.
- Select Your Substrate: Choose the material (e.g., live edge wood for a natural look) that best suits your design—unless you're coating a pre-existing bar top.
- Gather Materials: Assemble all necessary supplies, ensuring your work area is well-ventilated, level, and free of dust.
Step #2: Surface Preparation
- Sanding: Lightly sand the substrate to remove any imperfections and promote better epoxy adhesion.
- Cleaning: Wipe down the surface with a lint-free cloth and isopropyl alcohol to remove dust, grease, and other contaminants.
- Sealing (if needed): For porous materials like wood, apply a thin seal coat of UltraClear Bar & Table Top Epoxy to prevent air bubbles during the main pour.
Step #3: Mixing the Epoxy Resin
- Accurate Measurement: Follow the manufacturer’s instructions precisely. Use graduated cups—we have 1-Quart and 5-Quart variants in our store—to measure the resin and hardener at the recommended ratio (typically 1:1 for table top epoxy or 2:1 for deep pour epoxy).
- Mixing Process: Stir slowly and thoroughly for 3-5 minutes. Make sure to scrape the sides and bottom of the container for complete integration. See our mixing guide for detailed advice and tips.
- Power Drill Option: For larger batches, a power drill fitted with a mixing bit can help achieve uniform blending, but be careful to mix gently to avoid incorporating excess air.
- Optional Tinting: If desired, add pigments or dyes during mixing and ensure they are completely dispersed.
Step #4: Pouring the Epoxy
- Initial Pour: Slowly pour the mixed epoxy onto the prepared substrate. Begin at the center and work outward to allow the resin to naturally flow into a uniform layer.
- Controlling the Flow: Use painter’s tape or construct a temporary dam if you want to restrict the resin within certain boundaries.
- Layering Technique: For thicker designs or river fills, consider pouring in layers. Allow each layer to reach a tacky state before pouring the next to ensure proper bonding and even curing.
Step #5: Removing Air Bubbles
- Immediate Bubble Removal: Use a heat gun or torch in sweeping motions across the surface immediately after pouring to release trapped air bubbles.
- Repeat if Necessary: For thicker applications, you may need to pass over the coating multiple times to ensure a smooth finish.
Step #6: Curing and Finishing
- Curing Time: Allow the epoxy to cure undisturbed according to the product guidelines—typically 72 hours for a thin coat with UltraClear Bar & Table Top Epoxy. Thicker layers may require more time.
- Maintain Optimal Conditions: Ensure the curing area is at a consistent temperature (70°F to 75°F) and free from dust.
- Final Touches (Optional): Once the epoxy has cured, some users opt to lightly sand any imperfections with fine-grit sandpaper or an orbital sander, then polish the surface to alter the transparent epoxy surface to a more matte or shiny texture.

Why Choose UltraClear Epoxy?
High-quality epoxy is essential for a durable and visually striking bar top. UltraClear Epoxy products, made 100% in the USA, offer a range of benefits over subpar, low-cost alternatives:
- Superior Clarity: UltraClear formulations remain crystal clear, resisting yellowing and retaining vibrant color, which is especially important for showcasing any embedded pigments or decorative elements.
- Consistent Curing: Products such as UltraClear Bar & Table Top Epoxy and UltraClear Deep Pour Epoxy are engineered to cure uniformly, ensuring a robust, even finish.
- Enhanced Durability: UltraClear Epoxy is designed to withstand heavy use, resist scratches, and protect against moisture and heat—making it ideal for commercial or high-traffic settings.
- Reliable Performance: Manufactured under strict quality control standards in the USA, UltraClear Epoxy outperforms low-cost resins that may not hold up well over time.
By choosing UltraClear Epoxy, you’re investing in a product that will ensure your bar top remains a durable, attractive centerpiece for many years.

Unconventional Epoxy Bar Top Ideas
While traditional epoxy bar tops are popular, there are several creative twists you can consider:
- Live Edge River Table Top: Use a combination of natural wood slabs and a deep, tinted river fill with UltraClear Deep Pour Epoxy to create a dramatic, organic design.
- Embedded Object Bar Top: Incorporate elements like bottle caps, coins, or custom logos within the resin for a personalized look. Use UltraClear Bar & Table Top Epoxy for a smooth, protective finish.
- Crushed Glass Accents: Add crushed glass or metallic flakes into the epoxy to produce a textured, shimmering surface that catches the light beautifully.
- Layered Color Effects: Create a multi-layered design by pouring successive layers with varying colors or embedded patterns, then finish with a top coat of UltraClear Bar & Table Top Epoxy.

DIY Epoxy Bar Tops: Frequently Asked Questions (FAQs)
Question #1: What is the ideal substrate for an epoxy bar top?
Wood is the most common substrate due to its natural beauty which pairs so well with epoxy resin, but options like concrete, metal, or stone are fully viable. The key is proper preparation—sanding, cleaning, and sealing are essential for any substrate.
Question #2: How do I decide which UltraClear Epoxy product to use?
For a typical bar top finish, choose UltraClear Bar & Table Top Epoxy, as this will provide the strongest, clearest surface. For thicker pours such as river fills, UltraClear Deep Pour Epoxy is best, as it allows for high-depth epoxy layers without developing blemishes or excessive air bubbles.
Question #3: How can I ensure a bubble-free finish?
Use a heat gun or torch immediately after pouring to remove air bubbles. Stir the mixture gently and avoid over-mixing to minimize air introduction.
Question #4: How long does the curing process take?
Typically, a thin coat of UltraClear Bar & Table Top Epoxy cures within 72 hours, while thicker applications with UltraClear Deep Pour Epoxy may take longer. Always follow the product's curing guidelines.
Question #5: Can I tint epoxy resin for a custom color?
Yes, adding dyes or powder pigments during the mixing process allows for customized colors. Ensure the colorant is well blended for a uniform finish.
See our guide to coloring epoxy for more information.
Question #6: How do I maintain my epoxy bar top once it's completed?
Regular cleaning with a damp, soft cloth and mild detergent is recommended. Avoid abrasive cleaners to maintain the integrity of the epoxy finish.
Question #7: What safety precautions should I follow during the project?
Always wear nitrile gloves, safety goggles, and a respirator mask. Work in a well-ventilated, dust-free environment and follow all mixing and curing instructions carefully.

Have Questions? Want Advice? We're Here to Help!
If you have any questions about finishing your own epoxy bar top, or if you'd like assistance in planning an epoxy project, please reach out to us at UltraClear Epoxy—our epoxy experts are ready to assist!
You can contact us via phone or email here. During business hours, you can also text chat online with one of our resin specialists by clicking the Help button at the bottom of your screen.
In our online store, you'll find a variety of useful tools and supplies, ideal for resin projects, plus our award-winning UltraClear Bar & Table Top Epoxy and our UltraClear Deep Pour Epoxy.


